How to Make your Windows 11 Taskbar Always on Top
Everything you need to keep the Taskbar glued to the top
Key notes
- If you want the Windows 11 Taskbar to always stay at the top, you need to make some changes in the Registry Editor.
- Another available option is to use third-party software.
Windows 11 comes with a series of customization options, including the ability to place your Taskbar in different positions. With this, some users are looking for ways to make the Windows 11 Task always stay on top like it is in some operating systems.
While moving the Taskbar to the top is pretty straightforward, making it stay there is another thing entirely. In this guide, we will show you the steps you need to follow to achieve this effortlessly.
How do I keep the Taskbar on top on Windows 11?
1. Use Regedit
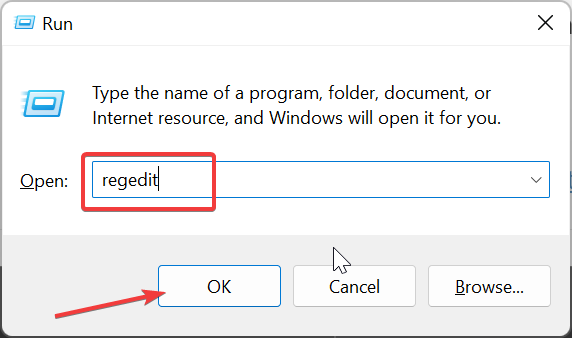
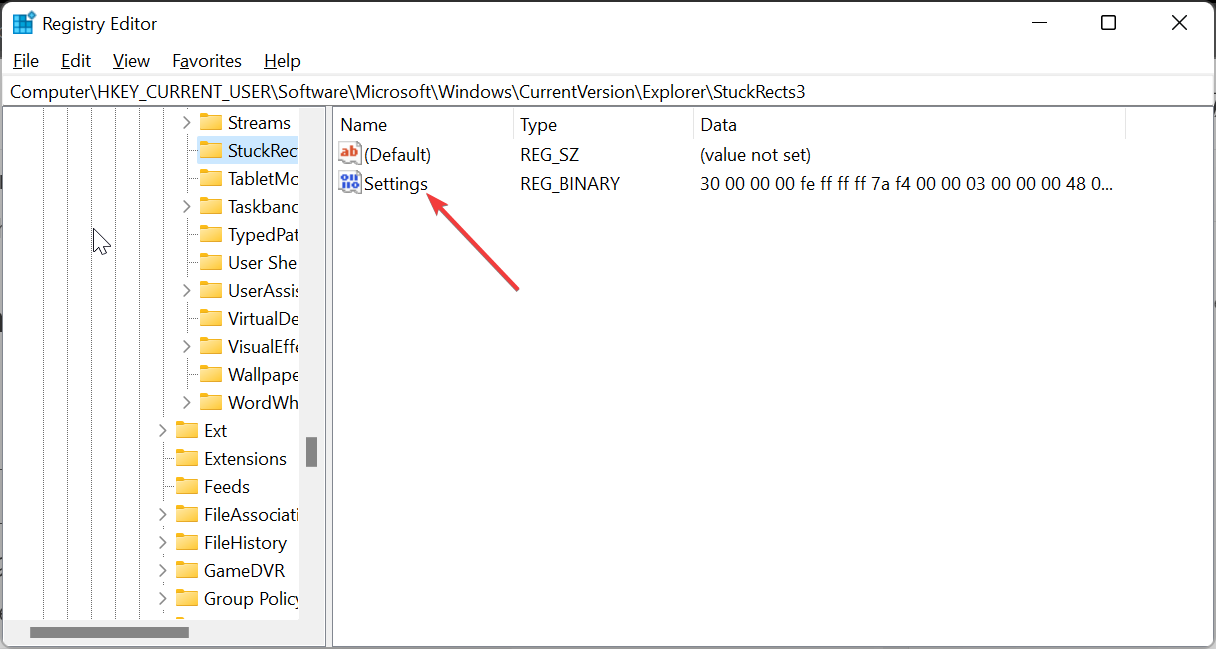
- Press the Windows key + R, type regedit, and click OK.
- Navigate to the path below in the left pane:
HKEY_CURRENT_USER\SOFTWARE\Microsoft\Windows\CurrentVersion\Explorer\StuckRects3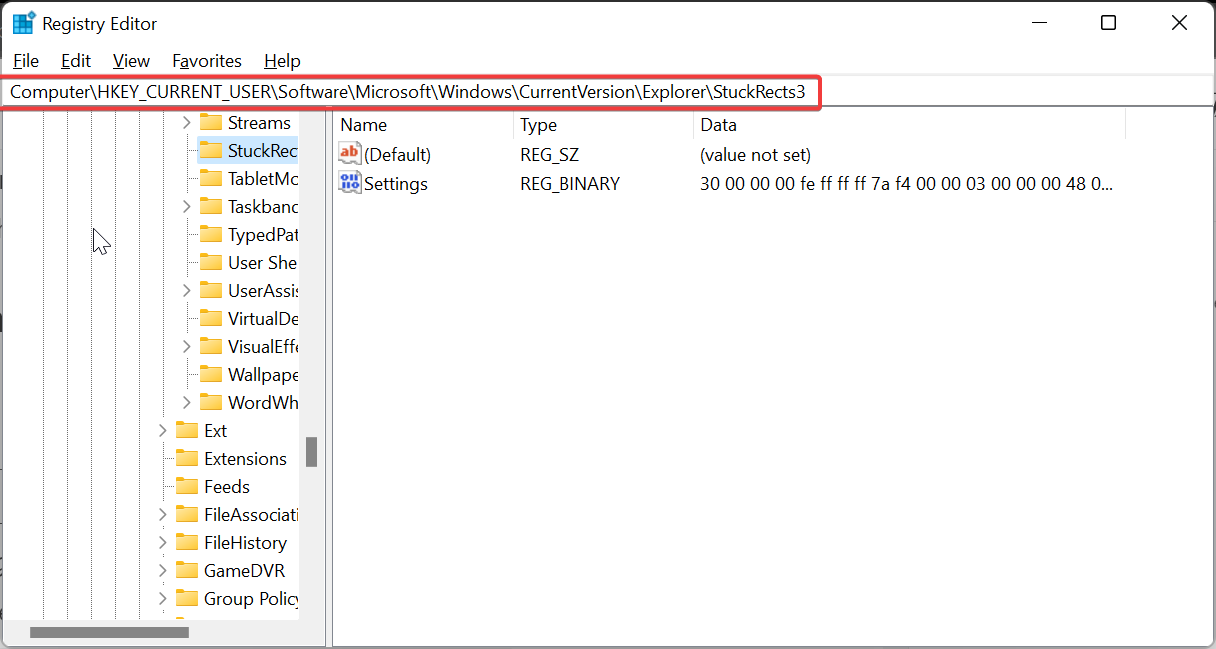
- Now, right-click the StuckRects3 key and choose Export.
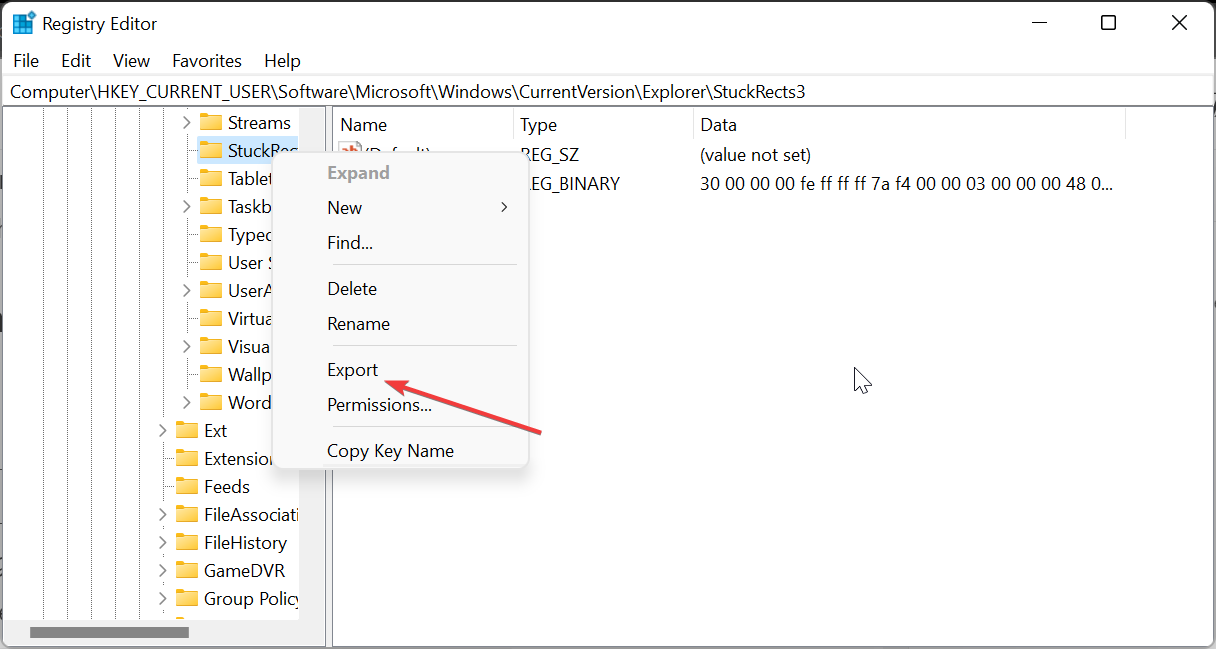
- Save the REG file on your desktop with a name that you will easily remember. This will serve as a backup in case something goes wrong later.
- Next, double-click the Settings value in the right pane to open its properties.
- Go to line 0008 and place your cursor in the fifth column before the 03 value.
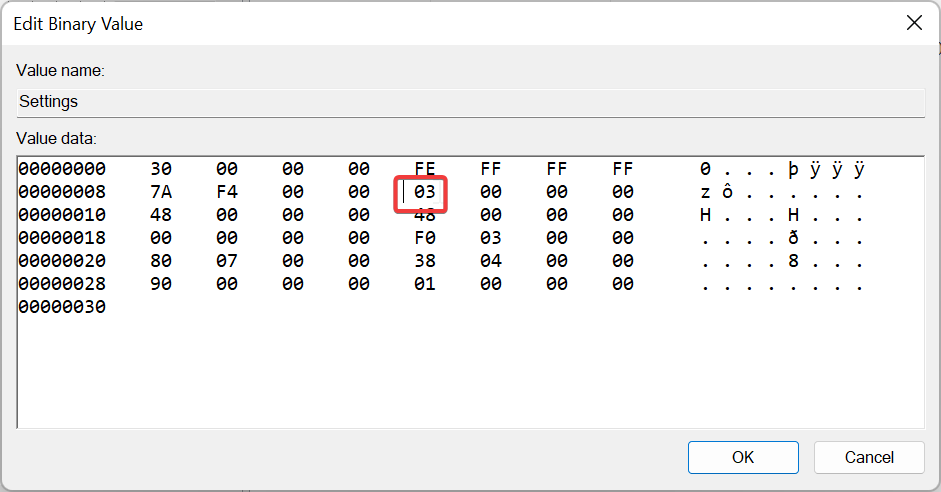
- Now, press the Delete button to delete the value 03.
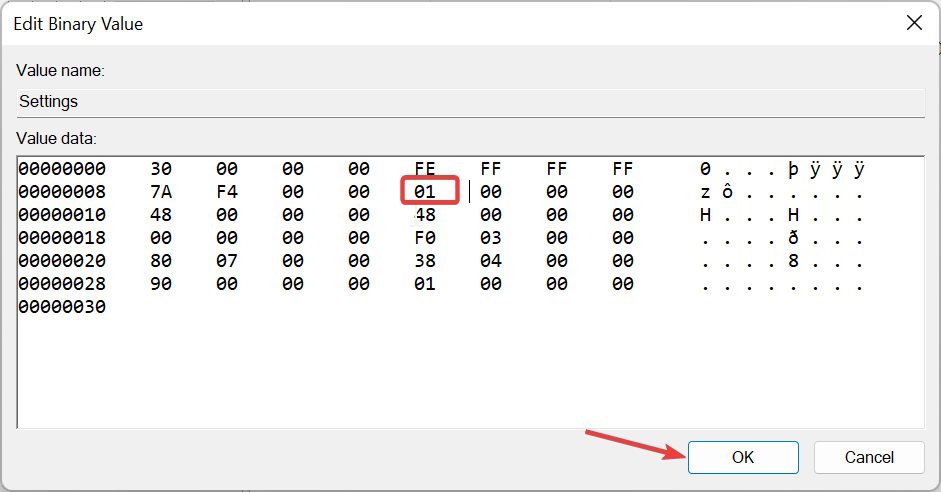
- Type 01 as the new value in the same spot, click the OK button, and close Registry Editor.
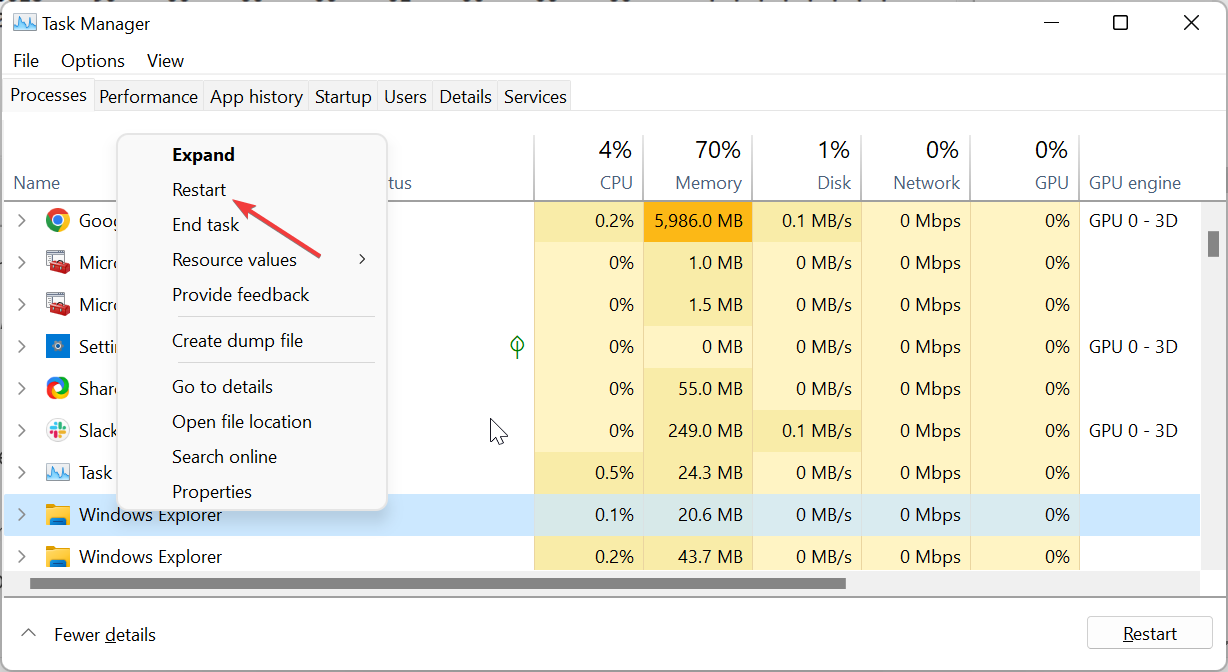
- From here, press the Ctrl + Shift + Esc to launch Task Manager.
- Finally, right-click Windows Explorer and select Restart.
After completing the steps above, the Windows 11 Taskbar will always appear at the top of your PC.
To change the settings and make it return to the bottom, you only need to restore the registry file you backed up by double-clicking it and restarting Windows Explorer.
2. Use a third-party tool
- Visit the GitHub official website to download the ExplorerPatcher app.
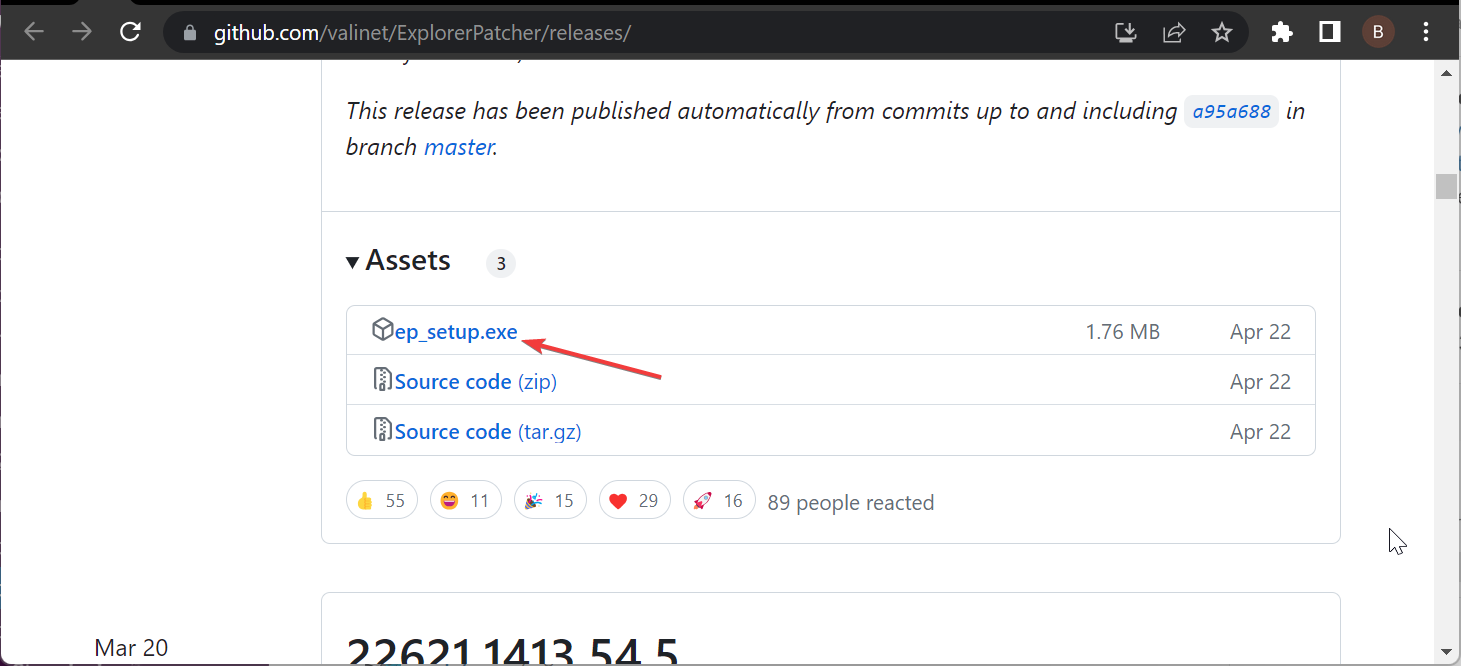
- Double-click the downloaded file and follow the onscreen instructions to complete the installation. When the installation is complete, your Taskbar will change to Windows 10 format.
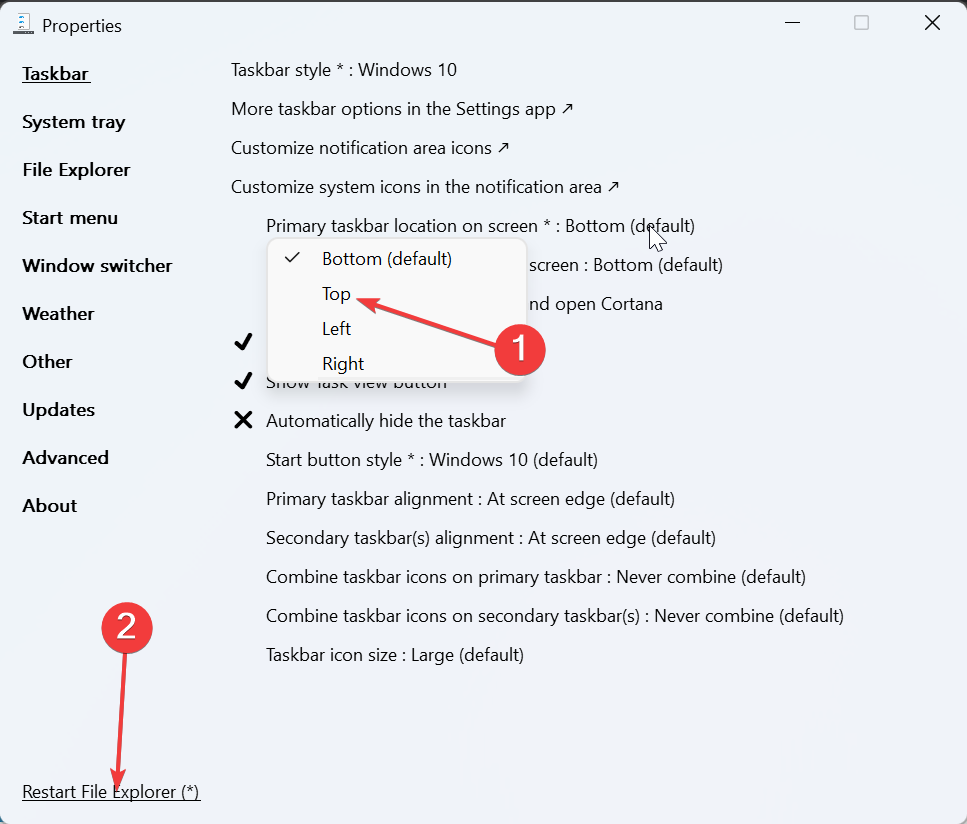
- Now, right-click the Taskbar and select Properties.
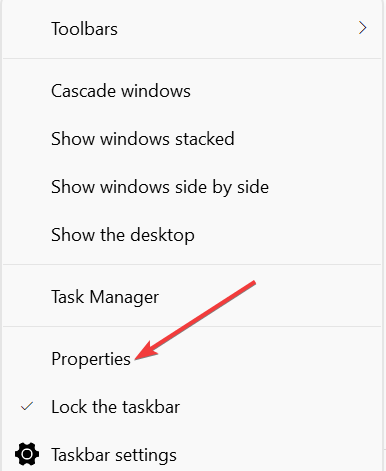
- Next, select Taskbar in the left pane and set the Primary taskbar location on screen to the Top.
- Click the Restart File Explorer option in the bottom left corner. This will move the Taskbar to the top almost immediately.
- For more effective results, click the Start menu tab at the top.
- Change the Start menu style to Windows 10 and set the Position on screen to At screen edge.
- This will make the Taskbar fixed in the top left corner and in Windows 10 format.
With the above steps, the Windows 11 Taskbar should always appear at the top. The only downside is that the Taskbar will be in Windows 10 format and to the left of the screen at the top.
If you try to change it to Windows 11, the Start Menu is likely to stop working, or the Taskbar can just go back to the bottom of the page.
We also have a list full of Windows 11 customization software and some of them can also tweak your taskbar.
How can I fix my Taskbar if it doesn’t stay on top?
1. Restart Windows Explorer
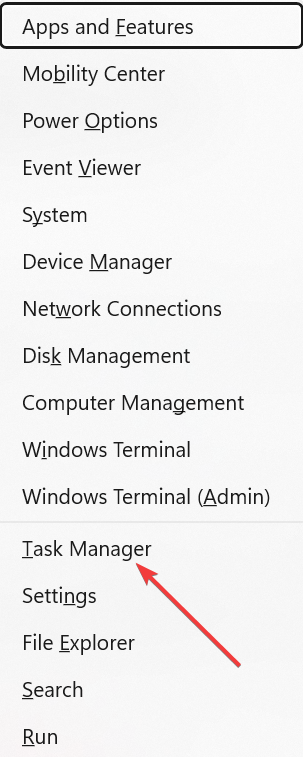
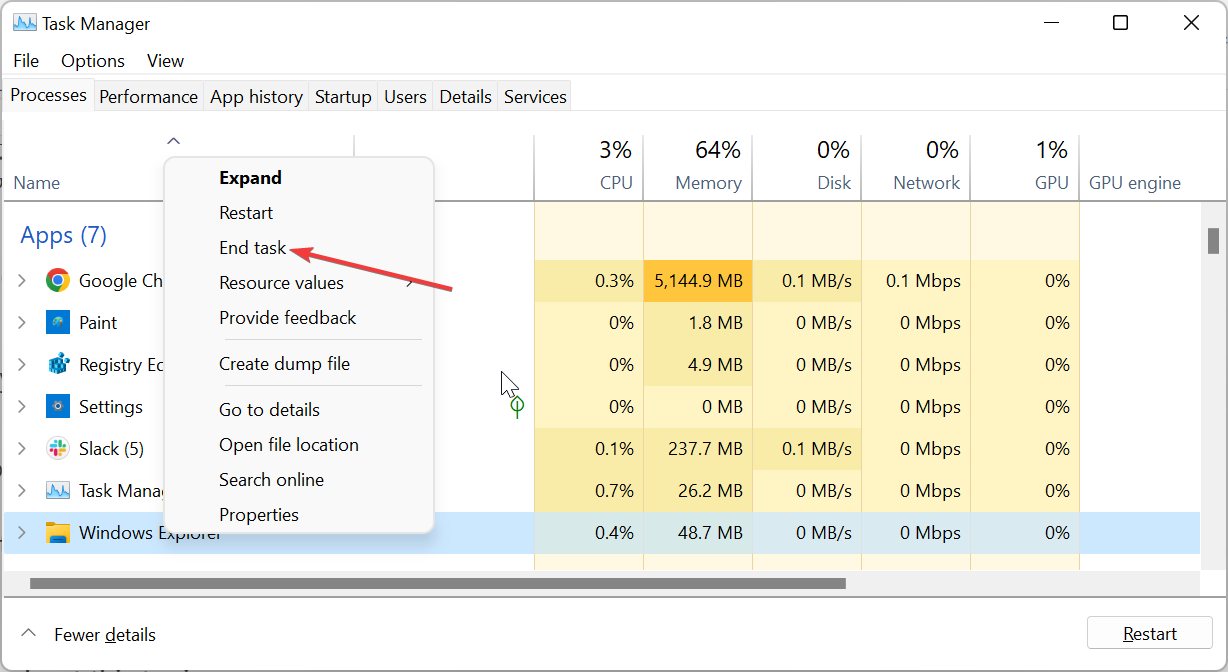
- Press the Windows key + X and select Task Manager.
- Right-click the Windows Explorer process and select End task.
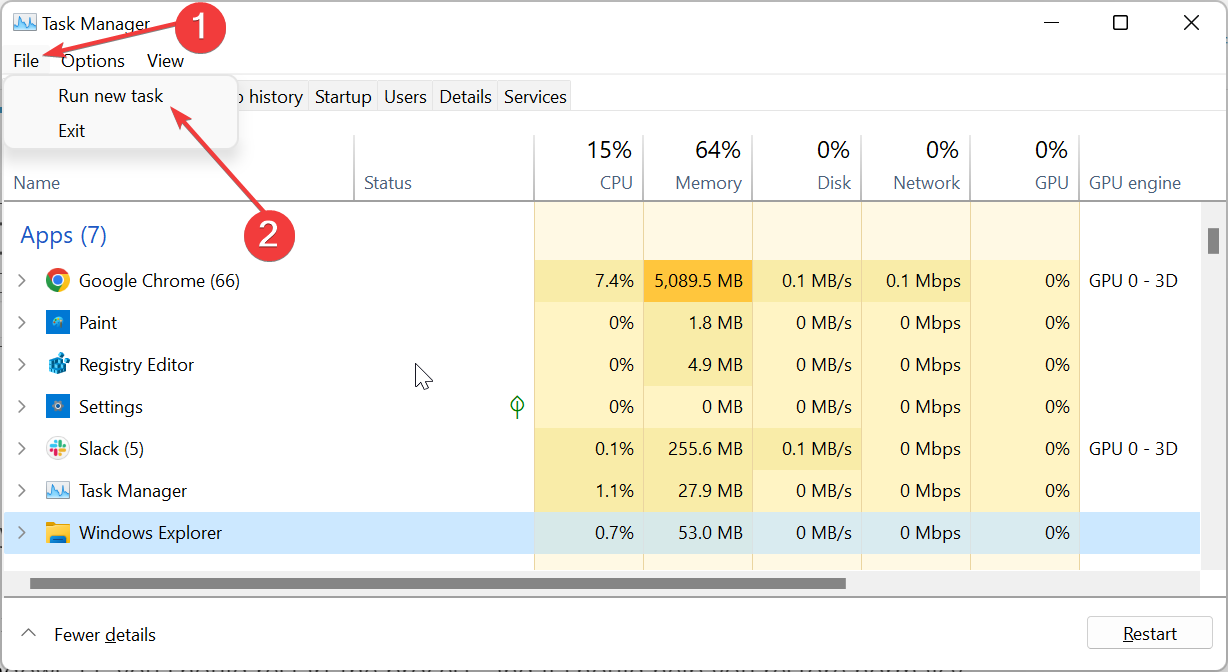
- Now, click the File tab at the top and select Run new task.
- Finally, type explorer.exe and click the OK button.
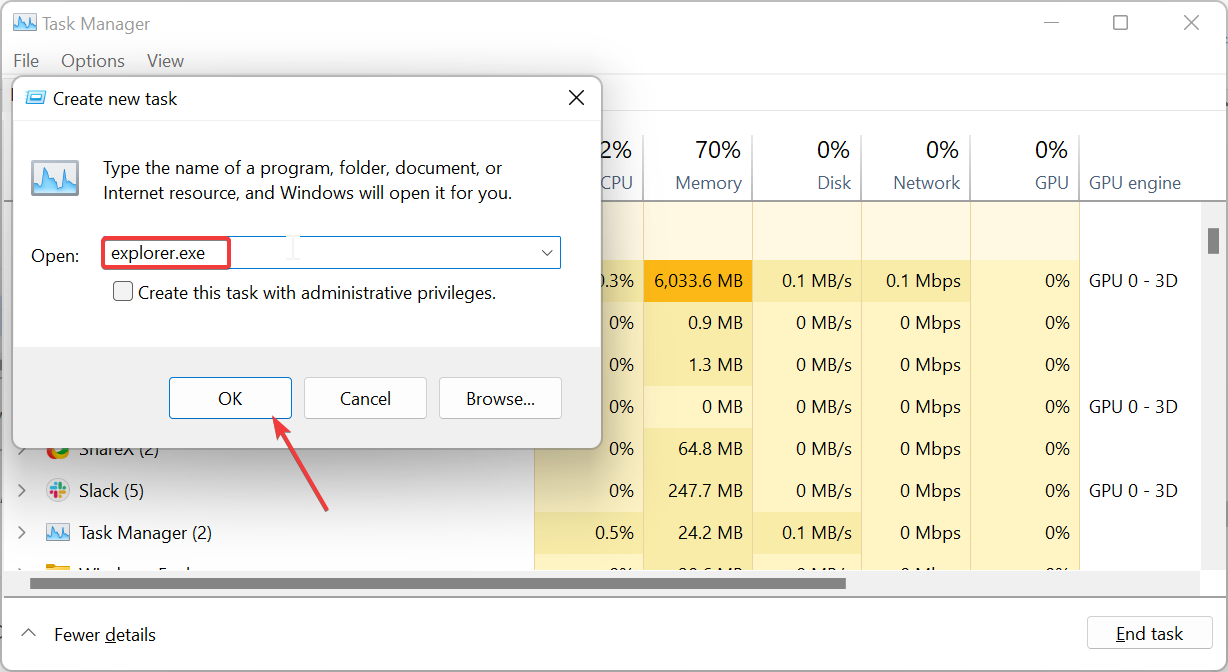
Windows Explorer process controls the File Explorer app and the Taskbar. So, if the Taskbar won’t stay on top on Windows 11, you should restart the process, and it should help you restore normalcy.
2. Disable the Xbox Game bar
- Press the Windows key + I and select the Gaming option in the left pane.
- Select the Game Mode option in the right pane.
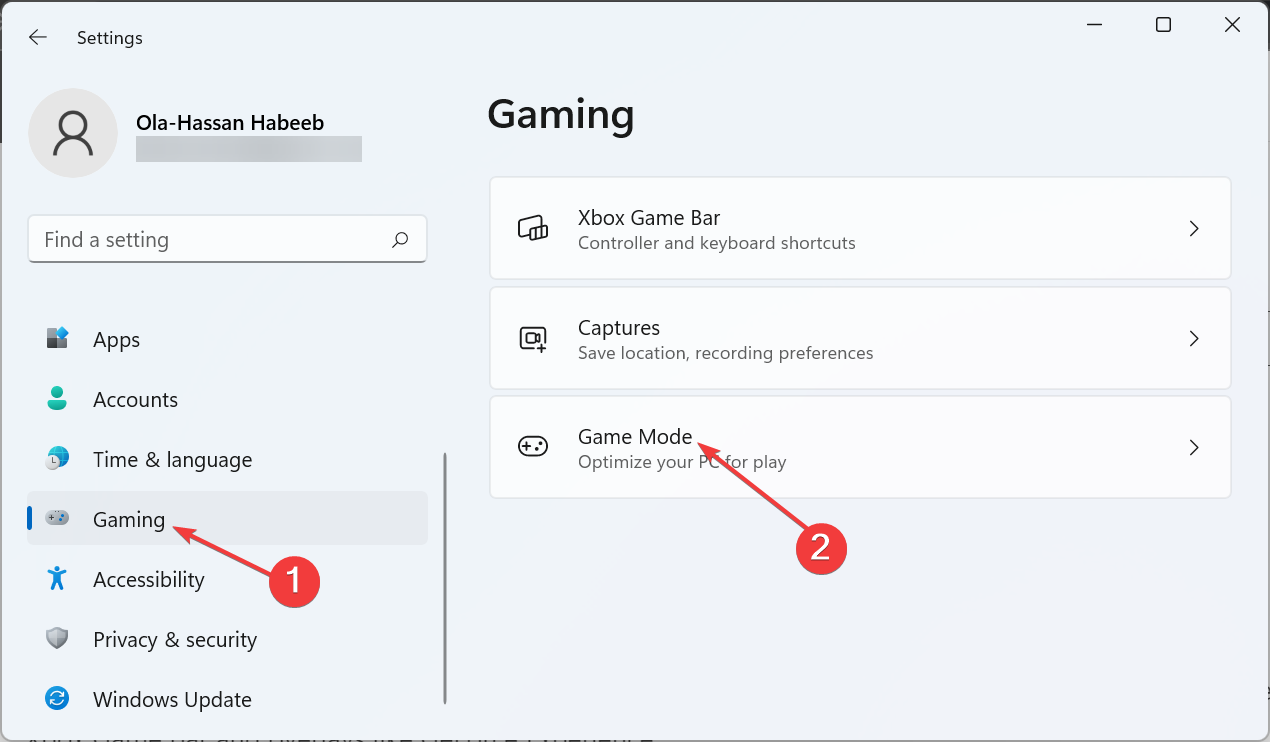
- Now, toggle the switch before Game Mode backward to disable it.
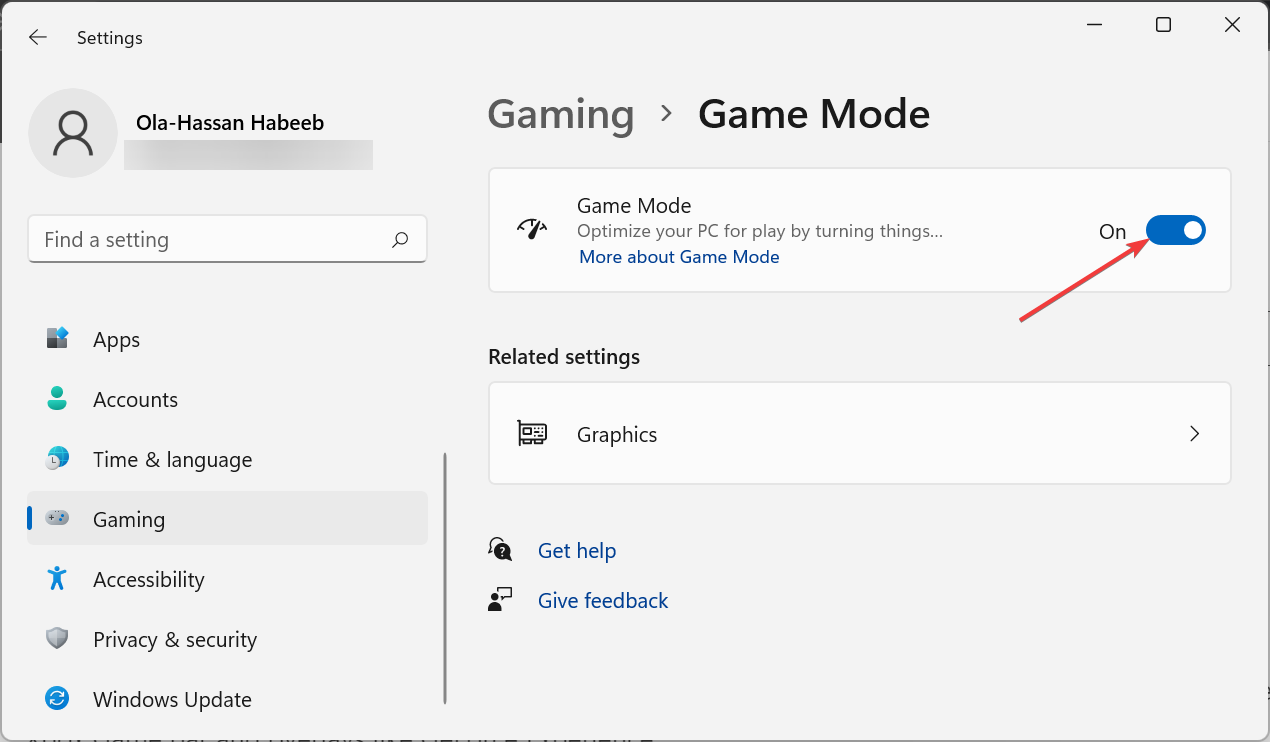
- Finally, if you have overlays like GeForce Experience active, make sure to disable them and restart your PC.
Some users have reported that the Windows 11 Taskbar won’t stay at the top because of features like the Xbox Game bar and overlays like GeForce Experience.
Disabling these features helped them fix this issue for good, especially in cases where every window overlays in front of the Taskbar.
3. Reset your PC
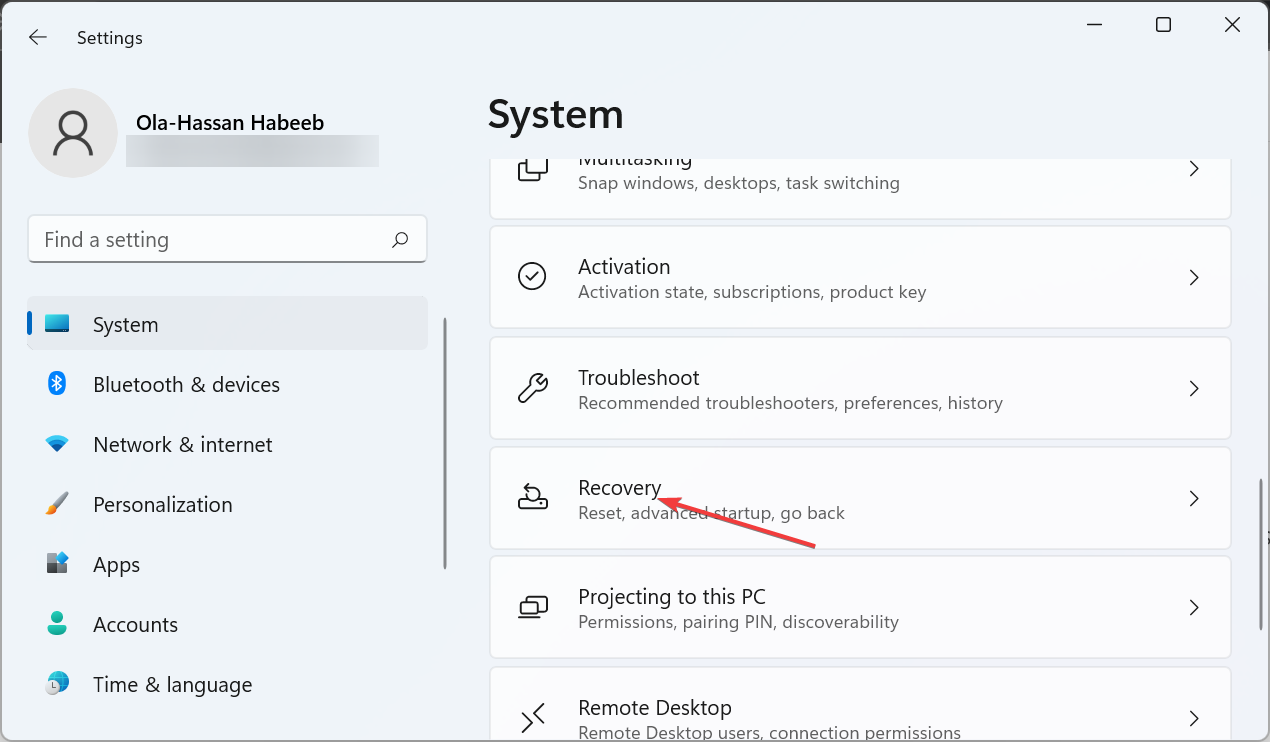
- Press the Windows key + I to open the Settings app and select Recovery in the right pane.
- Click the Reset PC button before the Reset this PC option.
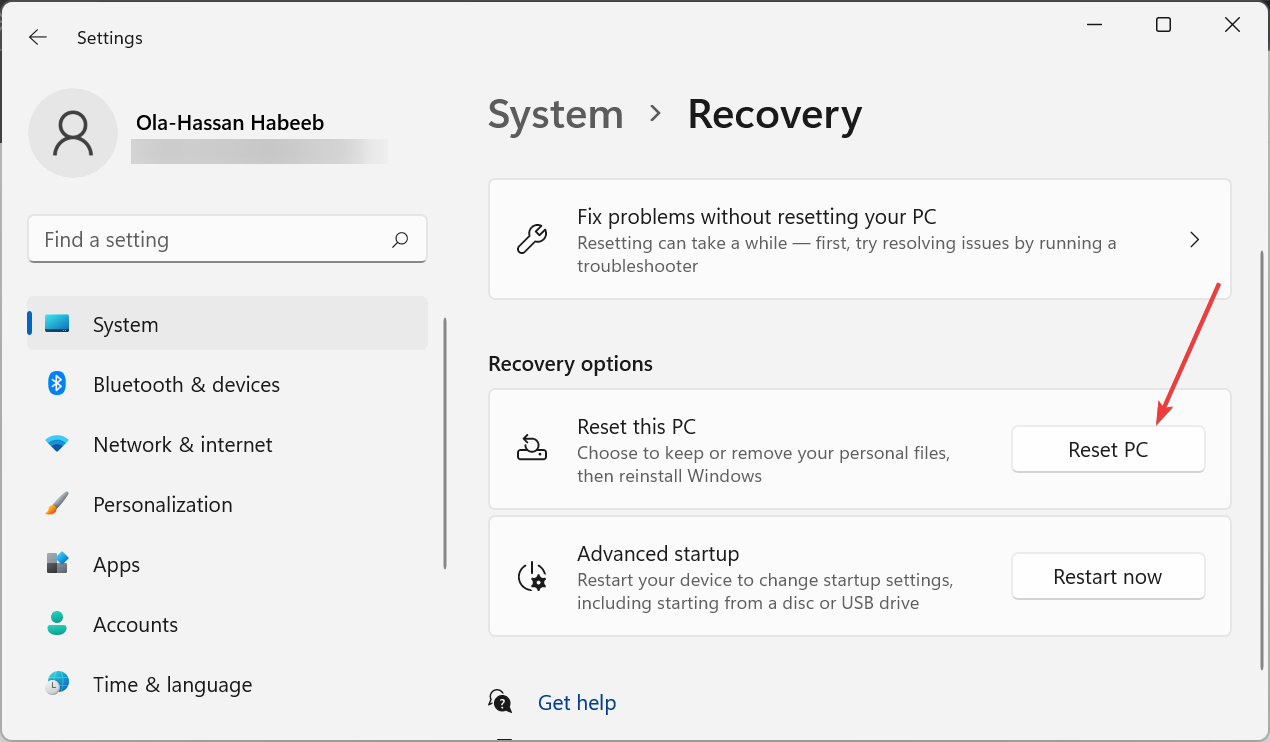
- Finally, choose whether to keep your files or remove them and follow the onscreen instructions to complete the process.
If push comes to shove and you still can’t get your Taskbar to stay on top on Windows 11, you need to reset your PC. You can do this without losing your files, and it has proved to work for many users.
With this, we can now conclude this detailed guide on how to make the Windows 11 Taskbar always stay on top. We have detailed 2 simple ways to achieve this feat and also shown how to fix some of its related issues.
So, you are now equipped with all the information you need. If you need more customization options and want to change the Taskbar size, our comprehensive article will guide you.
Feel free to let us know in the comments below if you encounter any problems applying the steps above.
Read our disclosure page to find out how can you help Windows Report sustain the editorial team. Read more


Improve this guide


User forum
3 messages