VMware Not Working on Windows 11? You Can Fix it in 3 Steps
Key notes
- Installing Windows 11 on Vmware Workstation isn't as simple as it is with other operating systems.
- While installing Windows 11 on a virtual machine, you may encounter errors like This PC can't run Windows 11.
- TPM 2.0 and secure boot requirements are frequently the sources of these problems.
- Modifying the .vmx file, enabling TPM from the VMware Workstation settings, or adding a few keys to the Registry are all options for resolving such issues.

When trying to install Windows 11 as a guest on your VMware Workstation, you may encounter different types of errors, such as This PC cannot run Windows 11.
The fact that Windows 11 is a free update for Windows 10 users does not negate the reality that the operating system has hardware restrictions.
The problem is usually caused by Trusted Platform Module (TPM), and it can be resolved in a few steps by modifying the registry or VMX file.
Later, we’ll discuss why your VMware crashes and how to fix it, but first, let’s look at solutions to the most common VMware errors in Windows 11.
What causes the VMware Workstation error in Windows 11?
Your system must have the TPM 2.0 and secure boot requirements in order to install Windows 11 successfully.
Even if your PC is compliant, VMware Workstation does not support this feature by default, which results in an error.
Fortunately, you can get around this restriction by modifying the Windows Registry or the VMX file in the working directory.
The error message displayed is This PC can’t run Windows 11; to resolve this problem, follow the steps below.
How can I fix the Windows 11 VMware Workstation error?
1. Edit the VMX file to add VTPM
- Launch VMware Workstation. Create a new virtual machine if you don’t have one already. Also, power off any running virtual machine.
- Right-click on the virtual machine and select Settings.

- Open the Options tab in the Settings window.

- Locate the Working directory in the right pane. This is where your virtual machine’s VMX file is stored. Then, Copy the path to your clipboard.

- After that, close the Settings window.
- Press Windows + E at the same time to open File Explorer.
- Right-click in the File Explorer address bar, select Paste, and press Enter.

- If you don’t see file extensions, go to View options, hover over Show, then enable the File name extensions option.
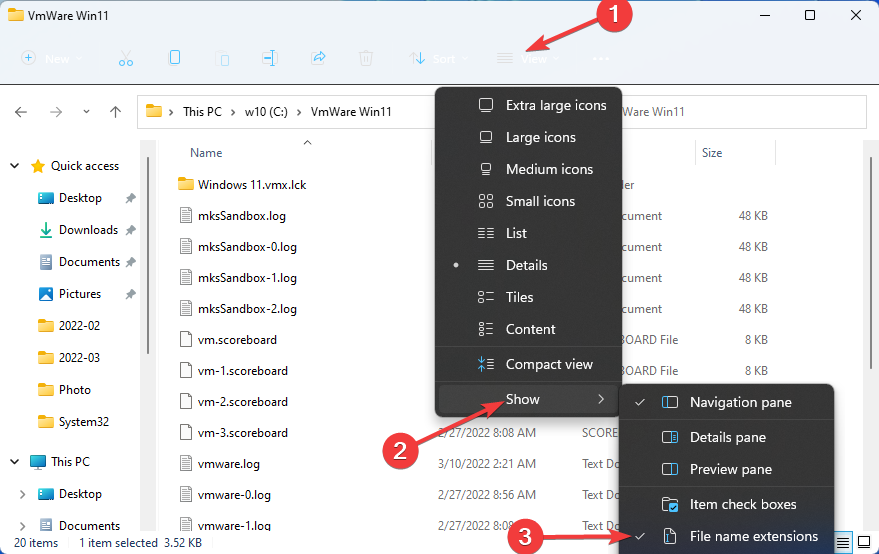
- Locate the file with the .vmx extension, right-click it, and choose Open With, then Choose another app.
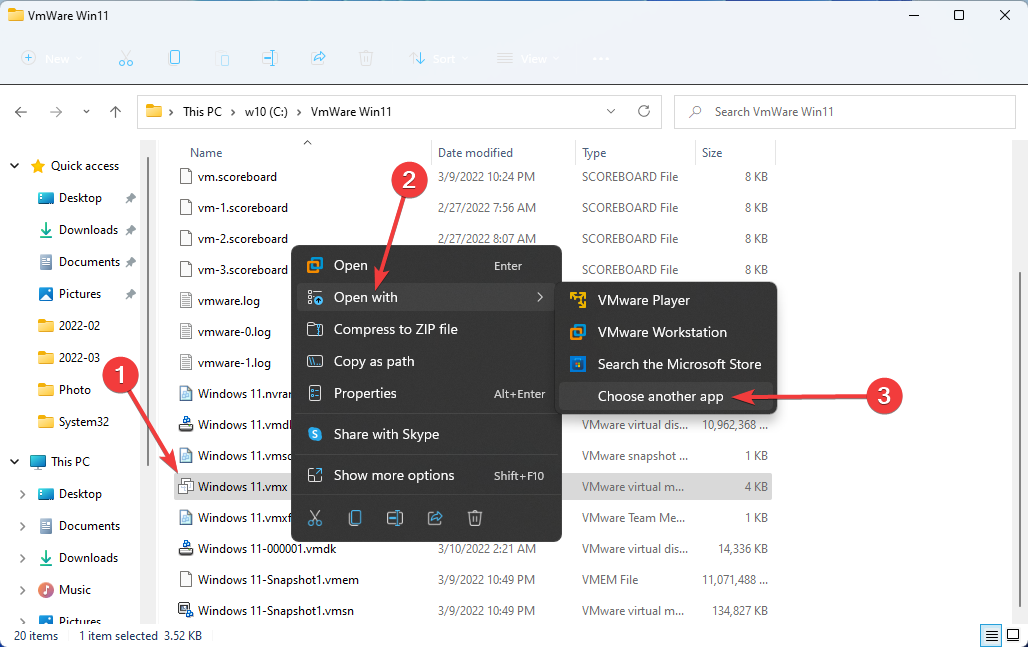
- Select Notepad then click OK.
- Add the following line to the end of the file when it opens in Notepad:
managedVM.autoAddVTPM = "software"
- To save the file, press Ctrl + S and then close it.
- Restart VMware Workstation once the file has been edited.
- Now, proceed with the Windows 11 installation. You should be able to skip the TPM check and finish the installation.
Editing your virtual machine’s .VMX file and adding the VTPM (Virtual Trusted Platform Module) is the simplest way to fix the Windows 11 VMware Workstation error.
This solution works with all VMware Workstation versions, including Pro, Player, and Fusion.
2. Enable TPM 2.0
- To begin, open VMware Workstation Pro. If you haven’t already done so, create a new virtual computer.
- Right-click on your virtual machine, then select Settings.
- In the Settings menu, choose the Options tab.
- In the left pane, select the Access Control tab then, in the right pane, click on the Encrypt button.

- Enter an encryption password and confirm it. You’ll need the encryption password to access the virtual machine, so keep it safe.
- Wait for the encryption procedure to finish before clicking the Encrypt button.
- When you’re finished, click OK to save your changes.

- TPM can now be installed on your virtual system. To do so, select Settings from the context menu of your encrypted virtual machine.
- Click the Add button on the Hardware tab.
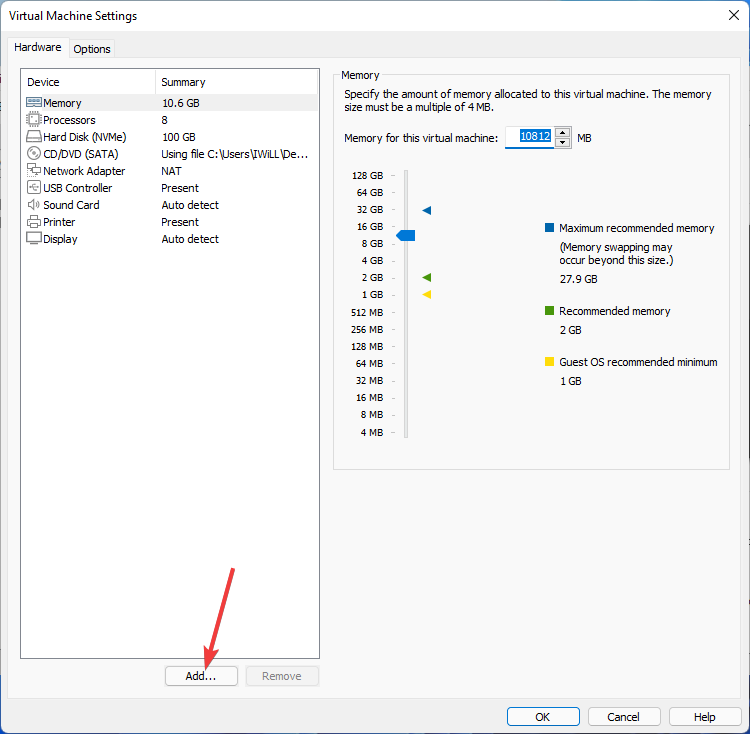
- Select Trusted Platform Module then click the Finish button to add virtual TPM to your virtual machine.

- In the Settings window, Trusted Platform Module will show in the Summary column.
- Click OK to save the changes.
If you use VMware Workstation Pro, you can fix the error by encrypting your virtual machine and then adding a virtual Trusted Platform Module (TPM).
However, if you’re using VMware Workstation Player, move on to the next method, which involves a registry hack and modifying the VMX file.
3. Bypass TPM 2.0 requirements
- Set up your virtual machine and start Windows 11 installation process.
- When you get This PC can’t run Windows 11 error press Shift + F10 to open Command Prompt.
- To open Registry Editor, type the following command in the Command Prompt window and hit Enter:
Regedit
- Navigate to the following location in the Registry Editor:
HKEY_LOCAL_MACHINE\SYSTEM\Setup - Right-click on the Setup folder, select New then Key.

- Rename it to BypassTPMCheck.
- Now click BypassTPMCheck, then right-click and hover over New in the right pane, then select DWORD (32-bit) value.
- Rename the value to LabConfig.
- Double-click on it, type 1 in the Value data field of the pop-up menu, then click OK.

- Close the Registry Editor and Command Prompted when you’re finished.
- You’ll be taken back to the Windows Setup window where the error occurred. Click the Back button in the top left corner (back arrow icon).
- Click Next after selecting the Windows edition you want to install.
- You should now be able to complete the Windows 11 setup without encountering any errors.
This solution may seem complicated, but it is universal, and you can use it in all versions of the VMware Workstation.
Also, if you don’t want to encrypt your virtual machine like the previous method, you can bypass the Trusted Platform Module requirement by using this registry hack.
Why does Windows guest in VMware Workstation Pro crash on startup ?
You may encounter another problem when working with VMware Workstation Pro v.16.1.2.
This issue happens if you create a Windows guest VM using Workstation Pro 16.1.2 on Windows 11, and the host system has enabled Hyper-V (in this case, WSL2 has enabled in the host), and you select more than one processor and/or one core processor for the guest, the Windows gust VM crashes at boot.
The error you will see is as follows: VMware Workstation unrecoverable error: (vcpu-0). Exception 0xc0000005 (access violation) has occurred.
It is worth noting that the issue mentioned above often happens to users with AMD Ryzen5950x processors.
However, this error is not a problem anymore. VMware issued an update for Workstation recently to address the problem.
So, if you have the same problem, you do not have to do anything but update your Workstation since this issue occurs in older versions.
Many users that have lab environments and are running VMware Workstation on outdated hardware that lacks a Trusted Platform Module are affected by the Windows 11 VMware problem.
Fortunately, this issue can be solved and all you need to do is follow the steps outlined in this guide. Also, take a look at our article if you’re trying to install Windows 11 on an unsupported PC.
If you’ve tried any of these methods, please share your experiences in the comments section down below!
Read our disclosure page to find out how can you help Windows Report sustain the editorial team. Read more


Improve this guide


User forum
0 messages