How to transfer installed programs from Windows 7 to Windows 10
3 min. read
Updated on
Read our disclosure page to find out how can you help Windows Report sustain the editorial team. Read more

The first thing that was on the user’s mind when Microsoft announced that it will cease support for Windows 7 was probably that they should upgrade as soon as possible.
Of course, no one is thinking about going to Windows 8, thus Windows 10 is the go-to answer. While those that belong to business environments could always opt to use the Windows 7 Extended Support for Business, this is just a temporary solution that will only buy you another 2 years at best.
As such, with a Windows 10 upgrade left as the only viable long-term solution, users will just have to comply.
The only problem is that when you migrate from one OS to another, the first thing that may be on your mind is what will happen with all of your data?
While personal files and folders can always be Copy and Pasted to an external hard drive and then move back onto the computer after the upgrade, your installed programs are a whole different story.
Fortunately enough, there are solutions for you to transfer installed programs from Windows 7 to Windows 10, without losing time having to reinstall them again.
How do I transfer programs from Windows 7 to Windows 10?
1. Use a dedicated transfer software
There are plenty of backup tools on the market, and many of them do a pretty good job. However, Laplink PCmover is the only third-party tool specifically designed to help users migrate from Windows 7 to Windows 10.
Down to its essence, it helps migrate pretty much everything from one computer to another, including personal files, folders, installed games or programs, user profiles, and more.
Since most applications are installed ready-to-use on the new PC, you won’t need to find old CDs, previously downloaded programs, serial numbers or license codes.
Another advantage to using this program is the interface, which pretty much guides you every step of the way, so you always know exactly what to do and when.
2. Use the Microsoft Media Creation Tool
This method is a bit more complicated, and it uses tools provided by Microsoft itself. The only advantage that it has over using Laplink PCmover is that it can be used in in-place upgrades, while Laplink requires that you have a secondary external hard drive.
Before using this tool, you must know that you must first buy Windows 10 or have a valid Windows 10 serial number.
Using the Media Creation Tool is fairly simple, as you need to just follow these steps:
- Go to the Microsoft Media Creation Tool’s website
- Press the Download tool now button
- Launch the installer once the download is finished
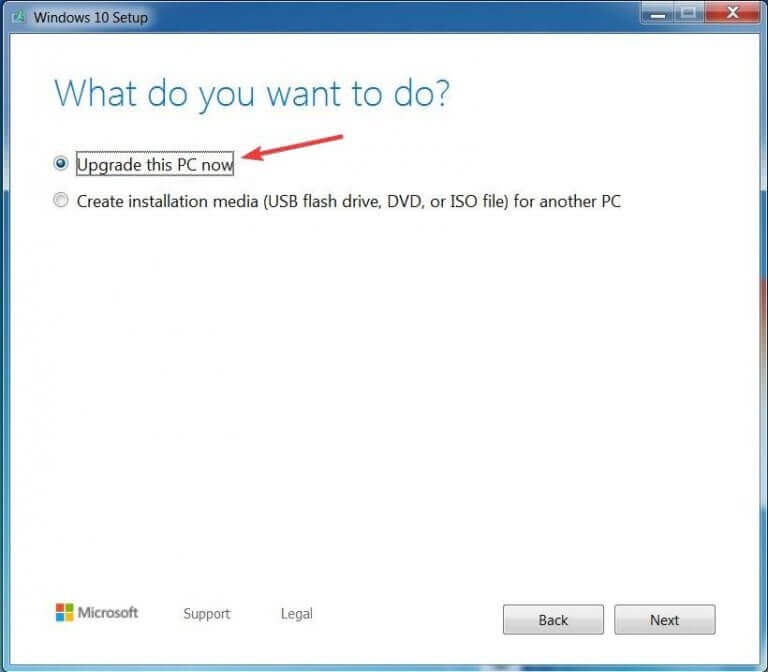
- In the What do you want to do menu, select Upgrade this PC now
- Enter your Windows 10 license key
- Select Next
- Agree with the licensing terms and conditions
- Select Keep personal files and apps
- Click on Install
While the Microsoft Media Creation Tool may be free of charge, it does not guarantee that all of your files and folders will remain untouched during the upgrade. Thus, if your data is your priority, using Laplink PCmover is your safest bet.
By following the methods mentioned above, you should be able to transfer any programs you have installed on your Windows 7 PC to Windows 10 without having to reinstall anything else.
Did you find this article helpful? Let us know what else you want to read about in the comment section below.


User forum
0 messages