FIX: Windows 10/11 disconnects from Wi-Fi after Sleep Mode
8 min. read
Updated on
Read our disclosure page to find out how can you help Windows Report sustain the editorial team. Read more

Many users reported that Wi-Fi disconnects after Sleep Mode on their PC, and this can be an annoying issue. However, there’s a way to fix this problem once and for all, and we’re going to show you how to do it.
Everyone is talking about Windows 10 Technical Preview and its pros and cons. But we mustn’t forget about the problems of other operating systems. Some users say that they’re unable to connect to WiFi after waking from sleep mode. But there are some fixes that may help them.
Sleep Mode disconnects network connection? Fix it with these solutions
- Change Power Management Settings
- Uncheck the IPv6 box
- Use Network troubleshooter
- Change your power settings
- Disable Broadcom Bluetooth
- Disable your antivirus
- Make sure that Ethernet is disabled
- Change your connection to Private
- Disable Require sign-in
- Perform a System Restore
There are many problems with Wi-Fi that can occur, and in this article, we’re going to cover the following issues:
- No internet after sleep Windows 10 – According to users this is a common problem. Even though their PC wakes up from Sleep Mode, there’s no Internet connection available.
- Windows 10 WiFi keeps dropping – Another common problem that users can experience is Wi-Fi dropping. This is an annoying problem, but you should be able to fix it with one of our solutions.
- Windows keeps disconnecting from WiFi – This is another common problem that can occur with Wi-Fi. According to users, Windows keeps disconnecting from Wi-Fi after waking up from Sleep Mode.
- WiFi disconnects sign in required – By default, Windows will ask you to sign in when you wake up from Sleep Mode. This is a standard security feature, but it can sometimes cause problems with Wi-Fi.
- Sleep mode WiFi will not connect – This is another problem that can occur after you put your PC to sleep. According to users, they can’t connect to Wi-Fi at all after waking up their PC.
- Sleep mode WiFi doesn’t work – This is another variation of this problem, and users reported that their Wi-Fi doesn’t work after waking up their PC. Although this is an annoying problem, you should be able to fix it with one of our solutions.
1. Change Power Management Settings
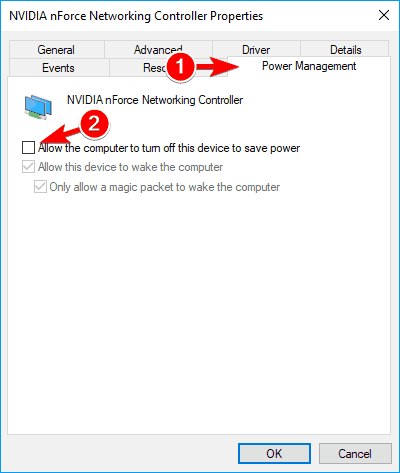
One of the most common causes of this issue is the wrong Power Management plan. You should check if your Wireless network adapter is not set to be turned off to save power when computers go to sleep mode.
If it the current Power Management plan turns off your Wireless adapter while in sleep mode, just change it and your problem will be solved. You can check if it is the case and change your current Power Management plan in Device Manager. Do so, follow these instructions:
- Press Windows logo key and X key together and choose Device Manager.
- Expand Network Adapters, right-click the adapter, click Properties.
- Click the Power Management tab, and then clear the Allow the computer to turn off this device to save power check box.
This feature is associated with wake on LAN, and to learn more, we have an in-depth guide on how to enable or disable wake on LAN that you should check out.
2. Uncheck the IPv6 box
If the wrong Power Management plan is not an issue, you might have some problems with IPv6 protocol. In order to disable it, you should perform a couple of operations in your Network and Sharing Center. To untick the IPv6 box, follow these steps:
- Go to the Network and Sharing Center.
- Click on Change adapter settings (in the left pane).
- Right-click on the connection you‘re using. Click Properties.
- Now remove the tick from the IPv6 and click OK to save changes.
3. Use Network troubleshooter
If Windows disconnects from Wi-Fi after sleep, you might be able to fix this problem with this simple workaround. According to users, you just have to run the Network troubleshooter by following these steps:
- Right click the network icon in the bottom right corner. Choose Troubleshoot problems from the menu.
- Network troubleshooter will now start and try to fix your problem.
After the troubleshooter is finished, check if the issue still appears. Many users reported that this solution worked for them, so feel free to try it. We have to mention that this might not be a permanent solution, so you’ll have to repeat it whenever the issue appears.
4. Change your power settings
According to users, sometimes Windows disconnects from Wi-Fi after sleep due to your power settings. Users reported that they fixed the problem simply by following these steps:
- Press Windows Key + I to open the Settings app.
- When Settings app opens, navigate to System section.
- In the left pane navigate to Power & sleep section. Scroll all the way down and check both boxes under Wi-Fi section.
After doing that, your problems with Wi-Fi should be completely resolved.
5. Disable Broadcom Bluetooth
If Windows disconnects from Wi-Fi after sleep, the problem might be your Bluetooth adapter. It seems that Broadcom Bluetooth starts automatically with Windows causing this problem to occur. To fix this problem, you can do the following:
- Press Ctrl + Shift + Esc to open Task Manager.
- When Task Manager opens, go to Startup tab and locate your Bluetooth service. Right click it and choose Disable from the menu.
If you can’t find the Bluetooth service in Startup tab, you can disable it by doing the following:
- Press Windows Key + R and enter msconfig. Press Enter or click OK.
- Navigate to the Services tab and click on Hide all Microsoft services. Locate Bluetooth service and disable it. Now click on Apply and OK to save changes.
After making the necessary changes you need to restart your PC in order to apply them. Keep in mind that disabling the Bluetooth service might not be the best solution if you use Bluetooth devices frequently. To use your Bluetooth devices again, you’ll have to enable the disabled services.
6. Disable your antivirus
According to users, if Windows disconnects from Wi-Fi after sleep the problem might be related to your third-party antivirus software or firewall. To fix this problem, it’s advised to disable any third-party antivirus software or firewall and check if that solves the issue.
If disabling your antivirus software or firewall doesn’t solve the issue, you might have to uninstall your antivirus software completely. To do that, it’s advised to use a dedicated removal tool to remove all files associated with your antivirus software.
After removing your antivirus and firewall, check if the issue still appears. If the issue is resolved, you might have to reinstall your antivirus again or switch to a different antivirus solution.
You can find plenty of great Windows 10 compatible antivirus software that will not interfere with your system. Just make sure it has a good threat database, real-time protection, a transparent privacy policy, and good online security.
7. Make sure that Ethernet is disabled
If Windows disconnects from Wi-Fi after sleep, the problem might be your Ethernet connection. One of the fastest ways to fix this problem is to make sure that your Ethernet connection is disabled. This is rather simple and you can do it by following these steps:
- Open Network and Sharing Center and navigate to Change adapter settings.
- Locate your Ethernet connection, right click it and choose Disable from the menu.
After disabling your Ethernet connection check if the issue is resolved. In addition, you can also perform this solution simply by disconnecting your Ethernet cable from your PC.
8. Change your connection to Private
Sometimes this issue can occur because your network connection is set to Public. Public network connections use a different set of rules, and sometimes that can cause certain issues to occur. If Windows disconnects from Wi-Fi after sleep, you can fix that by doing the following:
- Click your Wi-Fi icon in the bottom right corner and click on Properties.
- Now locate Make this PC discoverable section and enable it.
After enabling this option your connection will automatically change to Private fixing any Wi-Fi issues.
9. Disable Require sign-in
According to users, sometimes Wi-Fi problems can be caused by your settings. By default, Windows will ask you for your password once you wake up your PC.
This is a security measure, but many users reported that this feature is causing Windows to disconnect from Wi-Fi. To fix this problem, you just have to disable this feature by following these steps:
- Open the Settings app and go to Accounts section.
- Select Sign-in options from the menu on the left. In the right pane, in Require sign-in section select Never.
After changing this setting your PC won’t require you to login after waking up from Sleep Mode. Disabling this feature can be a slight security concern, but it should help you with this problem.
10. Perform a System Restore
If you’re still having this problem, perhaps you can fix it by performing System Restore. To do that, follow these steps:
- Press Windows Key + S and type system restore. Now choose Create a restore point from the list.
- The System Properties window should appear. Click the System Restore
- Once the System Restore window opens, click the Next button to proceed.
- Check Show more restore points option, if available. Now you need to select the desired restore point and click Next.
- Follow instructions on the screen to complete the process.
Once your PC is restored, check if the problem is resolved.
If these solutions didn’t work out for you, or you have some other suggestions, comments, or maybe other useful solutions for this problem, please write them down in the comment section below, we would love to read your feedback.


User forum
1 messages