Windows Did Not Detect Any Networking Hardware [Error Fix]
Third-party VPN software could cause this error
4 min. read
Updated on
Read our disclosure page to find out how can you help Windows Report sustain the editorial team. Read more
Key notes
- This error usually occurs if you have unsupported VPN software installed on your computer during the upgrade.
- This guide will cover all the expert-recommended methods to fix the issue.
![Windows Did Not Detect Any Networking Hardware [Error Fix]](https://windowsreport.com/wp-content/uploads/2023/03/Windows-Did-Not-Detect-Any-Networking-Hardware-Error-Fix-886x590.png)
Many users have reported that Windows did not detect any networking hardware error after upgrading their Windows. Unfortunately, this means the computer cannot see a wireless connection.
This guide will discuss some tested methods to fix the error after explaining the causes. Let’s start!
What causes the Windows didn’t detect any networking hardware error?
There could be various reasons why Windows can’t detect your network adapter or wireless; some of the common ones are:
- Unsupported VPN software – If you had unsupported VPN software installed on your computer during the upgrade, you might face this error. You need to uninstall the VPN software to fix the error.
- Driver issues – If the network driver on your computer is not installed correctly, you might see this error.
- Power issues – If the network adapter is not getting sufficient power, your computer may be unable to detect the networking hardware.
- Third-party software interference – Sometimes third-party software conflicts with the network adapter or wireless card, causing this error. It would be best if you uninstalled the freshly installed software to fix the issue.
What can I do if Windows didn’t detect any networking hardware?
Before engaging in advanced troubleshooting steps, you should consider performing the following checks:
- Uninstall VPN software.
- Restart your computer
- Back up your registry files, open Registry Editor, go to File, then click Export. Finally, save the file to the desired location.
1. Run the Windows troubleshooter
- Download the Troubleshooter on another device and save it to a USB flash drive.
- Move the file to the computer with the network problem.
- Double-click the file to open.
- Click Next. It will try to detect the problem on your device.
- On the next screen, click Next.
- Follow the on-screen instructions to fix the problem.
2. Install the network driver manually
- Press Windows + R to open the Run dialog box.
- Type devmgmt.msc and press Enter to open Device Manager.
- Go to Network adapter and expand it.
- Locate and right-click the wireless driver to open the context menu. Select Update driver.
- Click Search automatically for drivers.
- Follow the on-screen instructions to complete the process. If this didn’t help, proceed with the next step.
In any case, you have another way to manage or install your network drivers without applying the steps above.
Thus, you can employ a dedicated driver tool like Outbyte Driver Updater capable of fully scanning the PC and installing any drivers automatically.

Outbyte Driver Updater
Try out expert driver software to install and manage any drivers on your PC securely.3. Reinstall the network driver
- Open Device Manager using the steps mentioned in method 2.
- Go to Network adapter and expand it.
- Locate the wireless driver, right-click it, and select Uninstall driver.
- Now click Action, and select Scan for hardware changes to install the driver.
4. Use the Command Prompt
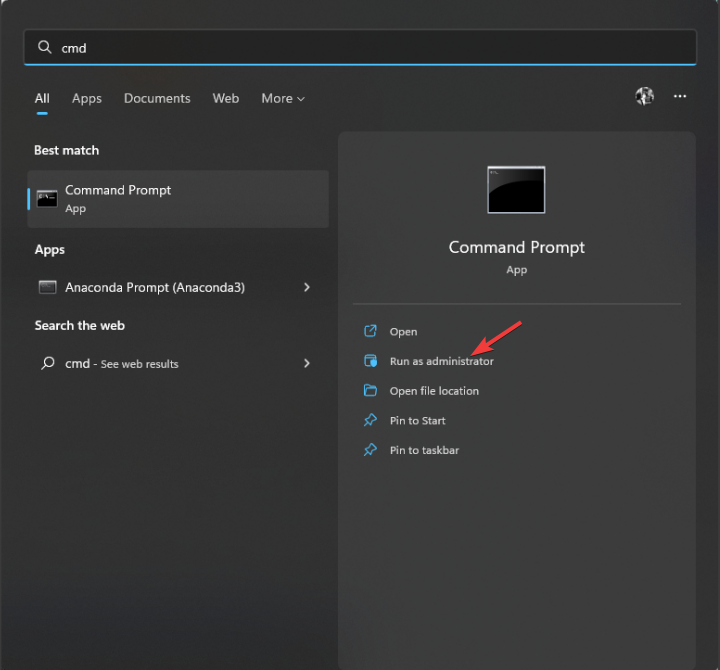
- Press the Windows key, type CMD, and click Run as administrator.
- Copy and paste the following commands one by one and press Enter after every command:
reg delete HKCR\CLSID\{988248f3-a1ad-49bf-9170-676cbbc36ba3} /fnetcfg -v -u dni_dne - If you see an error while executing the commands, restart your PC and follow the next method.
5. Use the Registry Editor
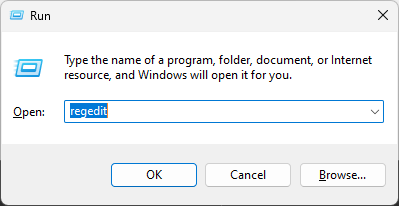
- Press the Windows + R to open the Run console.
- Type regedit and press Enter to open Registry Editor.
- Follow this path:
Computer\HKEY_CLASSES_ROOT\CLSID - Double-click the CLSID folder to expand and locate the {988248f3-a1ad-49bf-9170-676cbbc36ba3} key.
- Right-click the key and select Delete to remove it.
- Restart your computer to let the changes take effect.
6. Restore your system to the previous version
- Press the Windows key, type Control Panel, and click Open.
- Select Large icons from the dropdown for View as and click Recovery.
- Click Open System Restore.
- On the System Restore window, select Choose a different restore and click Next.
- Select the restore point and click Next.
- Click Finish to initiate the process.
7. Contact Microsoft Support
If nothing has worked for you so far, it is advised you contact Microsoft Support. Explain the scenario and tell them about the fixes you tried to make them understand. They can help you with additional troubleshooting as per your device.
So, these are some methods you can follow to fix Windows that did not detect any networking hardware error. Try them and let us know what worked in the comments section below.


User forum
0 messages