Windows Update Error 0x800704c7: 3 Easy Ways To Fix
Learn to get rid of this error once and for all
3 min. read
Updated on
Read our disclosure page to find out how can you help Windows Report sustain the editorial team Read more
Key notes
- One of the most common Windows errors that you can encounter is a Windows Update error.
- Below we will be showing you how to deal with Windows Update error 0x800704c7.
- It can come up on both Windows 10 and Windows 11 devices, and the solutions below can apply to both OSs.

The error 0x800704c7 is caused due to missing/corrupted files or background processes conflicting with the update due to which you are not able to get the latest update.
Sometimes, this Windows 1o error appears when they try to install certain updates by using the Windows Update function. The hotfixes released by Microsoft are vital and your system relies on them.
However, errors like this one can prevent you from getting your hands on the update.
Luckily in this fix article, we will talk about some of the reasons for 0x800704c7 error and offer practical troubleshooting solutions to solve it.
How do I fix the Windows Update error 0x800704c7?
1. Downloading the most recent KB
- Press Windows key + I to open Settings.
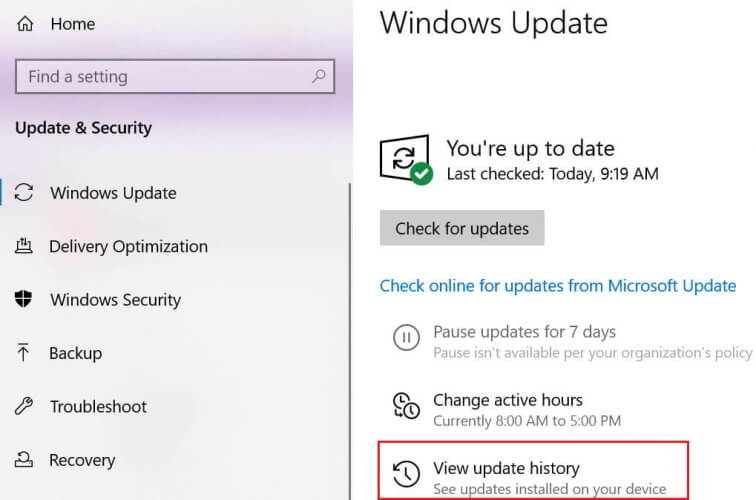
- Go to Update and Security.
- In the middle of the window, you will see View update history. Click on it.
- Identify the most recent KB and copy the code.
- Go to the Microsoft Update website and search the KB code.
- Download it for your Windows version.
- Once the download is finished, open the file and install it.
2. Performing a System Restore
- Open Start.
- Search for Create a restore point, and click the top result to open the System Properties experience.
- Select the System Restore button and click Next
- Select the restore point that you want to use on your computer.
- Select the Scan for affected programs button to check the apps that will no longer be available because they will be added after the creation of the restore point.
- Select the Close button and the Next button.
- Click on Finish to complete.
Once you complete the steps, System Restore will return your computer to the previous working state.
However, to perform a System Restore on Windows 10 you will first need to have System Restore feature enabled and to previously create a System Restore point.
Check this handy guide to find out how to enable System Restore and how to create a System Restore point.
3. Using Media Creation Tool
- Download Media Creation Tool from Microsoft’s website.
- After the download completes, open it up.
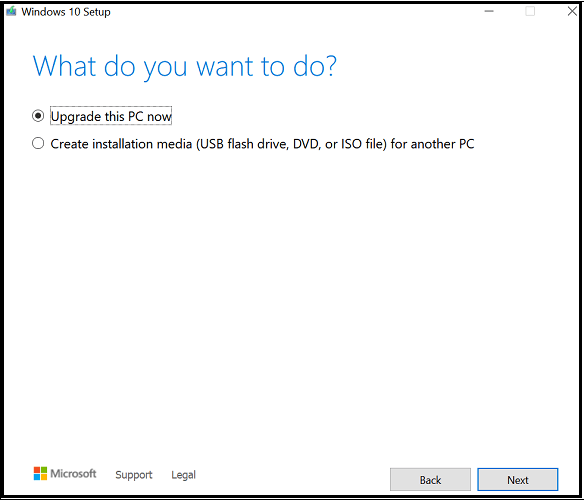
- Agree to the terms, and then select Upgrade this PC now.
- Select Keep Personal Files to make sure your files are safe.
- Wait for the upgrade to finish.
Many users reported that the 0x800704c7 error was fixed after restoring their PC with the System Restore tool. You may try to do the same.
Have you attempted to apply one or more of the solutions provided? Let us know which one worked for you in the comments area below.





User forum
0 messages