How to fix Windows update error code 800F0A13 with ease
4 min. read
Updated on
Read our disclosure page to find out how can you help Windows Report sustain the editorial team. Read more

Like it or not, it’s just a matter of time before seeing the Windows update error code 800F0A13. This error is quite common after a Windows 10 update fails.
Thankfully enough, be sure that there are a few working solutions that you can try in order to get things back on track.
That is precisely why we’ve created this step-by-step guide that will show you a few simple ways to solve this Windows update error code 800F0A13 in no time. Don’t postpone applying them!
What can I do if getting Windows update error code 800F0A13?
1. Perform a clean boot of Windows
- Open up a Run dialog box by pressing Windows key + R keyboard shortcut.
- Next, type msconfig.
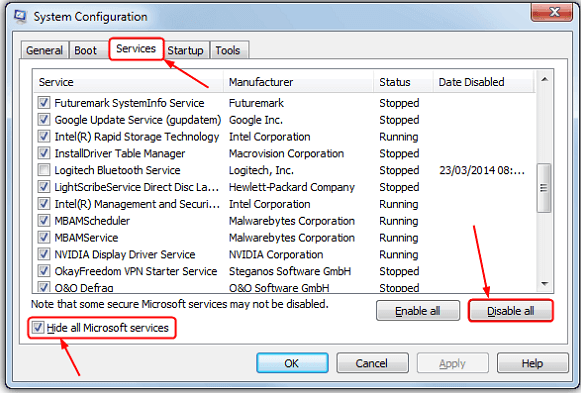
- When the System Configuration window opens, go to the Services tab.
- It’s time to put a tick in the Hide all Microsoft services box at the bottom left.
- Click the Startup tab.
- Then, press the Disable all button.
- Finally, you may restart your computer for a clean boot.
- Check if the 800F0A13 error is temporarily gone, then load msconfig and start enabling items one by one in the services and startup tabs until you can identify the one causing the issue.
Users often discover that their third party software is the cause of the problem. That’s why our first recommendation for fixing the issue is to prevent all non-Windows programs and services from starting.
The system would prevent any third party software from launching on boot.
2. Fire up DISM and SFC scans
- Press Win key+R to show the Run dialog and type cmd.
- Press Ctrl + Shift + Enter to open up an elevated CMD prompt.
- Up next, click Run as Administrator.
- If you are prompted to enter an administrator password or confirmation, type the password or click Allow.
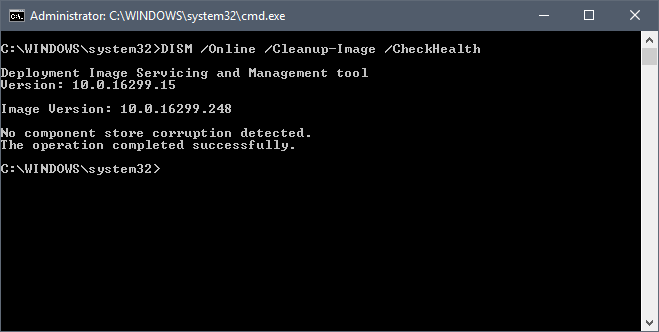
- After opening an elevated CMD window, type the following command and press Enter after each line to initiate a DISM scan:
Dism.exe /online /cleanup-image /scanhealth
Dism.exe /online /cleanup-image /restorehealth - After finishing the DISM scan, restart your computer.
- Once the next startup sequence is complete, follow previous steps again to open up another elevated CMD prompt.
- This time, type the following command instead and press Enter to initiate an SFC scan:
sfc /scannow - When all steps are completed, restart your computer.
Note: Do a full backup of the Windows system partition before you run DISM and SFC scans. If you’re unsure about this procedure, the best local data backup software tools come in handy.
Several users affected by the 800F0A13 error have reported that they managed to resolve this issue by running DISM and SFC scans. The first DISM command checks the image for the corruption flag and returns its findings without running any repair operations.
However, the second one tries to repair any issues that it finds automatically. Even if no issues are reported, you should continue with the SFC scan too.
3. Launch Startup Repair
- Turn on your PC.
- As soon as the Windows logo appears on your screen, press the Power button to interrupt the boot sequence.
- Repeat the above steps two more times.
- After the third interruption, Windows will open into the Advanced Startup environment.
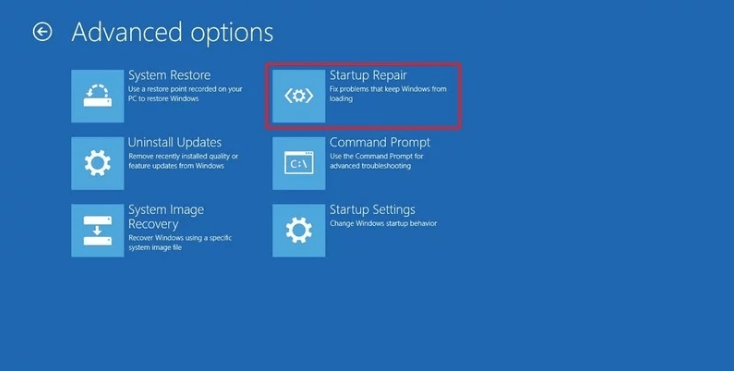
- Then, select Troubleshoot > Advanced options.
- Click Startup Repair to run the procedure.
- Select your account.
- Up next, you’ll need to type your account password.
- Click the Continue button.
If you’re still having problems, you should use Startup Repair. This tool can’t fix every problem and there are times when your Windows installation is so damaged that reinstalling Windows is the only option.
However, before getting to this conclusion, follow the above steps and see if it can help you remove the Windows update error code 800F0A13 for good.
Anyway, if the computer is loading correctly, you’ll get the Start Repair couldn’t repair your PC message since there’s nothing that needs fixing.
Have you followed the steps in this article to troubleshoot the problem? Do let us know which method helped you resolve the issue in the comments section below.
[wl_navigator]





User forum
0 messages