WSAPPX High Disk Usage: 8 Proven Fixes for Windows

WSAPPX is a Windows process that helps install, update, and manage apps from Microsoft Store. However, it can sometimes cause high disk or CPU usage, slowing down your PC.
In this guide, you’ll learn why WSAPPX causes performance issues and how to fix it easily.
Table of contents
- How to Fix WSAPPX High Disk Usage?
- 1. Check for Windows Updates
- 2. Disable Microsoft Store Automatic Updates
- 3. Adjust Virtual Memory Settings
- 4. Disable Windows Store Using Group Policy (Pro Edition)
- 5. Disable the Service via Registry Editor (Home Edition)
- 6. Scan for Corrupt System Files
- 7. Limit Background Apps
- 8. Check Windows Store Service Settings
- What Is WSAPPX and Why Is It Using So Much Disk?
- FAQs
- Conclusion
How to Fix WSAPPX High Disk Usage?
1. Check for Windows Updates
Outdated system files can cause WSAPPX to overuse resources. Follow these steps:
- Press Windows + I to open Settings.
- Go to Windows Update.
- Click Check for updates.

- Download and install any pending updates.
- Restart your computer once done.
Updating often stabilizes Windows background services and reduces disk usage. For more details on how Windows updates affect system performance, check out this guide on WSAPPX and CPU usage.
2. Disable Microsoft Store Automatic Updates
If the Store keeps updating apps in the background, WSAPPX may constantly run.
- Open Microsoft Store.
- Click on your Profile icon > App settings.
- Toggle off App updates.
- Restart your PC.
This prevents WSAPPX from running automatically to update apps.
3. Adjust Virtual Memory Settings
When your PC runs low on RAM, Windows uses disk space as virtual memory. This can trigger high WSAPPX activity.
- Press Windows + R, type sysdm.cpl, and press Enter.
- Go to the Advanced tab > click Settings under Performance.
- Open the Advanced tab > click Change under Virtual memory.

- Uncheck Automatically manage paging file size for all drives.
- Select your system drive (C:), choose Custom size, and enter:
- Initial size: 1.5× your RAM in MB
- Maximum size: 3× your RAM in MB
- Click Set, then OK, and restart your PC.
4. Disable Windows Store Using Group Policy (Pro Edition)
For Windows 11 Pro users, disabling the Store completely can help.
- Press Windows + R, type gpedit.msc, and press Enter.
- Navigate to: Computer Configuration > Administrative Templates > Windows Components > Store.
- Double-click Turn off the Store application.

- Select Enabled > click Apply, then OK.
- Restart your PC.
This stops WSAPPX from starting automatically.
5. Disable the Service via Registry Editor (Home Edition)
If you use Windows Home, use the Registry instead.
- Press Windows + R, type regedit, and press Enter.

- Go to:
HKEY_LOCAL_MACHINE\SOFTWARE\Policies\Microsoft\WindowsStore - Right-click the WindowsStore key > New > DWORD (32-bit) Value.
- Name it RemoveWindowsStore and set its value to 1.
- Restart your PC.
Be careful with Registry edits, create a backup first.
6. Scan for Corrupt System Files
Corrupt system files can trigger constant WSAPPX activity.
- Press Windows + S, type cmd, right-click Command Prompt, and select Run as administrator.
- Type:
sfc /scannow
- Wait for the scan to finish.
- Once done, restart your PC.
If the issue persists, also run:
DISM /Online /Cleanup-Image /RestoreHealth
You can also read how system repairs help fix 100% disk usage issues on Windows 11.
7. Limit Background Apps
Many apps running in the background can keep WSAPPX active.
- Press Windows + I > go to Privacy & security > Background apps.
- Turn off Let apps run in the background.
- Restart your computer.
This reduces system load and disk usage.
8. Check Windows Store Service Settings
Make sure AppX and ClipSVC services are not set to start automatically.
- Press Windows + R, type services.msc, and press Enter.
- Locate AppX Deployment Service (AppXSVC) and Client License Service (ClipSVC).
- Right-click each one > Properties.
- Change Startup type to Manual.
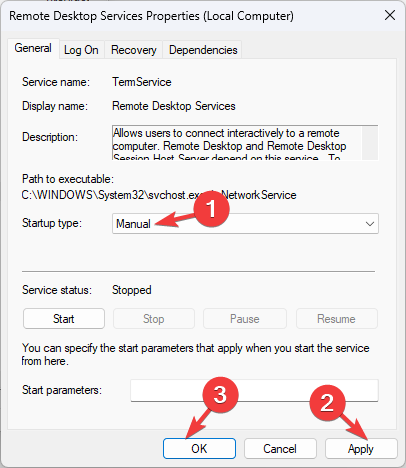
- Click Apply, then OK.
Restart and monitor disk usage in Task Manager.
What Is WSAPPX and Why Is It Using So Much Disk?
WSAPPX runs services like AppX Deployment Service (AppXSVC) and Client License Service (ClipSVC). They manage Store apps, background updates, and app licenses. When they malfunction or run constantly, your system may experience 100 percent disk usage. Learn more in this detailed Windows 11 WSAPPX guide.
FAQs
No. WSAPPX is a legitimate Windows process. However, malware can disguise itself under this name, so scanning with Windows Security is recommended.
Not completely, but you can limit when it runs by disabling Microsoft Store updates or services as shown above.
Constant disk usage can add unnecessary writes, so reducing WSAPPX activity helps extend SSD health.
The process can still run in the background to verify app licenses or prepare background updates, even if you do not open the Microsoft Store manually.
Conclusion
WSAPPX high disk usage usually happens when background updates or Store services get stuck. By managing virtual memory, stopping automatic updates, and repairing system files, you can reduce the process impact and restore smooth performance.
Read our disclosure page to find out how can you help Windows Report sustain the editorial team. Read more


Improve this guide


User forum
0 messages