Homegroup cannot be set up in Windows 10/11 [BEST SOLUTIONS]
Networking is a crucial part of every computer, especially if you need to share files and collaborate with other users. This is extremely important if you’re working in a company or if you want to share files between two computers.
To do this, you first need to set up a Homegroup, but Windows 10 users are reporting an error that says “Homegroup cannot be set up on this computer”.
How can I fix issues with the homegroup in Windows 10?
Homegroup is a useful feature that allows you to easily share files across the PCs in the same network, but many users reported that they are unable to create a Homegroup on Windows 10.
Speaking of Homegroup issues, these are some of the most common problems that users experienced with Homegroups:
- Cannot connect to Homegroup Windows 10 – Sometimes you might not be able to connect to a Homegroup on your PC. This can be a big problem, but you might be able to fix it by turning off all PCs and setting up a new Homegroup.
- Can’t create Homegroup only join – If you’re having this problem, be sure to delete the content of PeerNetworking directory and try to create your Homegroup again.
- I can’t create, join, or use a Homegroup – This is another problem with Homegroup that you might encounter. If this happens, make sure that the necessary Homegroup services are enabled.
- Homegroup cannot be created on this computer, detected, removed – There are various issues with Homegroups that can occur on your PC, but if you have any of these problems, you should be able to fix them using one of our solutions.
- Homegroup cannot access other computers, see other computers – If you can’t see other computers in your Homegroup, you might have to change security permissions for MachineKeys and PeerNetworking directories.
- Homegroup Windows 10 not working – This is a general problem that can occur with Homegroups and in order to fix it, be sure that IPv6 is enabled.
Solution 1 – Delete files from PeerNetworking folder
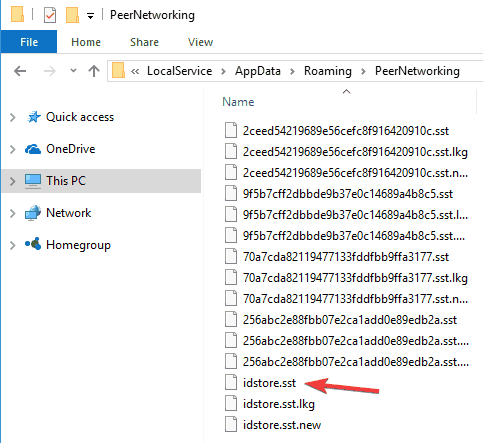
- Go to C:WindowsServiceProfilesLocalServiceAppDataRoamingPeerNetworking.
- Delete idstore.sst and move on to Step 3. If deleting idstore.sst doesn’t work, go back to C:WindowsServiceProfilesLocalServiceAppDataRoamingPeerNetworking and delete all files and folders in it and go back to Step 3.
- Go to the Network Settings and Leave the Homegroup.
- Repeat this for all the computers in your network.
- Turn off your computers.
- Turn on just one, and create a new Homegroup on it.
- This Homegroup should be recognized on all of your computers now.
Solution 2 – Enable Peer network grouping services
Sometimes it can happen that services needed for Homegroup to work are disabled for some reason, but there’s a way to enable them.
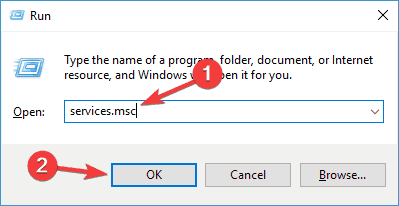
- In the Search bar type services.msc and press Enter or click OK.
- Search the list for Peer Network Grouping, Peer Network Identity Manager, Homegroup Listener and Homegroup Provider.
- If those services are disabled or set to manual set them to Automatic and leave your Homegroup.

- Create new Homegroup and see if it works.
We have to mention that you might have to do this for all the computers in your network.
If you encounter peer networking error 1068 on Windows 10, you can solve it by following this handy guide.
Solution 3 – Allow Full Control to MachineKeys and PeerNetworking folders
- Find:
- C:ProgramDataMicrosoftCryptoRSAMachineKeys
- And then find:
- C:WindowsServiceProfilesLocalServiceAppDataRoamingPeerNetworking
- Right click each folder and choose Properties.
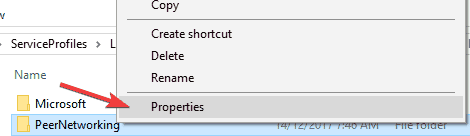
- Go to Security tab. You’ll see a group of users, click on a group, and press Edit.
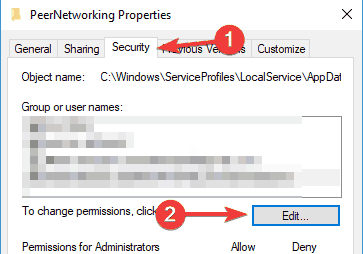
- From the list of options, click Full Control.
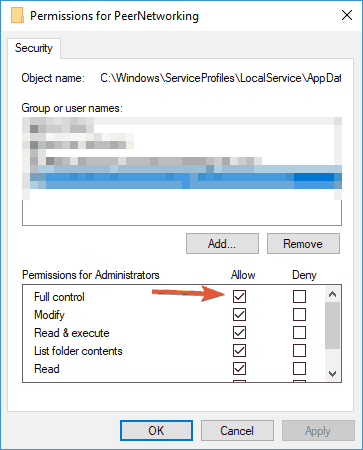
- Repeat the process for all that you wish to have access to your Homegroup.
We have to mention that you might have to do this for all of your computers in a network.
Homegroup cannot be set up on this computer is an annoying Windows 10 error, and if none of these solutions were helpful, maybe you should perform a clean install as a last resort.
Solution 4 – Rename MachineKeys directory
If you can’t set up a Homegroup on Windows 10, the issue might be related to MachineKeys folder. However, you can fix the issue simply by renaming the MachineKeys directory. To do that, just follow these steps:
- Navigate to C:ProgramDataMicrosoftCryptoRSA directory.
- Now locate MachineKeys, right click it and choose Rename from the menu.
- Change the name from MachineKeys to MachineKeys-old.
- Now create a new folder called MachineKeys and give full control permissions to Everyone and all users on your PC. To see how to do that, be sure to check the previous solution for more information.
After recreating the MachineKeys directory, the issue should be completely resolved and you’ll be able to set up a Homegroup once again. Many users reported that this solution worked for them, so be sure to try it out.
Solution 5 – Turn off all PCs and create a new Homegroup
If you’re unable to set up a Homegroup in Windows 10, the issue might be other PCs. Other PCs in your network can sometimes interfere and cause issues with Homegroup to appear. However, you can fix the problem simply by doing the following.
- First, stop all services beginning with Home and Peer on all computers.
- Now go to C:WindowsServiceProfilesLocalServiceAppDataRoamingPeerNetworking directory and delete all contents of that folder. Do this for all PCs in your network.
- Now shut down all computers in your network except one. Make sure that the PCs are completely turned off. If needed, unplug them from the wall outlet just to be sure.
- Now you should have only one PC running. Restart the HomeGroup Provider service on this PC.
- Now create a new homegroup on this PC.
- Restart all PCs in your network and join the newly created homegroup.
This solution might be a bit complicated, but several users reported that it works, so be sure to try it out.
Solution 6 – Make sure that your clock is correct
If you can’t set up a Homegroup on your PC, the problem might be your clock. Several users reported that their clock was incorrect and that caused the problem with Homegroup to occur.
If you can’t set up a Homegroup on your computer, be sure to check if the time is correct. To adjust the time on your PC, do the following:
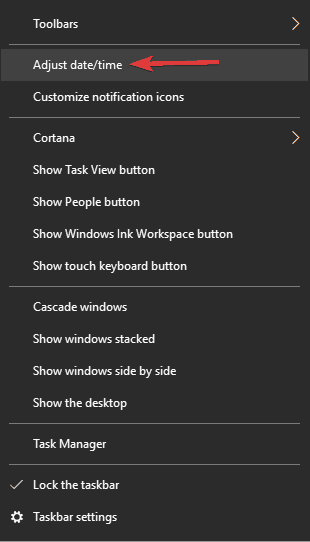
- Right click the clock in the right corner of your Taskbar. Choose Adjust date/time from the menu.
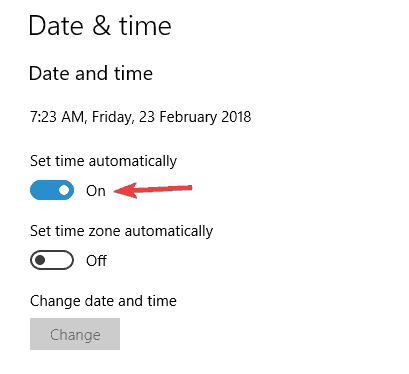
- Uncheck Set time automatically and turn in back on after a few seconds. This should automatically set your time. You can also turn off this feature and click the Change button to set the time manually if you want.
This is an unusual solution, but several users reported that adjusting their clock fixed the problem for them, so be sure to try it.
See if your Windows Time service is working properly by following this step-by-step guide.
Solution 7 – Check the Homegroup password
Many Windows 10 users reported that they can’t join a Homegroup because they don’t have the necessary password. This can be an annoying problem, but there’s a way to fix it. To fix this issue, simply do the following:
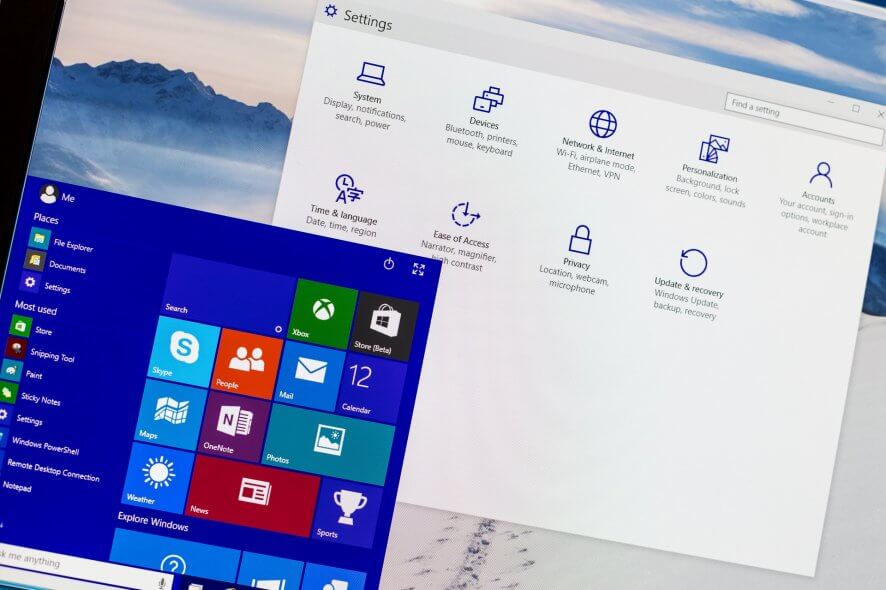
- Open the Settings app. You can do that quickly by pressing Windows Key + I.
- When Settings app opens, navigate to Network & Internet section.

- Select Ethernet from the menu on the left and choose HomeGroup from the right pane.
After doing that, you should be able to see the password for your Homegroup and use that password to connect other PCs. Keep in mind that this solution works only if you already have a Homegroup set up on your PC.
If you’re having trouble opening the Setting app, take a look at this article to solve the issue.
Solution 8 – Make sure that IPv6 is enabled on all PCs
If you’re unable to set up a Homegroup, the issue might be the IPv6 feature. According to users, this feature might be disabled on some computers and that can cause this issue to appear.
However, you can easily fix the problem by enabling IPv6. To do that, just follow these steps:
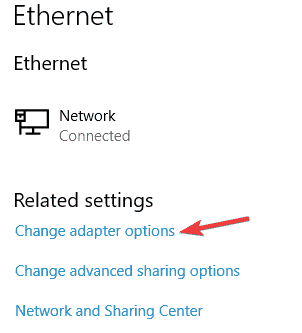
- Click the network icon in the bottom right corner and select your network from the menu.

- Now select Change adapter options.
- Right click your network connection and choose Properties from the menu.
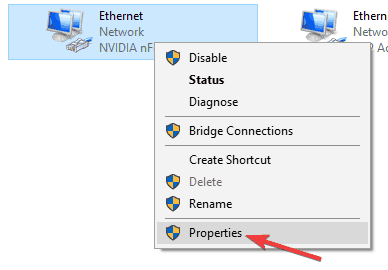
- Locate Internet Protocol Version 6 (TCP/IPv6) and make sure that it’s enabled. Now click OK to save changes.

- Repeat these steps for all PC on your network.
After enabling IPv6 for all PCs, you should be able to set up Homegroup without any problems.
Solution 9 – Change the computer name
If you’re having Homegroup problems on your PC, you might be able to solve them simply by changing the name of the affected PCs.
By changing the computer name, any configuration problems that you have with Homegroup should be resolved. To change the name of your computer, do the following:
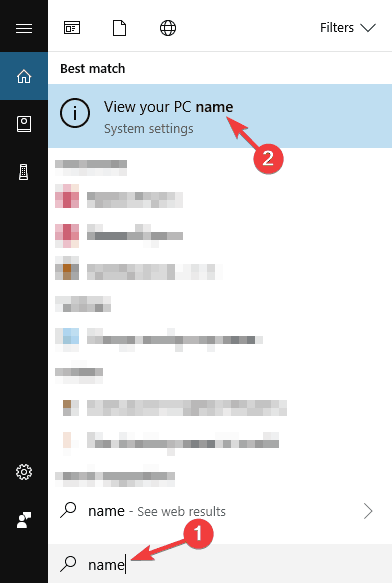
- Press Windows Key + S and enter name. Select View your PC name from the list of results.
- Now click the Rename this PC button.
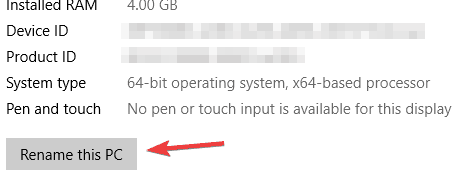
- Enter the new computer name and click Next.
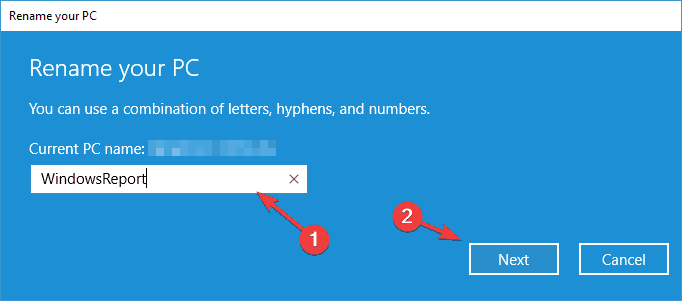
- After changing the name, restart your PC to apply changes.
Keep in mind that you need to repeat this step for all computers in the network that are affected by this issue. After doing that, you should be able to connect to Homegroup without any problems.
If you have any other Windows 10-related issues you can check for the solution in our Windows 10 Fix section.
READ ALSO:
Read our disclosure page to find out how can you help Windows Report sustain the editorial team. Read more


Improve this guide


User forum
29 messages