FIX: Can't connect to Homegroup via WiFi on Windows 10/11

Have you upgraded to the Windows 10/Windows 8.1 operating system and you are having trouble connecting to a certain Homegroup or perhaps your own Homegroup? Well, I can tell you that by the time you’ve reached the end of this article your Homegroup in Windows 10, 8.1 will be available and you can connect your laptop to it as you normally do.

The issues that might occur when trying to connect to a certain Homegroup in Windows 10, 8.1 can be caused by the Windows Firewall, Antivirus or some registry errors that might occur in Windows 10, 8.1. After following the tutorial below in the order it is described, you can fix this problem in the shortest time possible.
How to connect your PC to a Homegroup on Wi-Fi
- Run the Network and Internet troubleshooter
- Join the HomeGroup
- Turn off your antivirus
- Turn on Find Devices and Content
- Check date and time settings
- Check the name of your computer, domain and workgroup
- Turn on network discovery
- Leave HomeGroup and then join it again
- Turn off Windows Firewall
- Repair network problems
1. Run the Network and Internet troubleshooter
- Move the mouse cursor over to the lower right side of the screen.
- From the menu that appears left click or tap on the Search feature.
- In the search dialog box write the following: “troubleshooting” without the quotes.
- After the search has finished left click or tap on the “Troubleshooting” icon.
- Left click or tap on the “Network and Internet” feature present in the troubleshooting menu.

- From the next window left click or tap on the “HomeGroup” feature.

Note: If you get prompted by a user administrator window you will need to write in your administrator user and password. - Left click or tap on the “Next” button to proceed.
- Follow the instructions on the screen to finish the troubleshooting process.
- Reboot your operating system after you are done.
- Check again if you can connect your Laptop to the Homegroup.
— RELATED: Full Fix: Homegroup Cannot Be Set Up in Windows 10, 8.1 and 7
2. Join the HomeGroup
- Move the mouse cursor over to the lower right side of the screen.
- From the menu that appears left click or tap on the “Settings” feature.
- From the next menu left click or tap on the network icon.
- From the list that shows you will need to left click or tap on the network you want to join.
- Left click or tap on the “Connect” button.
- Now try joining the Homegroup.
3. Turn off your antivirus
For the duration of this step you will need to completely disable any kind of third party antivirus.
- After you disabled it try connecting again to the Homegroup.
- If it works then you antivirus has restrictions that prevent you from accessing the desired Homegroup.
4. Turn on Find Devices and Content
- Move the mouse cursor over to the lower right side of the screen.
- From the menu that appears left click or tap on the “Settings” feature.
- Now left click or tap on the “Change PC settings” button.
- In the next window left click or tap on the “Network” option.
- Left click or tap on the “Connections” button.
- From the list choose your network connection.
- Turn on the feature “Find devices and content”.
- Reboot your operating system and try again accessing your HomeGroup.
— RELATED: Homegroup problems after installing Windows 10 Creators Update [Fix]
5. Check date and time settings
- Move the mouse cursor over to the lower right side of the screen.
- From the menu that appears left click or tap on the Search feature.
- In the search dialog box write the following: “date and time” without the quotes.
- After the search has finished left click or tap on the Settings option.
- Left click or tap on the “Date and time” icon.

- Left click or tap on the “Change date and time” feature.
Note: If you are prompt by a user account control window you will need to write in the administrator account and password. - Make sure the correct settings for the date and time are correct and then reboot your operating system.
- Try again your laptop to see if you can connect to the Homegroup.
6. Check the name of your computer, domain and workgroup
Make sure your Laptop has its own unique name, domain and Workgroup settings by doing the steps below.
- Move the mouse cursor over to the lower right side of the screen.
- From the list left click or tap on the “Search” feature.
- In the search dialog box write the following: “System” without the quotes.
- After the search has finished left click or tap on the “System” icon.
- Check your PC name under the “Computer name, domain, and workgroup settings” topic and make sure it is uniquely assigned only to your Laptop.
- If there are other PCs with the same name you will need to change the Laptops name to another one.
On Windows 10, you can quickly check and modify your computer’s name by going to Settings > System > About, as shown in the screenshot below.

— RELATED: How to: Remove Homegroup on Windows 10
7. Turn on network discovery
- Move the mouse over to the lower side of the screen.
- Left click or tap on the “Search” feature.
- In the search dialog box write the following: “advanced sharing” without the quotes.
- After the search has finished left click or tap on the “Manage advanced sharing settings” icon.
- Next to the “Private network profile” topic you will need to left click or tap on the drop-down arrow.
- Left click or tap on the “Turn on network discovery” feature.

- Left click or tap on the “Save changes” button.
Note: If you are prompted by a user account control window write in your administrator account and password. - After you changed the setting reboot your Windows 8.1 operating system.
8. Leave HomeGroup and then join it again
- Move the mouse cursor over to the lower right side of the screen.
- Left click or tap on the Settings feature.
- Left click or tap on the “Change PC settings” button.
- Left click or tap on the “Homegroup” button.
- Left click or tap on the “Leave” button next.
- Then try connecting again to your Homegroup and see if it works.
— RELATED: Fix: Asked to Join a Nonexistent Homegroup on Windows 10
9. Turn off Windows Firewall
- Move the mouse cursor over to the lower right side of the screen.
- From the list that appears left click or tap on the “Search” feature.
- In the search dialog box write the following: “firewall” without the quotes.
- After the search has finished left click or tap on the “Windows Firewall” icon.
- Left click or tap on the “Turn Windows Firewall on or off” option.
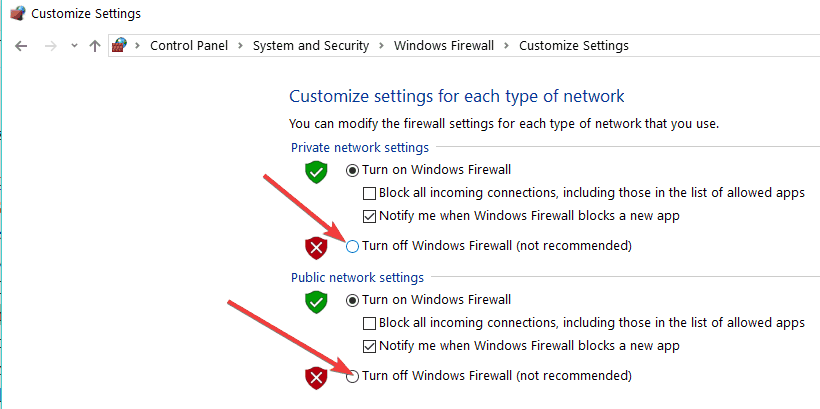
Note: If you are prompted by a user account control write in the administrator account and password. - Now under each network you will need to choose the “Turn off Windows Firewall (not recommended)” option.
- Left click or tap on the OK button.
- Try connecting again to your Homegroup.
10. Repair network problems
- Move the mouse cursor over to the lower right side of the screen.
- Left click or tap on the Search feature presented there.
- In the search dialog box write the following: “Identify and repair” without the quotes.
- When the search has finished left click or tap on “Identify and repair network problems”
- Follow the instructions on the screen to finish the troubleshooting issues.
- Reboot your operating system.
- Check again if you can connect your Laptop to the Homegroup.
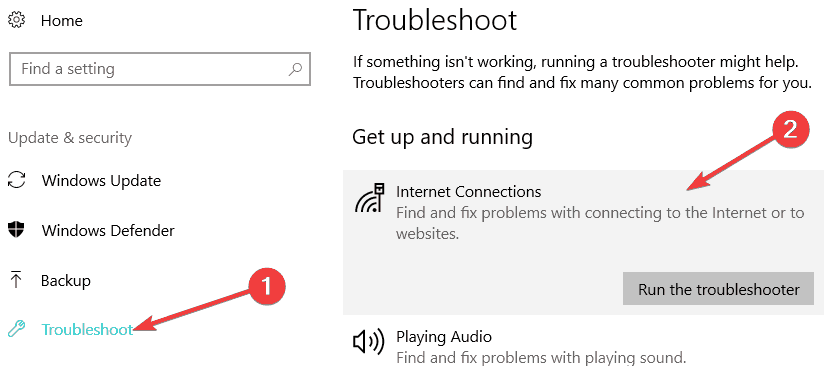
Note: The steps listed above to repair network problems apply only to Windows 8.1 systems. On Windows 10, you can simply go to Settings > Update & Security > Troubleshoot > select Internet Connections and run the troubleshooter.
And you are done, we hope one of these methods helped you solve the Homegroup issues that you are having in Windows 10, 8.1. If the problem persists, and you still can’t join your HomeGroup, here are a few additional troubleshooting solutions that you can use:
- Fix: Unable to Connect to Internet in Windows 10, Windows 8.1 and 8
- Full Fix: My internet connection is limited in Windows 10
- Fix: No Internet Connection after installing Windows updates
- Fix: Antivirus is blocking Internet or Wi-Fi network
Read our disclosure page to find out how can you help Windows Report sustain the editorial team. Read more


Improve this guide


User forum
0 messages