Windows 11 Screen Timeout Not Working: 5 Ways to Fix It
Find out the solutions that worked for others!
5 min. read
Updated on
Read our disclosure page to find out how can you help Windows Report sustain the editorial team. Read more
Key notes
- When Windows 11 screen timeout is not working, the display either turns off too soon or doesn't at all.
- The problem arises due to misconfigured settings or issues with the graphics driver.
- To get things running, update the BIOS, roll back driver update, or perform a clean boot, amongst other solutions.
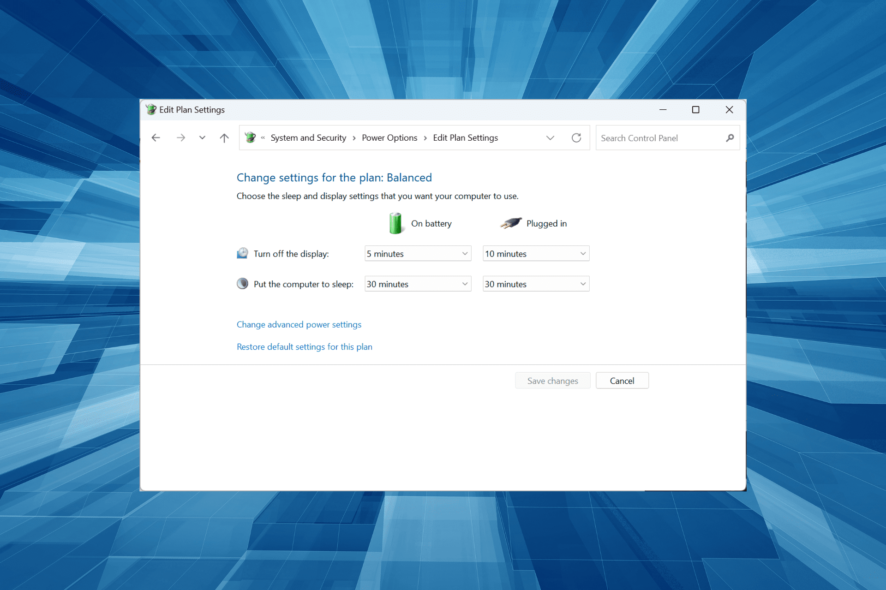
Screen timeout setting is one many users, and even administrators work with for various reasons. It helps conserve battery life though some prefer the display to be on even after minutes of inactivity. And this poses a problem when Windows 11 screen timeout is not working.
While it’s easy to change screen timeout in Windows 11, there isn’t much users can do without additional support when the feature is not working. And that’s what we are for! So, let’s learn about the problem and the solutions that work.
Why my screen timeout is not working?
Here are a few reasons screen timeout is not working in Windows:
- Corrupt or outdated graphics driver: In most cases, it was an issue with the graphics driver that triggered the error. Usually, running a corrupt or outdated driver is the reason.
- Misconfigured settings: Several settings affect how the timeout feature works, and if these are misconfigured, you are likely to face issues.
- Issues with the recent Windows update: For some users, the problem started after updating to a new version of the OS, which points to a bug in it.
What can I do if Windows 11 screen timeout is not working?
Before we proceed, try these quick solutions first:
- Install any pending OS updates if Windows 11 lock screen timeout is not working.
- Check for any available newer versions and update the BIOS.
- Disconnect all non-critical external peripherals from the computer since these could be preventing the display from turning off.
If none work, move to the fixes listed next.
1. Change the screensaver settings
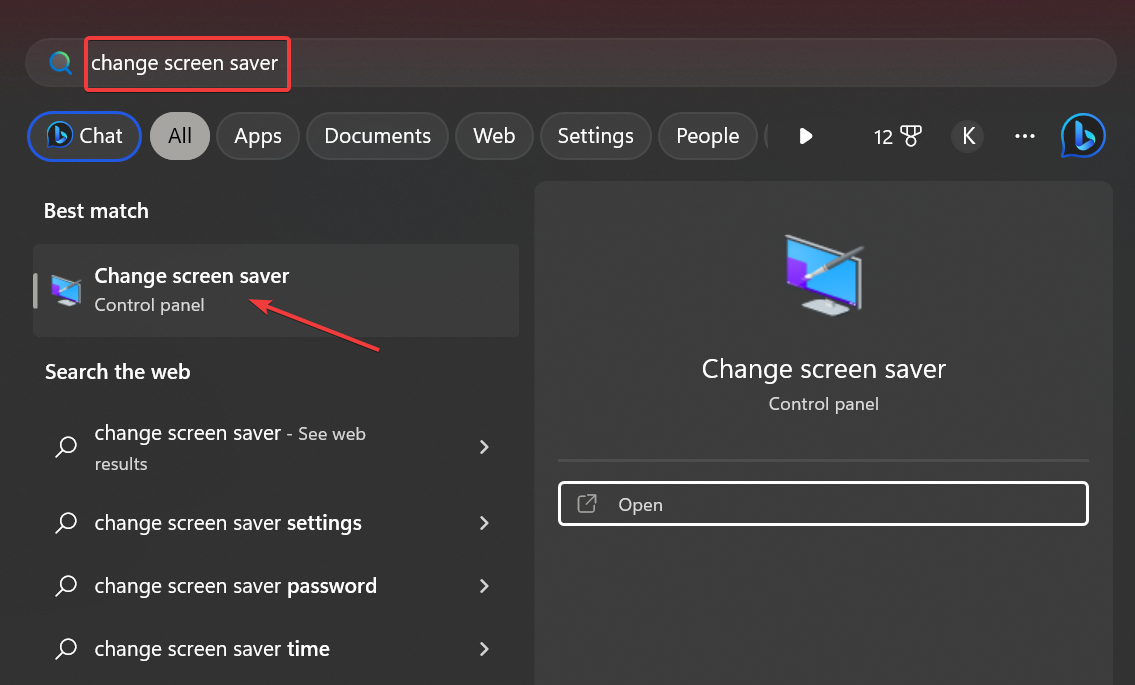
- Press Windows + S to open Search, type Change screen saver in the text field, and click on the relevant search result.
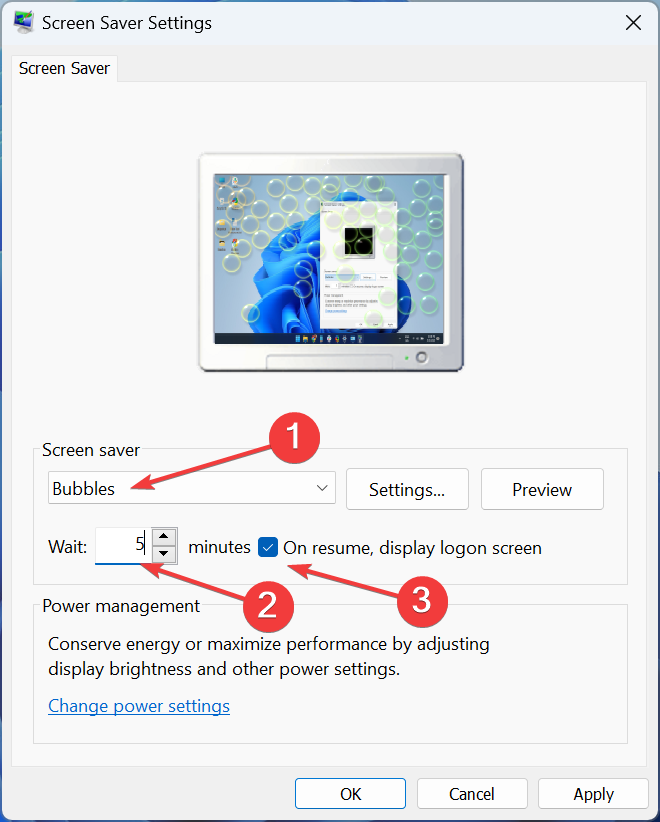
- Select the desired screensaver from the dropdown menu, enter a wait time, and tick the checkbox for On resume, display logon screen.
- Once done, click on OK to save the changes.
A quick solution that works for many when Windows 11 screen timeout is not working is to reconfigure the Screen Saver Settings. This will allow you to configure the screen timeout settings in Windows 11.
2. Update the graphics driver
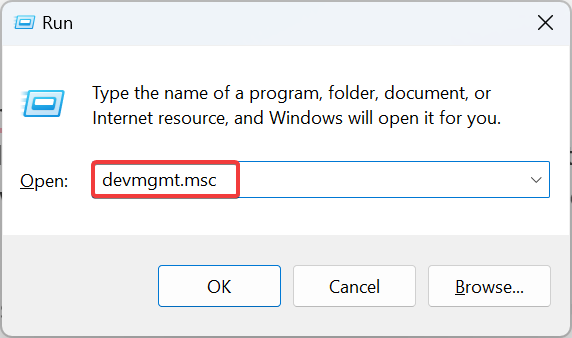
- Press Windows + R to open Run, type devmgmt.msc, and hit Enter.
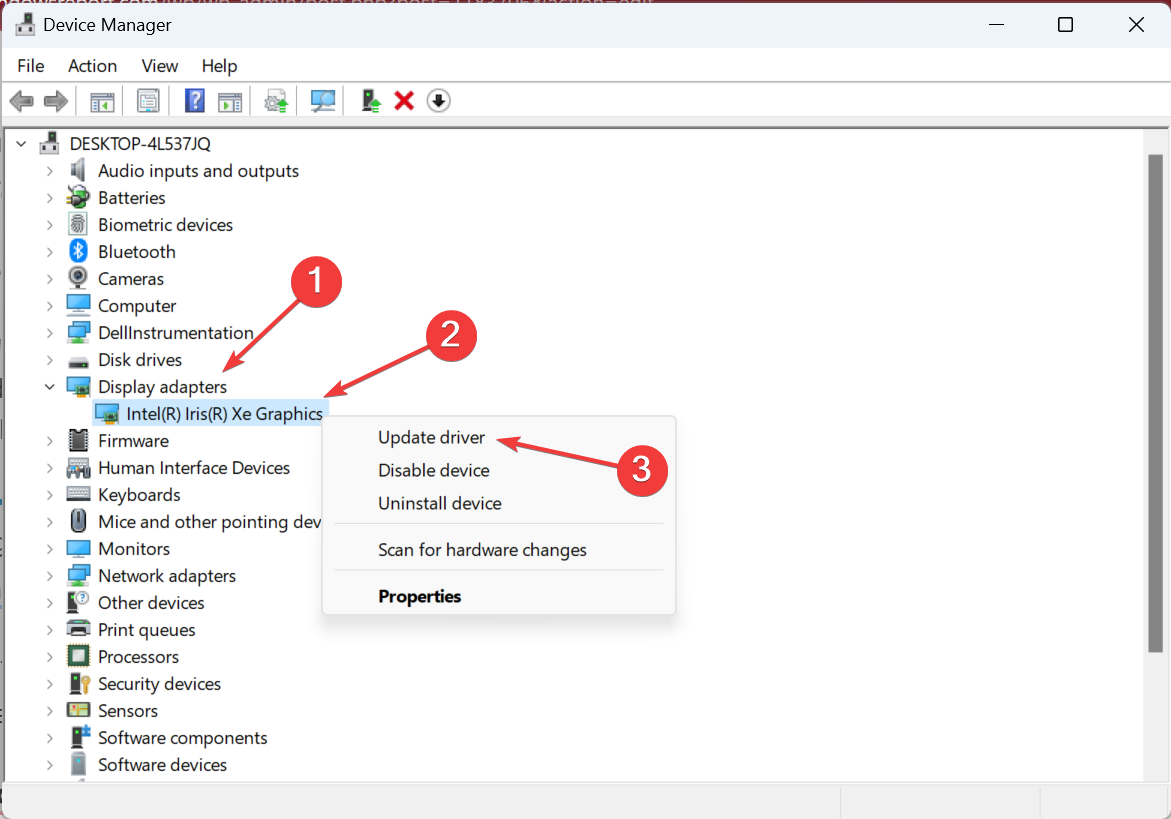
- Expand the Display adapters entry, right-click on the listed graphics card, and select Update driver.
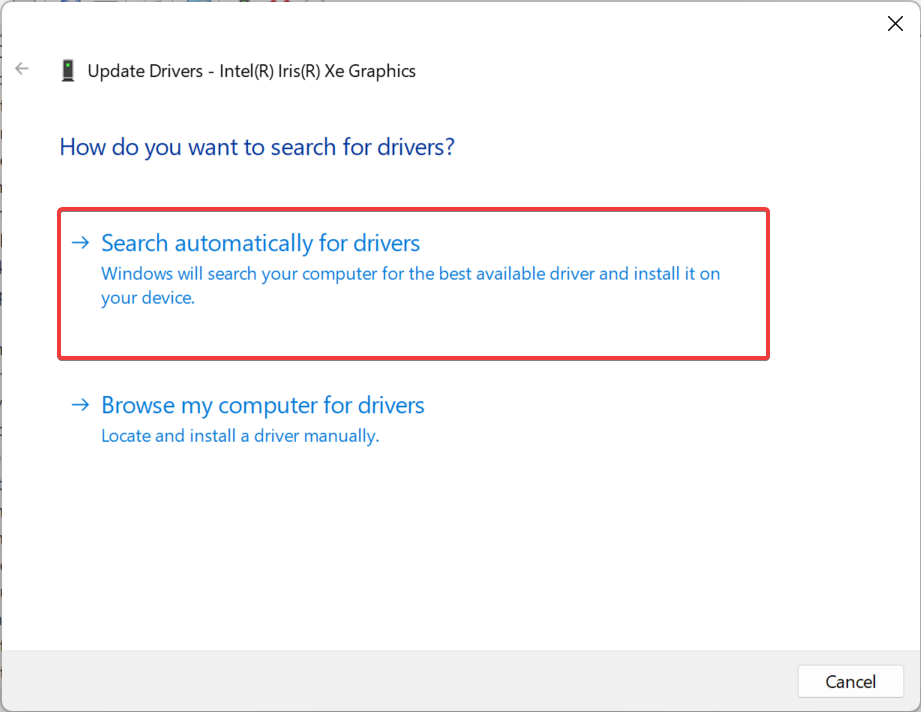
- Now, choose Search automatically for drivers, and Windows will install the best available one from the PC.
When facing issues with screen timeout settings, updating the graphics driver could get things up and running in no time. Updating drivers will also work when Windows 10 screen timeout is not working.
Remember, the offline update method doesn’t work in every case, so you may as well check the manufacturer’s website and manually install the latest driver.
- Download and install the Outbyte Driver Updater app.
- Launch the software and wait for the app to detect all incompatible drivers.
- Now, it will show you a list of all faulty drivers to select the ones to Update or Ignore.
- Click on Update & Apply Selected to download and install the newest versions.
- Restart your PC to ensure the applied changes.

OutByte
Keep your GPU in a flawless state without worrying about possible driver issues.3. Roll back graphics driver
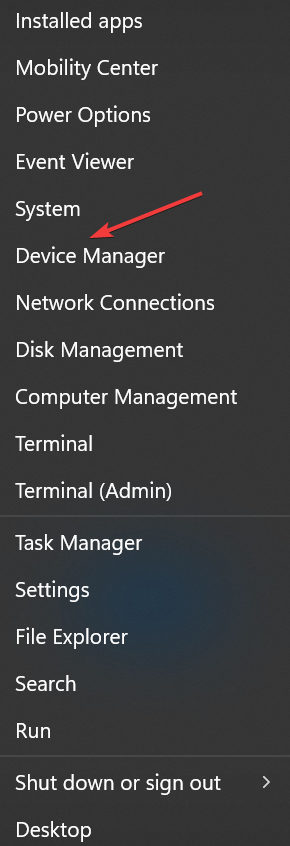
- Press Windows + X to open the Power User menu, and select Device Manager from the list.
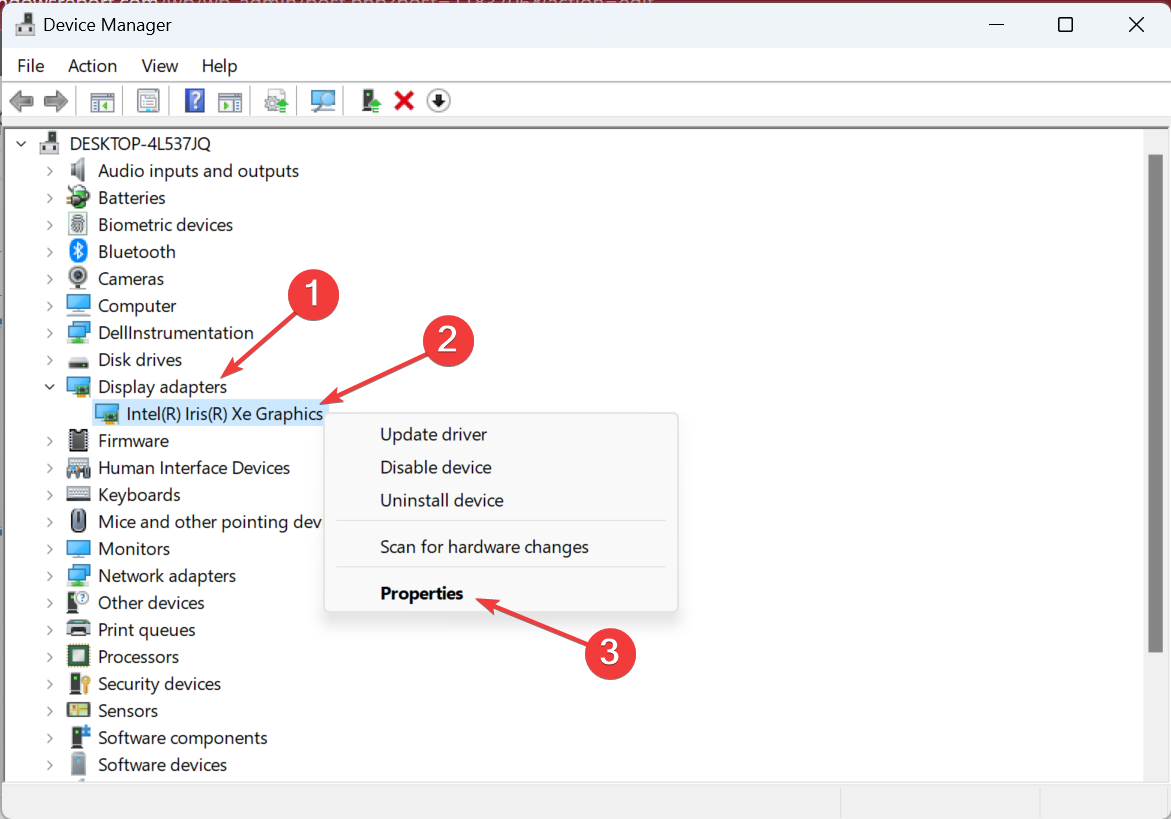
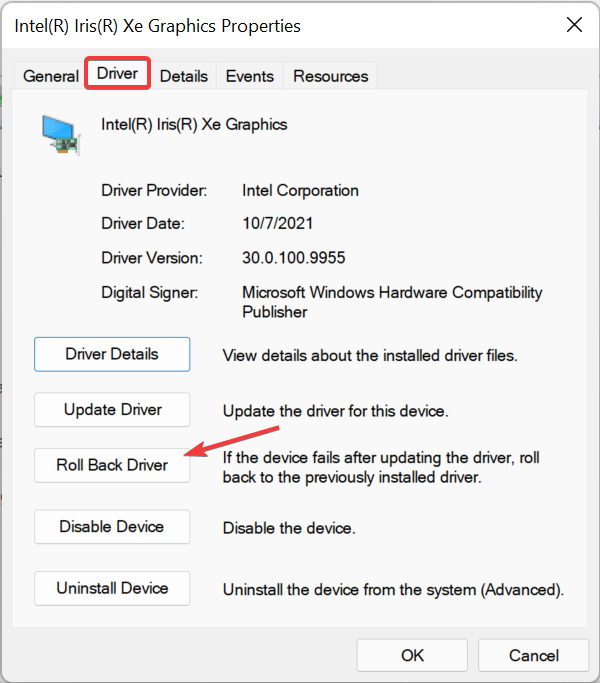
- Double-click on the Display adapters entry, right-click on the graphics adapter, and choose Properties.
- Navigate to the Driver tab, and click on Roll Back Driver.
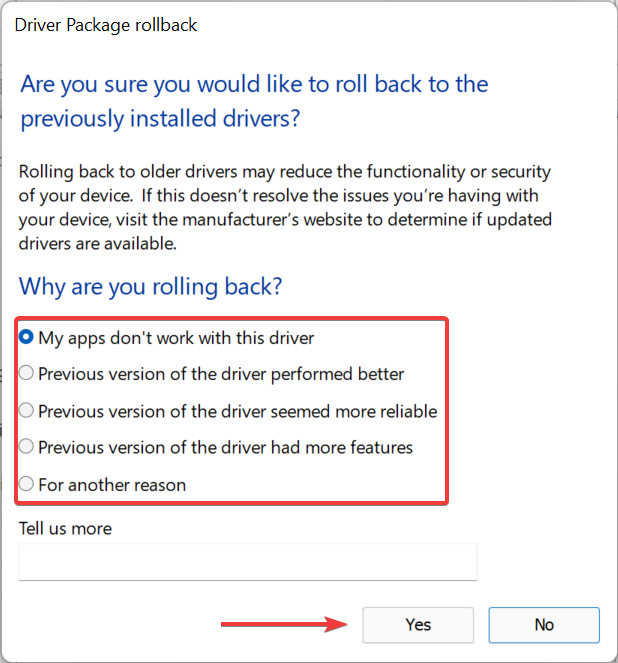
- Select a reason for rolling back the version, and click on Yes to proceed.
- Once done, restart the computer for the changes to come into effect.
If Windows 11 screen timeout is not working since a driver update, rolling back the driver could do the trick. It’s simple, and you can always reinstall the version if things don’t work out.
4. Perform a clean boot
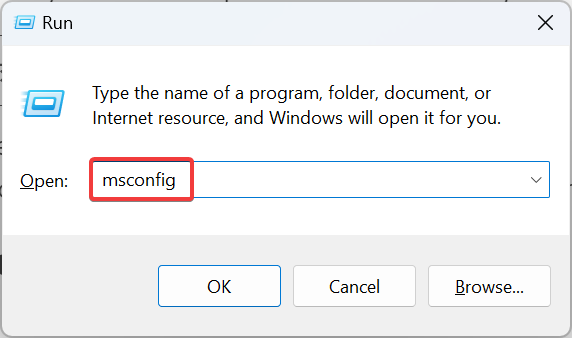
- Press Windows + R to open Run, type msconfig in the text field, and click hit Enter.
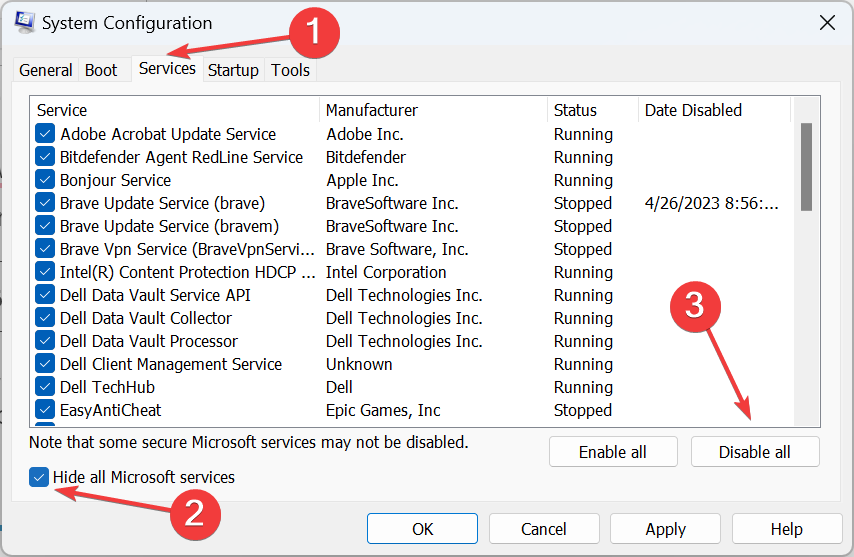
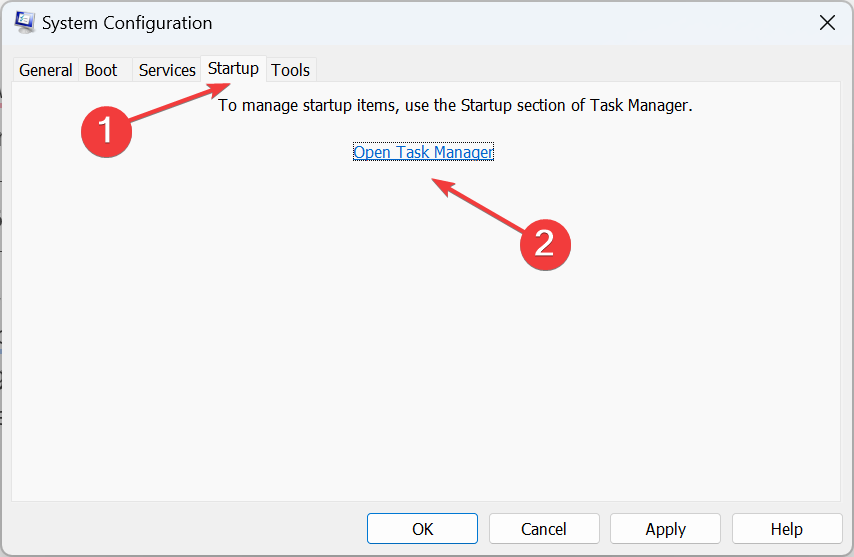
- Go to the Services tab, tick the checkbox for Hide all Microsoft services, and then click on Disable all.
- Now, navigate to the Startup tab, and click on Open Task Manager.
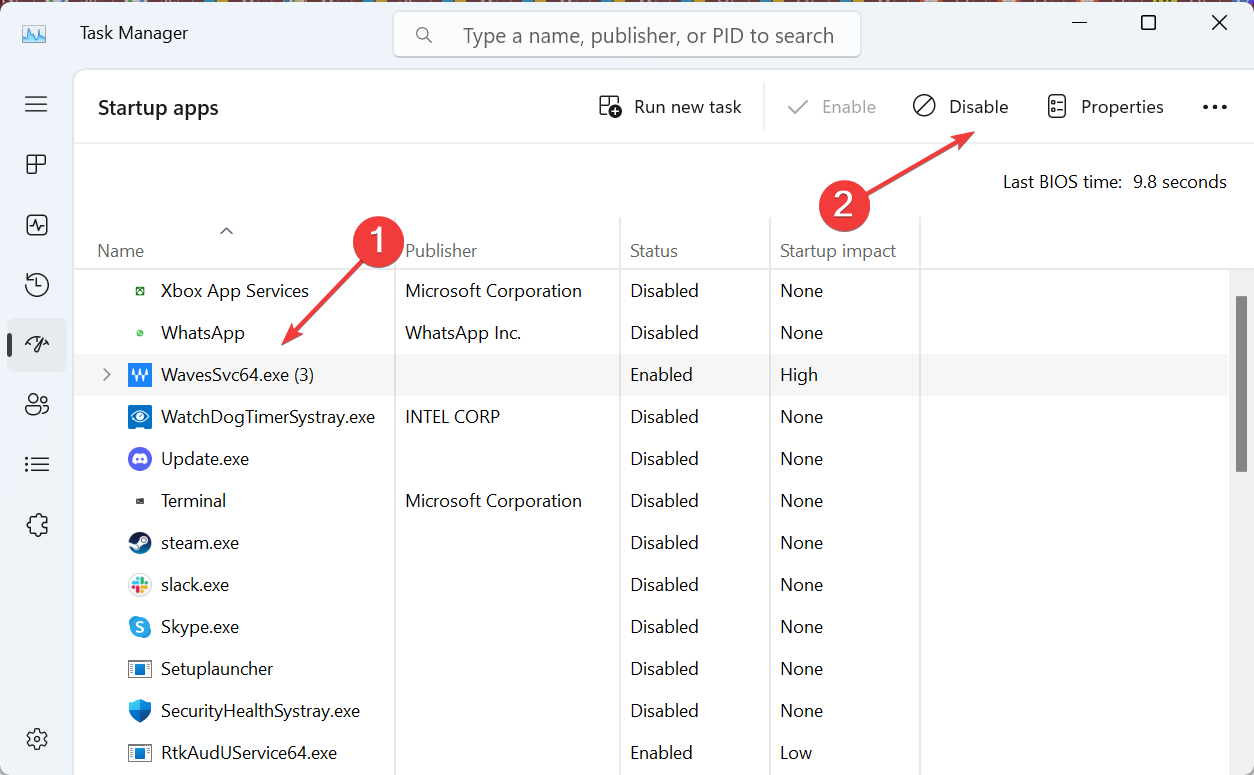
- Select any apps that read Enabled under the Status column, and click Disable.
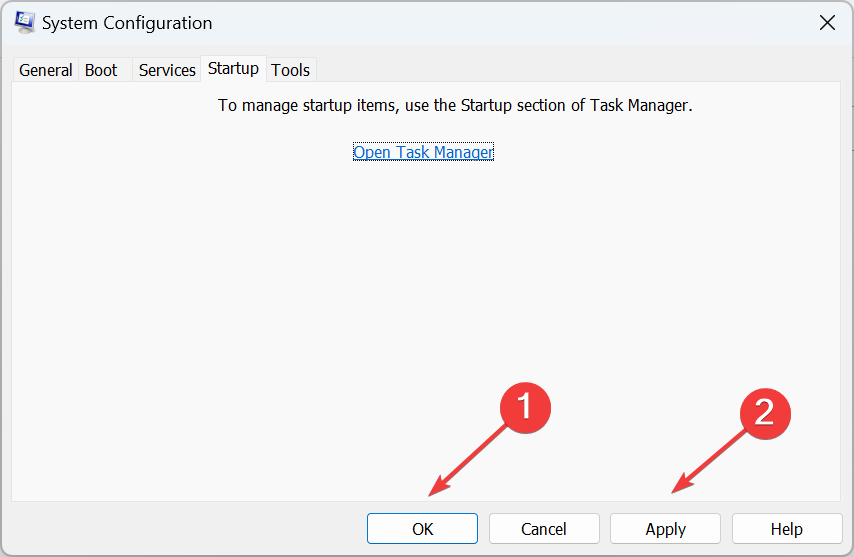
- Once done, head back to System Configuration, and click on Apply and OK.
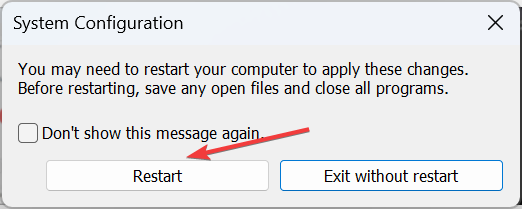
- Click on Restart in the prompt that appears.
- After the PC restarts, check if the problem is fixed. If yes, one of the processes or services you disabled earlier is the underlying cause.
- Now, enable the services and startup apps one at a time unless the problematic one is identified, and then make sure to disable it.
A clean boot provides an optimal troubleshooting environment to identify the reason Windows 11 screen timeout is not working. And in most cases, things should work out once you are done. In case it’s an app, make sure you uninstall the app to prevent the error from reappearing.
5. Uninstall recent updates
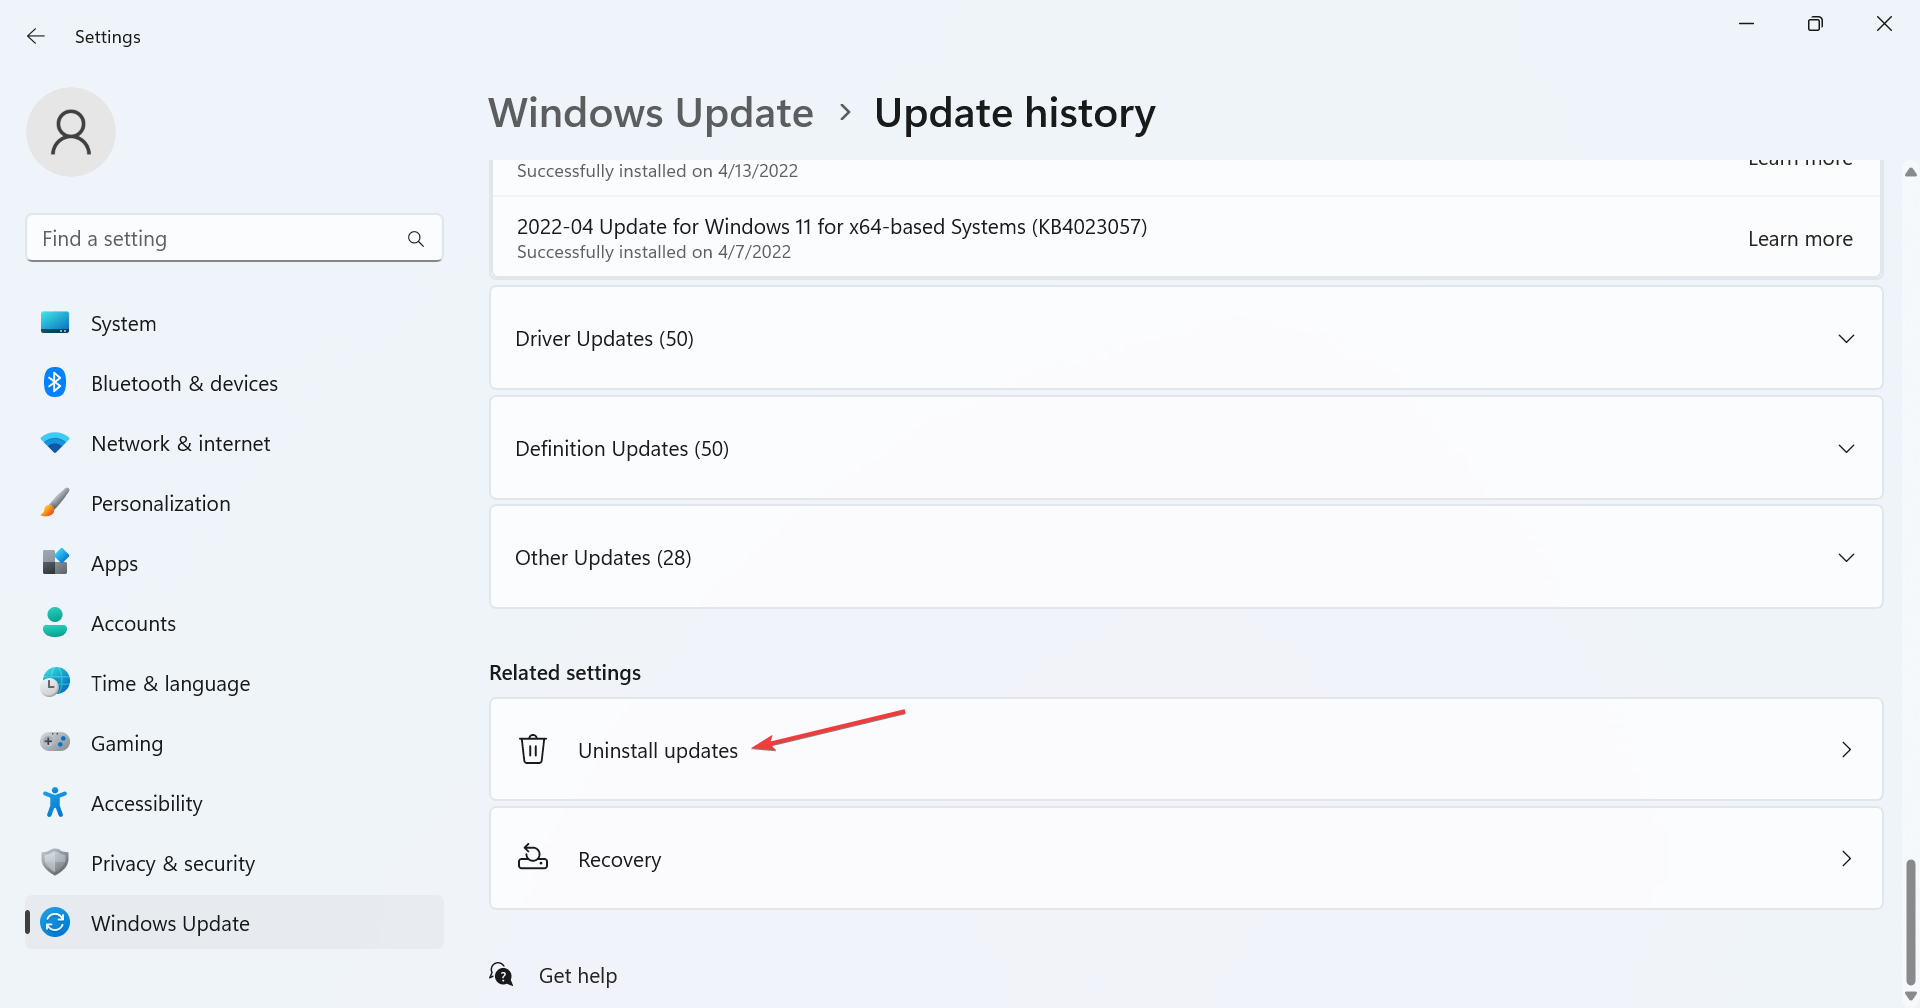
- Press Windows + I to open Settings, select Windows Update from the navigation pane, and click on Update history.
- Scroll to the bottom and click on Uninstall updates.
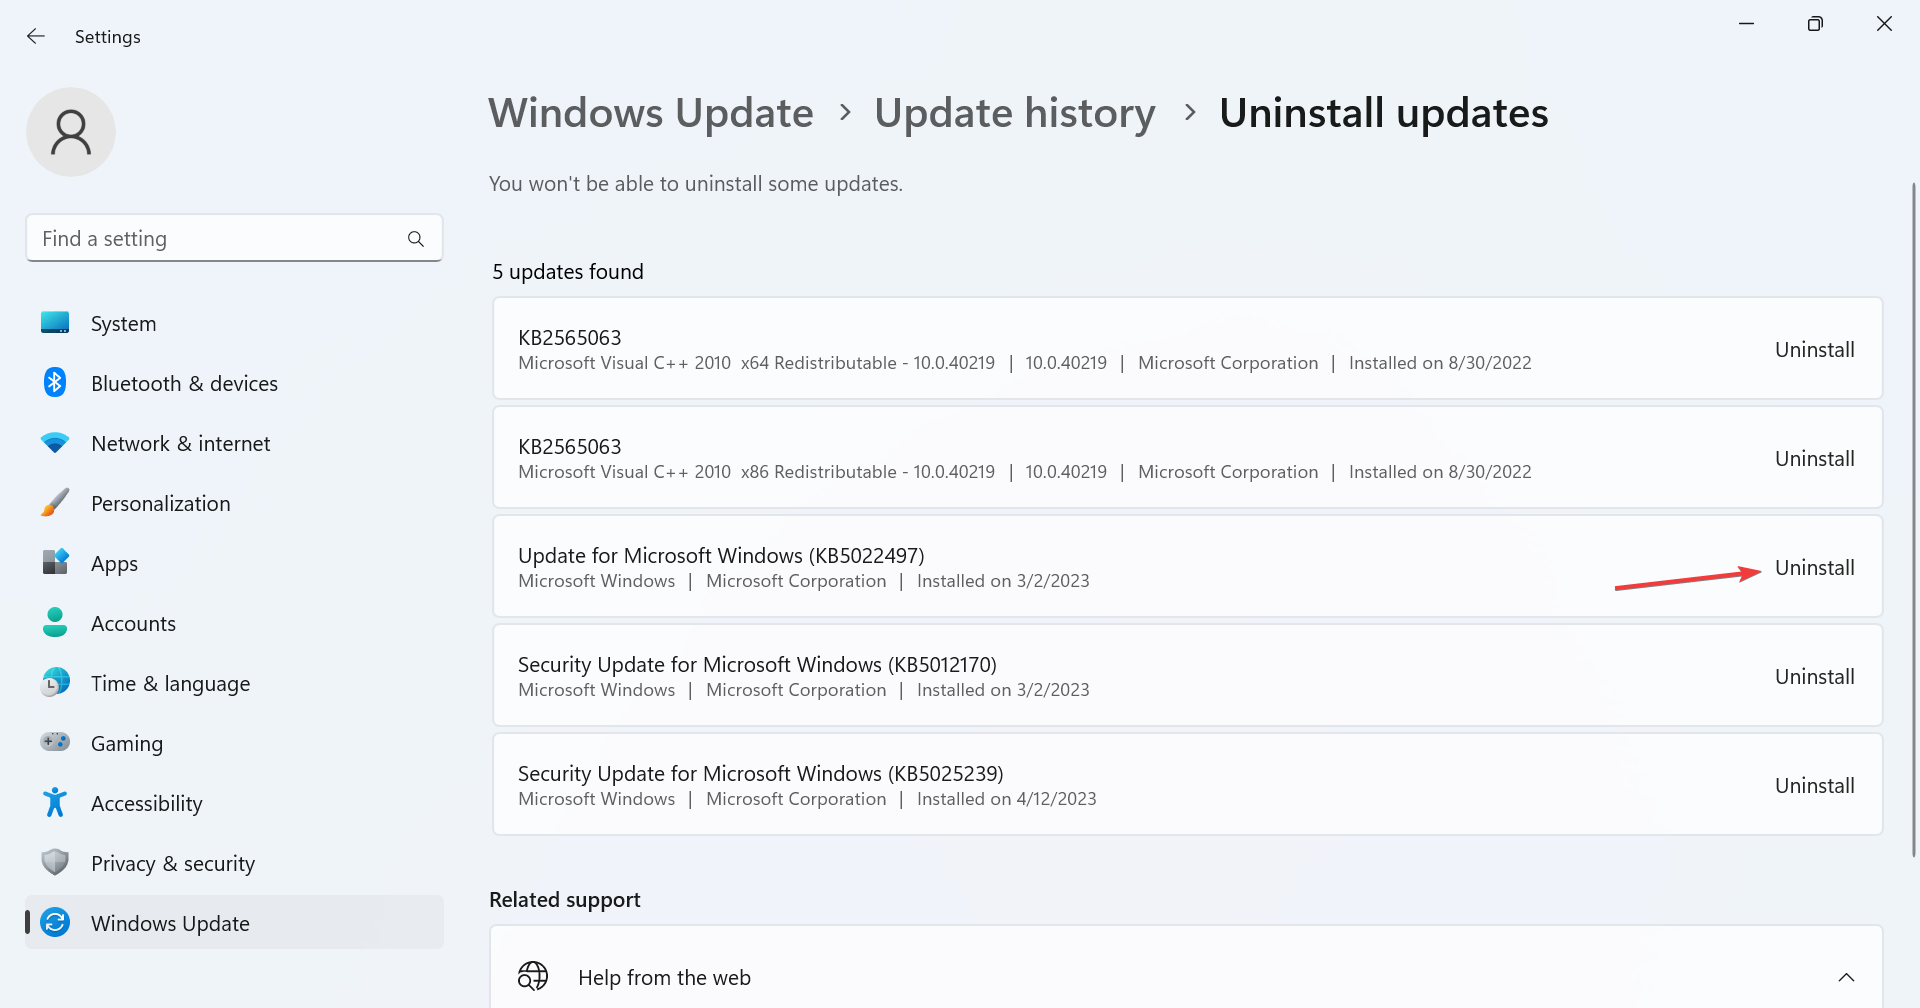
- Click Uninstall next to the recently installed update, after which the error first appeared.
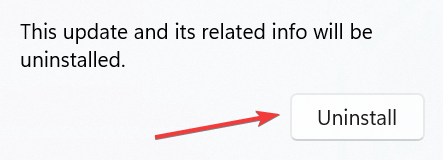
- Again, click Uninstall in the confirmation prompt.
- Restart the computer once done.
If the Windows 11 screen timeout stopped working after installing a newer version, uninstalling the update should work. And by now, the problem should be fixed for good.
Before you leave, check some quick tips to make Windows 11 run faster than before.
For any queries or to share the solution that worked for you, drop a comment below.




User forum
0 messages