PUBG Error Could Not Connect [All Fixes]
Have you run into the PUBG Error “Could not connect” warning message on your PC, Xbox, or PlayStation? Try these proven fixes to get back to your gameplay.
Since PUBG is an online game, it relies heavily on server connectivity. This is one of the most common errors that stop you from logging in and as a result, PUBG won’t launch.
I’ve tested many fixes for this pressing issue to discover these sure-shot methods. So, let’s get down to business!
Potential Causes
If you’re seeing this error, you’re most likely from a country where this game app is banned or not yet available. However, if you believe you’re from one of the allowed countries and still facing the issue, these are the root causes you need to look into:
- PUBG servers aren’t working or facing extraordinary user loads.
- The PC antivirus or firewall is blocking the game app.
- Your ISP might be blocking PUBG.
- There’s a problem in the internet configuration, like DNS and IP addresses.
- The game setup files are corrupted.
- Too many bandwidth-hogging background processes might be blocking PUBG from accessing its own servers.
How To Fix PUBG Error “Could Not Connect”
Find below the tried and tested approaches to fix this annoying PUBG server connectivity issue:
Perform These Basic Checks and Fixes First
- Check PUBG Server Status: Visit this PUBG X handle to skim for posts that indicate server maintenance, unexpected downtimes, or updates. If servers are down, take a coffee break and check back later.

- Restart the internet modem or router.
- Relaunch the game.
- Restart Steam.
- Close apps that consume high bandwidth.
- Launch Game With the EXE File: On the Steam app, go to the Steam Library, right-click on the PUBG game title, hover your cursor over Manage, and select Browse local files. Windows File Explorer will open the locally installed files and folders. Enter the Binaries directory to find the game EXE. Double-click on it to launch it. You can also use this local storage address to find the EXE file:
C:\Program Files(x86)\Steam\SteamApps\common\PUBG\TslGame\Binaries\Win64
Use a Virtual Private Network
Use a system-wide VPN software, like Windscribe to access the PUBG game server if you’re playing it on a PC. Don’t forget to switch to a premium server that offers a low latency ping and highspeed browsing experience.

Also, you can switch to an address closer to a PUBG game server location. For example, if you’re in New York, use high-speed VPN software to switch to IP addresses for states like Iowa, Virginia, Texas, Ohio, and California.
Here are more servers for you if you’re located in any other continent than the Americas:
- São Paulo, Brasil
- Ireland
- London, UK
- Sydney, Australia
- Mumbai, India
- Frankfurt, Germany
- Seoul, Korea
- Singapore.
These are the states where the game developer has placed the game servers. The closer you’re situated to the server, the better speed and ping you’ll get.
Try the Cloudflare Warp App
- Download and install the Cloudflare Warp software.
- Launch the app from the Desktop or Start menu.
- Its user interface will open in the System Tray area.
- It should be in the Disconnected state.

- Click on the toggle button to activate the app’s services.
- It should now show the Connected status.

- Click on the Cogwheel icon in the bottom right corner.
- A context menu will open. There, select the 1.1.1.1 with WARP option.

Add PUBG EXE to Local Antivirus and Firewall
Though the local antivirus and firewall shouldn’t tag the PUBG game EXE as malware and block it from accessing the web, you shouldn’t take any chance. Here’s what you need to do:
Whitelist an App in Antivirus
- Bring up the Windows Settings app by pressing the hotkey Windows + I.
- Click on the Update & Security settings menu.
- Select Windows Security on the left side navigation panel.
- Now, click on the Virus & threat protection option on the right.

- Scroll down to the Manage settings link and click on that.

- You should now see the Virus & threat protection window.
- Scroll down to the bottom and click on the Add or remove exclusions option.

- On the Exclusions screen, click on the Add an exclusion button.
- Choose File in the context menu.

- Use the Windows File Explorer dialog box to navigate to the PUBG game EXE file.
- Select that and click Open.

From now on, the built-in Windows Security app won’t block the PUBG EXE from running or accessing the web.
If you’re using an additional antivirus on top of Windows Security, go to the Settings or Options menu of the software to look up the Exclude apps or Allow app through the antivirus option.
Whitelist an App in Firewall
- Open the Windows Security menu in Windows Settings.
- Click on the Firewall & network protection option on the right side below the Protection areas.

- Select Allow an app through firewall on the next dialog box.

- You should enter the Allowed Apps window.
- Click on the Change settings button in the top right corner.

- Now, find the PUBG game app in the Allowed apps and features table and checkmark it.
- Click OK to save the settings you just changed.
Change Network DNS Address
You’re probably using the default DNS settings set by the ISP. Here’s how you can modify them to set up a custom address that’s better:
- Right-click on the Internet access or Wi-Fi icon in the System Tray.
- Choose the Open Internet & Network Settings option.

- The Network status dialog will open.
- Scroll down to the Advanced network settings section and click Change adapter options.

- Select the active network on the Network Connections dialog box, right-click, and select Properties.

- Double-click on the Internet Protocol Version 4 option. If you’re using IPv6, click on the appropriate protocol below IPv4.

- On the IPv4 Properties dialog, select Use the following DNS server addresses option and enter the following into the respective fields:
- Primary: 8.8.8.8 (Google DNS)
- Secondary: 8.8.4.4 (Google DNS)
- Primary: 208.67.222.222 (OpenDNS)
- Secondary: 208.67.220.220 (OpenDNS)
- Use any of the above pairs.
- Click OK to save.

Switch to IPv4 from IPv6 or Vice Versa
Since the IPv6 adoption rate is very low, devices using this protocol often get faster access to game servers than the conventional IPv4 protocol. Also, networks built for IPv6 adoption come with modern networking technologies, helping the users enjoy low latency and efficient bandwidth.
If you’re facing the PUBG Error: Could not connect issue on an IPv4 network, do the following:
- Login to the router administrator console by entering 192.168.1.1 in your browser’s address bar.
- If this doesn’t work for you, look at the back of the router for the admin console’s IP address.
- Enter your user ID and password to access the router control portal.
- Click on the Advanced tab at the top of the page and select IPv6 from the left-side navigation panel.
- Use the toggle button to enable IPv6.
- Choose the type of connectivity, like Static IP, PPPoE, Dynamic IP, etc., from the Internet Connection Type drop-down menu. If you don’t know which one to use, contact your ISP.
- Hit the Connect button.
- Click Save.

- Now, go to the Network Properties dialog box on the PC. You’ll find the steps in the previous troubleshooting method above in this guide.
- Uncheck the checkbox for the IPv4 protocol.
- Click OK to save the new configuration.

- Restart the Wi-Fi router.
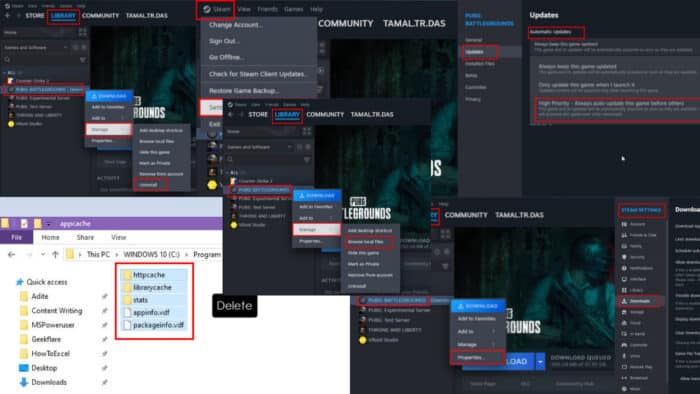
Update PUBG From Steam
- Open Steam on the PC and go to the Library tab at the top.
- Now, select the PUBG game title in the left-side navigation panel.
- Right-click and select Properties from the context menu.

- You should see the General dialog box.
- Navigate to the Updates dialog.
- Click the Automatic Updates drop-down menu and select the High Priority option.

- Select the Background Downloads drop-down menu and choose the Allways allow background downloads option.
- Steam will update PUBG in no time if any updates are pending.

Verify Game Files on Steam
- Navigate to the General dialog for the PUBG game title on Steam.
- You’ll find the steps in the earlier section.
- Now, select the Installed Files option from the left-side navigational panel.
- Hit the Verify integrity of game files button on the right.

Clear PUBG Steam Cache
- Click on the Steam icon in the top-left corner.
- Select Settings.

- Go to the Downloads menu on the left.
- Click on the Clear Cache button in the right-side menu.

- Now, visit this directory on your Windows PC:
C:\Program Files(x86)\Steam\appcache- Delete everything within the folder.

- Now, attempt the Verify Game Files on Steam method as shown earlier.
- Restart Steam and launch PUBG.
Here are the directories for the Steam cache for other supported devices:
- Mac
Contents/Library/Application Support/Steam/appcache- Linux
/home/yourusername/.steam/steamapps/commonReset Consoles
If you’re facing the PUBG Error: Could not connect warning message on a gaming console, you can try the following instructions:
Resetting an Xbox
- Press the Xbox button on your controller to open the guide.
- Navigate to Profile & system.
- Select Settings.
- Scroll down and choose System.
- Select Console info.
- Choose Reset console.
- Select Reset and keep my games & apps.
You can now test the game’s performance.
Resetting a PlayStation 4
- Go to the Function screen or area and select Settings.
- Scroll down and select Initialization.
- Choose Restore Default Settings from the options.
- Go through the list of items that will be affected by this action. Then, click Restore.

- Confirm your choice by selecting Yes when prompted.
- Wait for the PS4 to reset, which may take a few minutes.
- After the reset is complete, your PS4 will restart with default settings.
Before attempting this method, ensure you’ve got the following handy:
- Your PS4 login details.
- Wi-Fi network SSID and password.
Uninstall and Reinstall PUBG
Finally, you can delete the game app from your PC or console and re-install it again through the cloud download method.
Uninstall Using Steam
- Go to the PUBG game title in the Library tab of Steam.
- Right-click and hover the cursor over Manage.
- Click on the Uninstall option.

- Once uninstalled, look up PUBG in the Steam Library and hit the Install button.
Remove From Xbox
- Use the navigation buttons on your Xbox controller to select My games and apps on the Home Screen or Dashboard.
- If you can’t find My games and apps there, tap the Xbox button on the game controller.
- The left-side navigation panel will open.
- Scroll down once to select My games & apps.
- Press A on the controller to access this menu.

- Select See all and press A again.
- You should now see all the installed games.
- Select the PUBG game title and press the three-line menu button on the controller.
- Scroll down to the Uninstall option in the context menu that shows and press A.

- Select Uninstall all on the warning dialog box.
- Once removed, open the Microsoft Store app on the device and look up PUBG.
- Select the game from the search results page.
- Choose Install on the right side and press A to start the installation process.
Uninstall From PlayStation 4
- Open the PS4 Library app.
- Select Games in the left-side navigation panel.
- On the right, select the PUBG game title and press X.
- A right-side navigation panel will show up.
- Select Delete and press X to confirm.

- To install PUBG again, go to the Purchased menu in the PS4 Library app.
- Find the PUBG game title, select it, and press X.
- Select the Download button in the context menu and press X again to start the installation process.
Summary
You can fix the PUBG Error “Could not connect” on your PC, Xbox, or PS4 with these troubleshooting ideas. However, you should try them in the order they appear to avoid missing out on the simplest solutions and save time.
Comment below to let me know the method that worked for you.
You can also learn what to do when Steam games won’t launch and games keep crashing without errors.
Read our disclosure page to find out how can you help Windows Report sustain the editorial team. Read more


Improve this guide


User forum
0 messages