How to Upgrade From Windows 7 to 10 Without Losing Data
Follow our steps to keep your data intact
3 min. read
Updated on
Read our disclosure page to find out how can you help Windows Report sustain the editorial team. Read more
Key notes
- We made a list of methods for how to update your OS without losing data.
- One of the safest options is to use specialized programs.
As it is with all operating systems, one cannot be supported forever by Microsoft. That is why upgrades and new versions are constantly being rolled out so that users can enjoy the best that technology has to offer.
Such is the case with Windows 7 and how Windows 10 is supposed to replace it. Even if you do buy the Extended Support for it, sooner or later you will still have to perform the upgrade.
More so, maintaining the Extended Support can become extremely costly, so doing it as soon as possible is recommended.
Of course, the first thing that pops into everyone’s mind is how can they upgrade to Windows 10 without losing any of their precious data.
Since this is a very highly discussed subject, we’ve decided to list the options that you have for when you need to upgrade from Windows 7 to Windows 10.
How do I upgrade to Windows 10 without losing my data?
1. Use dedicated third-party software
When migrating to a new operating system but still wanting to save all of your personal and work files and folders, the best way to do it is to use a data transfer utility.
There are migration programs available to transfer data, folders, and user profiles from a Windows 7 to a Windows 10 OS. While upgrading the operating system on the same computer, files and application settings can be maintained.
In our scenario, you will be able to migrate all data from your PC while switching the operating system, which will be done automatically thanks to great utilities that are available at any time.
Laplink PCmover is a neat software tool that is made specifically to help you upgrade from Windows 7 to Windows 10.
It automatically transfers, restores, and upgrades all selected files, folders, settings, user profiles, and even applications from an old PC to a new PC or operating system, including Windows 10.
Since most applications are installed ready-to-use on the new PC, you won’t need to find old CDs, previously downloaded programs, serial numbers, or license codes.
The user interface is extremely simplistic, and you are guided through the process in a wizard-like fashion.
2. Use the Microsoft Media Creation Tool
The Media Creation Tool is a proprietary tool developed by Microsoft, and it is used to upgrade your current OS to the latest available version.
For those that still have Windows 7, you must know that you must first buy Windows 10, or have a valid Windows 10 serial number.
If you don’t have your own copy of Windows 10, you should check out the links below:
Using the Media Creation Tool is fairly simple, as you need to just follow these steps:
- Go to the Microsoft Media Creation Tool’s website
- Press the Download tool now button
- Launch the tool once it has been downloaded
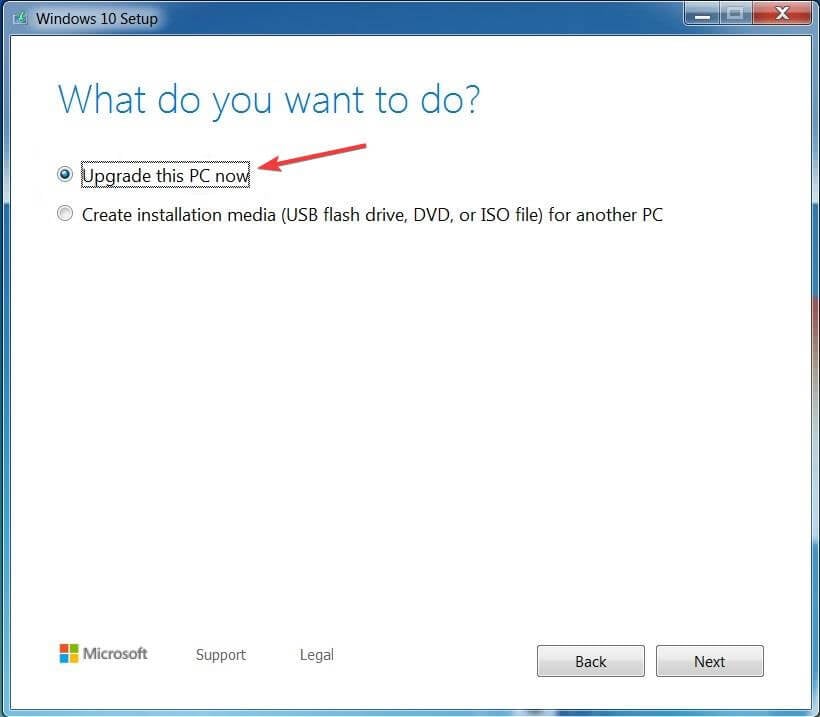
- In the What do you want to do menu, select Upgrade this PC now
- Select Next
- Input your Windows 10 license key
- Select Next
- Agree with the licensing terms and conditions
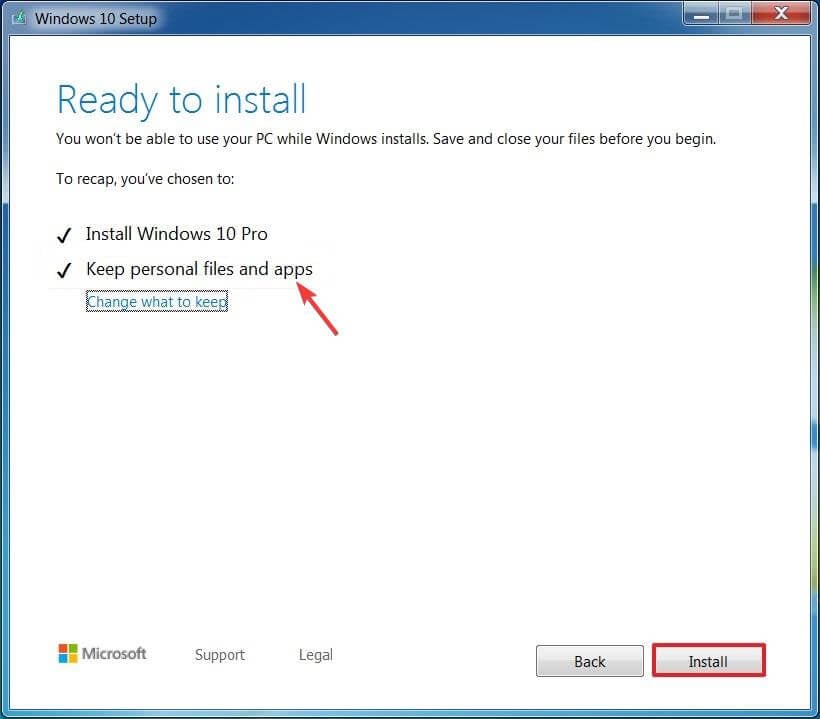
- Select Keep personal files and apps
- Click on Install
By following these steps, you should be able to upgrade your PC from Windows 7 to Windows 10 while keeping all personal files and user profiles.
One thing you need to remember is that, unlike the first method, using the Media Creation Tool has proven to be a bit less efficient as far as data migration goes.
While this doesn’t mean that you will lose any data, using Laplink is generally the preferred solution.
How do you plan on upgrading to Windows 10? Let us know in the comment section below.



User forum
0 messages