Acer Predator Sense Not Installing: 7 Ways to Fix the Error
Installing Microsoft .NET Framework worked for most

In the last few years, I have seen countless complaints of Acer Predator Sense not installing on a Windows PC. Even users who were reinstalling the app faced issues after uninstalling it. And surprisingly, neither Acer nor Microsoft, were of any help!
The installation error usually appears due to missing permissions, absence of critical components, misconfigured boot settings, conflicting leftover files from the previous installation, and outdated drivers.
Before you proceed to the solutions, restart the PC and install all pending Windows updates. Also, try getting Acer Predator Sense for another series from the official website. For instance, download the software for Predator Helios 16 on Predator Helios Neo 16!
What can I do when Acer Predator Sense is not installing in Windows?
1. Run the installer as an administrator
- Right-click on the Predater Sense installer setup (.exe file), and select Run as administrator.

- Click Yes in the UAC prompt.
- Follow the on-screen instructions to complete the installation.
If missing permissions are responsible for Acer Predator Sense not installing or working, running as administrator will fix things in no time!
2. Install the Microsoft .NET Framework
- Right-click on the downloaded ZIP file, and select Extract all.

- Choose an extraction path for the files and click on Extract.
- Now, run the Acer Predator Sense installer setup.

- While it’s running, minimize the setup, open the extracted files, go into the UWP folder, and run all the APPX files that have Microsoft in their names. If an installation fails, move to the next one.
- After running all the APPX files and installing the Microsoft .NET Framework, move back to the Acer Predator Sense setup and check if the installation moves forward.
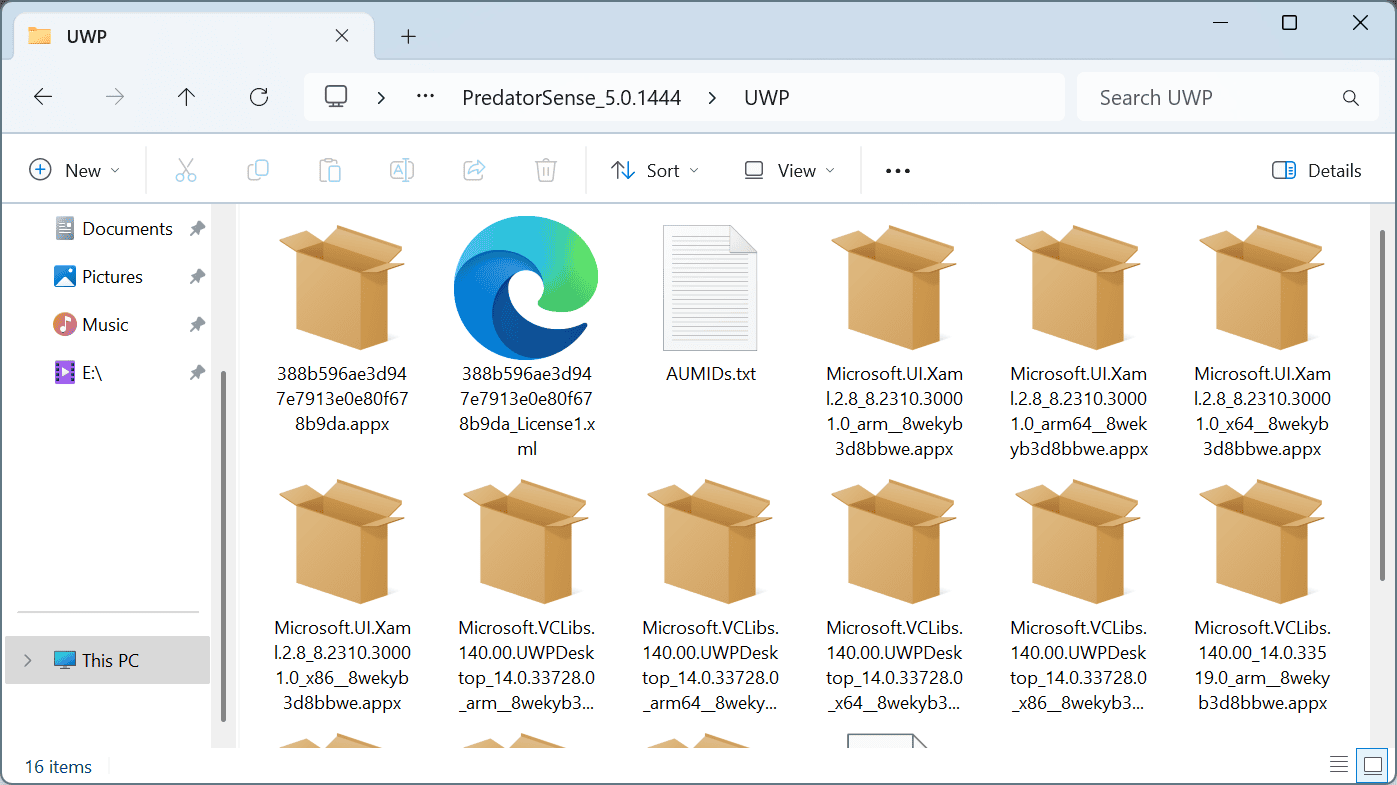
3. Run the APPX file
- Open the extracted files, go to the UWP folder, and run the 388b596ae3d947e7913e0e80f678b9da.appx file. It may be named differently on your PC, but the file always has a unique name, making it easily distinguishable.

- Follow the on-screen instructions to complete the installation.

- Finally, run the installer setup for Acer Predator Sense and check for improvements.
4. Clear leftover files and delete Acer Predator Sense Service
- First, restart the computer to terminate all Acer Predator Sense processes.
- Press Windows + R to open Run, type appwiz.cpl in the text field, and hit Enter.
- Select the Acer Predator Sense Service entry from the list, and click Uninstall.

- Follow the on-screen instructions to complete the process.
- Now, press Windows + E to open File Explorer, navigate to Program Files under the C: drive, and delete any files/folders related to Acer Predator Sense.

- Finally, restart the computer, and run the Acer Predator Sense setup.
If Acer Predator Sense is not installing after a clean uninstall, it’s likely that the Acer Predator Sense Service or other critical files were not removed and are conflicting with the new installation. So, you must manually clear them!
A simpler way of doing so is with a top-rated software uninstaller, which automatically wipes all traces of the previous app installation.
5. Disable fast startup
- If you haven’t yet removed Acer Predator Sense, uninstall the app.
- Now, press Windows + S to open Search, type Control Panel in the text field, and click on the relevant result.
- Click on System and Security.

- Click on Change what the power buttons do under Power Options.
- Now, click on Change settings that are currently unavailable.
- Untick the checkbox for Turn on fast startup to disable it, and then click on Save changes.

- Once done, restart the computer, proceed with Acer Predator Sense installation, and check whether it’s now installing without throwing any errors.
For several users, fast startup was conflicting with Acer Predator Sense installation, and disabling fast startup got things up and running!
6. Update all the drivers
- Press Windows + X to open the Power User menu, and select Device Manager.
- Expand the Display adapters entry, right-click on the graphics adapter, and select Update driver.

- Now, click on Search automatically for drivers and wait for Windows to install the best locally available version.

- Similarly, update the other drivers and then reboot the PC to apply the changes.
Running outdated drivers can also be the reason behind Acer Predator Sense not installing on Windows. So, update all the drivers, especially the NVIDIA drivers, as updating these fixed the problem for most!
If Windows can’t find a better version, go to the manufacturer’s website, locate the new releases, and then manually install the latest driver.
7. Uninstall any other Acer software
If you have previously installed another Acer software, say AcerSense 5, any traces of it on the PC can also conflict with the Acer Predator Sense installation. So, check for any of these in the app list and remove them completely!
Now that we have addressed the solutions for Acer Predator Sense not installing, it’s important to highlight that such problems are more common than you would expect. And this shouldn’t be the case, given the number of users that rely on the software. Acer should fix these issues!
Hopefully, you managed to fix the issue and now you can learn about LCD Overdrive in Acer Predator Sense. If you wish to explore other options, check the best Acer Predator Sense alternatives and get one that works best for you.
For any queries or to share what helped you fix the installation issue, drop a comment below.
Read our disclosure page to find out how can you help Windows Report sustain the editorial team. Read more


Improve this guide


User forum
0 messages