The Action Cannot Be Completed Because the File is Open: Fix
Get back to accessing your files on your PC with these detailed fixes
Key notes
- If you are seeing the this action cannot be completed because the file is open in another program error, it might be caused by the accumulation of thumbnails.
- A quick way to fix the issue is to end and restart the activities of the File Explorer from the Task Manager.
- Another effective fix is to use the Disk cleanup feature and repair the HDD.

Computer errors occur sooner or later on any PC. While some are relatively harmless, others, like your PC ran into a problem and needs to restart error will prevent you from performing specific tasks.
One error preventing users from accessing files on their PCs is that the action cannot be completed because the file is open in another program. This problem can be frustrating, as it causes delays when you need to open a file.
The error occurs on various applications and processes, including Excel, OneDrive, Microsoft SharePoint, or Network Share. Dealing with it isn’t very clear because it leads you to believe the app is running, but nothing is open.
This guide will show you how to fix the issue quickly and regain access to your file.
Can’t delete because the file is open? Here’s why:
There are some reasons for the the action can’t be completed because the folder or a file in it is open in another program error:
➡️ One of them is the accumulation of file thumbnails.
➡️ Problems with the File Explorer or the Recycle Bin.
➡️ A wrong group policy setting can prevent you from opening files.
How do you find which program is using a file?
- Open the Process Explorer on your PC. Download it from the official site if you don’t have it.
- Press the Ctrl + F keys to open the search box.
- Type the file’s name, and it will show you the program using it.
This error will prevent you from opening or changing files. Read on to see how to delete a file when you get the action cannot be completed because the file is open in another program error message.
How do I fix the this action cannot be completed because the file is open error?
1. Use Disk Cleanup and repair HDD
- Press Windows key + S and enter disk cleanup.
- Select Disk Cleanup from the menu.

- Select your system drive. By default, it should be C: and click on OK.

- Your PC will now scan the drive. Depending on your partition size, this process can take a while, so be patient.
- Once the scan is complete, you’ll see a list of options. Select Thumbnails and click OK.

- Wait while Disk Cleanup removes the selected files.
In some cases, this problem can be caused by thumbnails, but you might be able to fix it by removing them. If the file is open in another program error appears again after applying this fix, you might need to repeat this process.
Alternatively, you can use one of the best Windows 10 optimizer software to clean up and optimize your PC.
These tools can enhance your PC by conducting in-depth cleaning and diagnosis. Also, they help in removing junk data and broken shortcuts, fixing Registry entries, and disabling unnecessary services.
2. Empty the Recycle Bin
- Locate the Recycle Bin on your desktop.
- Right-click it and select Empty Recycle Bin.

If you’re getting the file open in another program error, but know it isn’t, you might be able to fix it by emptying the Recycle Bin. This sounds like an unusual solution, but many users claim that emptying the Recycle Bin fixes the issue, so feel free to try it out.
Also, to avoid adding files to the Recycle Bin, you can use the Shift + Delete shortcut or press and hold the Shift key while clicking the Delete option.
3. End the Windows Explorer process and restart it
- Press Ctrl + Shift + Esc to open Task Manager.
- Click Windows Explorer.
- Click on the Restart button.

Another temporary solution that can help you with the file is open in another program problem is to end the File Explorer process. Sometimes files can become locked, but after ending the File Explorer process, you should be able to unlock them.
If you can’t end a task in Windows 10, look at this step-by-step guide that will help you do it in just a few steps.
4. Edit your group policy
- Press the Windows key + R to open the Run utility.
- Enter gpedit.msc and click OK.

- When Local Group Policy Editor opens, navigate to the path below:
User Configuration > Administrative Templates > Windows Components > File Explorer - In the right pane, double click the Turn off caching of thumbnails in hidden thumbs.db files option.

- Now, select Enabled to enable the policy.
- Finally, click Apply and OK to save changes.

You can solve The action cannot be completed because the file is open in another program error simply by modifying your group policy.
All thumbnails will be disabled in File Explorer with the steps above, but the problem should be resolved entirely.
If you don’t have the Group Policy editor on your Windows 10, get it on your PC by following our guide on how to install Group Policy editor.
5. Disable the Preview panel
- Open File Explorer by pressing the Windows key + E shortcut.
- Now, go to the View tab.
- Make sure that the Preview panel isn’t selected.

According to users, The action cannot be completed because the file is open in another program can appear if you’re using the Preview panel.
After disabling the preview panel, you should be able to modify your file without any problems. If you want to disable the Preview pane quickly, you can use the Alt + P shortcut.
6. Disable thumbnails
- Press Windows key + S and enter file options.
- Select File Explorer Options from the menu.

- Go to the View tab and check the Always show icons, never thumbnails option.
- Now, click on Apply and OK to save changes.

Another way to solve the file open in another program problem is to disable thumbnails entirely. This might not be the best solution, especially if you like thumbnails, but it might be a solid workaround you can use quickly.
If you want at any point to restore thumbnails in Windows 10, check out this guide to learn how you can do it.
7. Modify your registry
- Press Windows key + R, enter regedit, and click OK.

- When the Registry Editor opens, navigate to the path below in the left pane:
HKEY_CURRENT_USER\Software\Microsoft\Windows\Current\Version\Explorer\Advanced - In the right pane, locate IconsOnly DWORD and double-click it.

- Once the properties window opens, enter 1 to show icons or 0 to show thumbnails in the Value data field.
- After you’re done, click OK to save the changes.
You can also disable thumbnails by changing other values in your registry. To do that, follow these steps:
- Open Registry Editor and navigate in the left pane to the path below:
HKEY_CURRENT_USER\SOFTWARE\Microsoft\Windows\CurrentVersion\Policies\Explorer
- Look for DisableThumbnails DWORD in the right pane.
- If the DWORD isn’t available, you’ll need to create it by right-clicking the space in the right pane and choosing New > DWORD (32-bit) Value from the menu.
- Now enter DisableThumbnails as the name of the new DWORD.

- Double-click DisableThumbnails DWORD to open its properties. Set the Value data to 0 and then click OK to save changes.

There’s also another way to fix this problem using Registry Editor. To do that, follow these steps:
- Open Registry Editor, and in the left pane, navigate the path below:
HKEY_CURRENT_USER\Software\Policies\Microsoft\Windows
- Right-click the Windows key and choose New > Key.
- Enter Explorer as the name of the new key.

- Go to the newly created Explorer key, right-click the space in the right pane, and choose New > DWORD (32-bit) Value.
- Enter DisableThumbsDBOnNetworkFolders as the name of the new DWORD.

- Double-click DisableThumbsDBOnNetworkFolders DWORD to open its properties.
- Set Value data to 1 and click OK to save changes.

If you’re frequently getting the file open in another program error, you might be able to fix it by making a few changes to the registry. After making the changes restart your PC.
Remember that modifying the registry can be potentially dangerous, so use extra caution.
8. Delete the TEMP folders
- Press Windows key + R, type %temp%, and click OK.

- When the temp folder opens, delete all files from it.
- Press Windows key + R, type temp and click OK.

- The temp folder will now open. Delete all files from it.
If you keep getting The action cannot be completed because the file is open in another program error message, you might be able to solve the problem by deleting the temp folders.
Windows stores temporary files in two temp folders, and sometimes temporary files can cause this problem to appear.
9. Set folder windows to open as separate processes
- Open File Explorer Options. as shown in Solution 6.
- Navigate to the View tab and check Launch folder windows in a separate process option.
- Click Apply and OK to save changes.

After making these changes, all folders will open as separate processes, and you won’t have any more problems with this error message.
Few users claim that this option is causing the problem, so if Launch folder windows in a separate process option is enabled, be sure to disable it and check if that solves the error.
10. Disable the Homegroup
- Press Windows key + S and enter homegroup.
- Choose Homegroup from the menu.

- Choose Leave the homegroup from the menu.

- A list of options will appear. Choose Leave the homegroup from the menu.

- If everything is in order, you’ll see a confirmation message. Click the Finish button.
After leaving the Homegroup, you have to disable its services. To do that, follow these steps:
- Press Windows key + R, type services.msc, and click OK.

- The Services window will now open. Locate HomeGroup Provider and double-click it.

- Locate the Startup type field and set it to Disabled.
- Now, click on Apply and OK to save changes.

- Locate HomeGroup Listener service, double-click, and set its Startup type to Disabled.
Lastly, you have to make a few changes to the registry, and you’re good to go. To do that, follow these steps:
- Open Registry Editor.
- In the left pane, navigate to the path below:
Computer/HKEY_LOCAL_MACHINE/SOFTWARE/Classes/CLSID{B4FB3F98-C1EA-428d-A78A-D1F5659CBA93} - Create a new DWORD in the right pane and enter System.IsPinnedToNameSpaceTree as its name. Now open the newly created DWORD and set its Value data to 0. After saving the changes, close Registry Editor.
Homegroup is a valuable feature, but sometimes it can cause this problem due to specific bugs. Disabling this feature isn’t the best way to solve this problem, but it might be helpful in some cases.
Few users claim they fixed the problem simply by leaving their current Homegroup, so you might not have to disable the Homegroup service or make changes to the registry to fix this problem.
11. Use Unlocker
If you can’t access or delete specific files due to The action cannot be completed because the file is open in another program error, you might be able to fix it by using Unlocker.
This is a simple tool that will allow you to unlock any files that are locked by your system and allow you to remove them. The tool is simple to use and free, so if you have any issues with this error, try Unlocker.
Another third-party solution that can help you fix this problem is Lockhunter. A few users reported they solved the problem using this tool, so try it out.
12. Change your folder view
- Open File Explorer.
- Go to the View tab.
- Choose Small icons, List, or Details from the menu.

After changing the folder view, you should be able to modify the files from this directory without any problems. Since this is a workaround, you’ll have to repeat these steps for every directory giving you this error.
13. Disable Windows Search
- Press Windows key + S and enter indexing options.
- Select Indexing Options from the menu.

- Indexing Options window will now appear. Click on Modify button.

- Now you can disable indexing locations simply by unchecking them. After you’re done, click OK to save the changes.

Now you need to disable the Windows Search service. To do that, follow these steps:
- Press the Windows key + R, type services.msc, and click OK.
- Once the Services window opens, locate Windows Search on the list and double-click it.

- Set the Startup type to Disabled and then click the Stop button to stop the service.
- Now click on Apply and OK to save changes.

According to a few users, this problem can also be caused by Windows Search, and to fix it. You need to disable this feature entirely.
Windows Search is a core component of Windows, and if you use it frequently, you might want to skip this solution and try a different one.
Also, keep in mind that changing Indexing Options or disabling the Windows Search service can cause problems with specific features. So, if any issues occur, restore everything to the previous state.
14. Open and close your file
If you cannot move a particular file because the action cannot be completed because the file is open in another program message, you might want to try opening and closing that file.
This is a simple workaround; by opening and closing the file, you’ll ensure that it’s not open in any application. This isn’t a permanent solution; you’ll have to repeat it with every file whenever this problem appears.
15. Use Safe Mode and Command Prompt
- Open the Start Menu, and click the Power button.
- Press and hold the Shift key and click on Restart from the menu.

- Navigate to the path below:
Troubleshoot > Advanced options > Startup Settings - Now, click the Restart button.
- Once your PC restarts, a list of options will appear. Select Enable Safe Mode with Command Prompt from the menu by pressing the appropriate key.
- Once you enter Safe Mode, Command Prompt will automatically start. Now you just have to use Command Prompt to navigate the problematic file and modify it.
Remember that Command Prompt is an advanced tool, and if you’re unfamiliar with it, you’ll have to learn basic syntax before using this solution.
Few users claim that you don’t even have to use Command Prompt. Simply start Safe Mode and find the problematic file, and you should be able to modify it without any problems.
You can not only access your files, but alsocan use Command Prompt to copy your files or folder to the destination path, to learn more about it, read this guide.
16. Perform the Clean boot
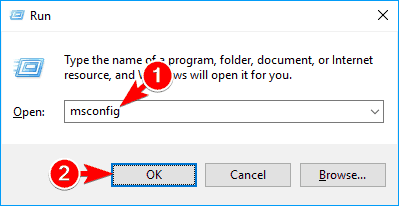
- Press Windows key + R, type msconfig and click OK.
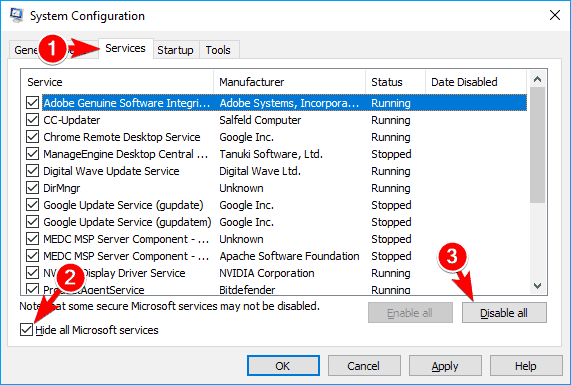
- Click the Services tab.
- Check the box for Hide all Microsoft services.
- Now, click on the Disable all button.
- Go to the Startup tab and click on Open Task Manager.

- Select the first entry on the list and click on Disable button. Now repeat the same steps for all entries on the list.

- After disabling all startup applications, go back to the System Configuration window.
- Click Apply and OK to save changes.

- Restart your PC or log out and log back into your user account to apply the changes.
Sometimes third-party applications can interfere with your PC and cause this and other errors. In fact, some applications tend to start automatically with Windows causing the problem to appear as soon as Windows starts.
To fix the issue, you need to find the problematic application. This is relatively simple, and performing a Clean boot is the best way to do that.
To find the problematic application, you need to repeat the same steps and enable startup services and applications one by one until you find the one causing this problem.
17. Use a different PDF application
According to users, Adobe Reader can sometimes cause this error message to appear. You need to download a different PDF reader and set it as a default application for PDF files to fix the problem. After doing that, the issue should be resolved entirely.
A few users also claim that you can fix this problem simply by uninstalling Adobe Reader from your PC, so you might want to try that as well.
18. Use Optimize for option
- Open the directory that holds the problematic files/folders.
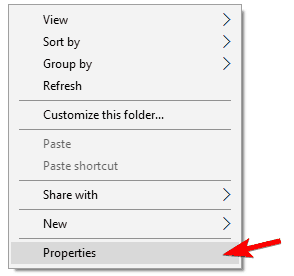
- Right-click on the space inside the folder and choose Properties from the menu.
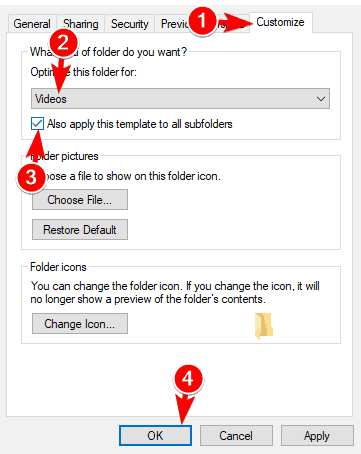
- Click the Customize tab and select the desired option from the Optimize this folder for the menu.
- Now, click on Also apply this template to all subfolders.
- Lastly, click on Apply and OK to save changes.
After using Optimize for option, you should be able to delete files without any issues. You might get a warning while trying to do so, but you should be able to circumvent it.
You might have to try optimizing your folder for different file types since it might take a few tries to find the setting that works for you.
19. Use Command Prompt to remove Thumbs.db file
- Press Windows key + X and select Command Prompt (Admin). If Command Prompt isn’t available, feel free to use PowerShell.

- Type X: in the command prompt Window and press Enter. Be sure to replace X with an actual letter representing your partition where the file to open is.
- Type the command below and press Enter to delete all thumbs.db files from your partition.
del /ash /s thumbs.db - Now you have to repeat these steps for all other partitions on your PC.
In many cases, the leading cause of this problem can be Thumbs.db file. The file is in charge of storing your thumbnail cache, but sometimes, these files can cause this and many other errors to appear.
You need to remove those files from your partitions to fix the issue. This is relatively simple, and you can do it by following the above steps.
Remember that this solution doesn’t require performing it on every partition. Instead, you can achieve it only on the one giving you this problem.
However, you might have to delete thumbs.db from all partitions on your PC to stop this error from appearing.
20. Stop sharing for the problematic folder
- Locate the folder or file that is giving you this error message.
- Right-click the problematic file or directory and choose Share with > Stop sharing from the menu.

After stopping sharing for the problematic folder, the issue should be resolved entirely, and you’ll be able to move, rename and delete your files without any problems.
21. Install the latest .NET Framework
Many Windows applications use .NET Framework; sometimes, this problem can occur if you don’t have the necessary .NET Framework installed.
However, you can fix this problem simply by downloading .NET Framework from Microsoft’s website. This framework is completely free, and to fix the problem, you might have to install all versions of the framework and check if that solves the issue.
22. Try to rename file or directory using the Command Prompt
- Open Command Prompt as administrator.
- Enter the desired directory, followed by the command below, and press Enter to rename the file. Note that you need to type the name and extension of the file to make it work.
rename problematic_file.txt new_name.txt - Alternatively, you can use the command below:
rename c:path_to_problematic_file problematic_file.txt new_name.txt
According to users, they sometimes cannot rename specific files because the action cannot be completed because the file is open in another program.
However, you might be able to fix the problem simply by using Command Prompt to rename the problematic file or directory. Keep in mind that this is an advanced solution. So, if you want to use it, learn Command Prompt syntax beforehand.
If for some reason, you’re getting Access denied message in Command Prompt, you might want to try running it from Safe Mode, as we showed you in Solution 15.
23. Change your security settings
- Locate a working folder that doesn’t have this problem. Be sure to use a non-system folder.
- Right-click the folder and choose Properties from the menu.

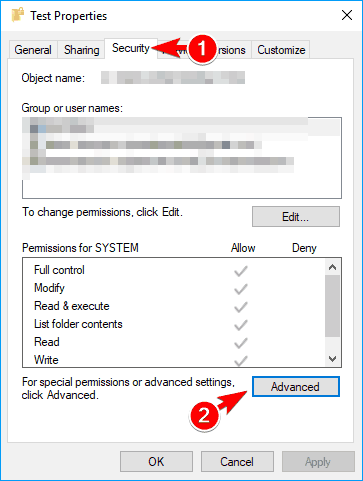
- Go to the Security tab, check the list of available groups and users and write it down.

- Repeat the same steps for the problematic folder or file once you open the Security tab, and check if any entries from Step 2 are missing.
- If so, you need to add them manually by clicking the Edit button.

- Now click the Add button.

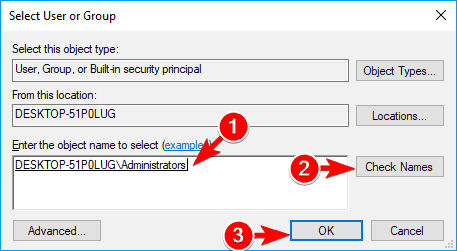
- Enter the desired user name or group in the Enter the object names to select the field and click on Check Names.
- Click the OK button.
- Select the newly added user or group and check Full control in Allow column.
- Click Apply and OK to save changes.

- Remember that you might have to repeat these steps and add all missing users and groups from Step 2.
If you’re getting this error frequently, it might be due to your security settings. Sometimes the problematic folder might lack specific security permissions causing the problem to appear.
Some users suggest just adding your user account and granting it Full control over the affected directory. After doing that, the problem should be resolved entirely.
This solution is a bit advanced, so you might be unable to perform it correctly if you’re a basic user.
It’s also worth mentioning that you shouldn’t use this solution on system files and directories. So, if you’re having problems with those, you might want to try a different solution.
24. Change dllhost.exe security permissions
- Press Ctrl + Shift + Esc to open Task Manager.
- Once Task Manager opens, navigate to the Details tab.
- Locate dllhost.exe on the list, right-click it and choose Properties from the menu.

- Navigate to the Security tab and click on the Edit button.

- Select Administrators from the list and check Full control in Allow column.
- Click OK and Apply to save changes.

If you can’t change the security permissions for some reason, you might want to try ending COM Surrogate process. Few users claim this solution worked for them, so feel free to try it out. To end the COM Surrogate process, do the following:
- Open Task Manager.
- Locate COM Surrogate in the list of processes, select it and click the End Task button.

This error can sometimes occur due to problems with COM Surrogate process. This process is related to dllhost.exe, and you can fix the problem by changing the security settings for dllhost.exe.
After ending the COM Surrogate process, the problem should be resolved. If the issue appears again, you might have to repeat this process.
25. End Windows Explorer process and use Command Prompt to delete the file
- Open Task Manager and end File Explorer process, as shown in Solution 3.
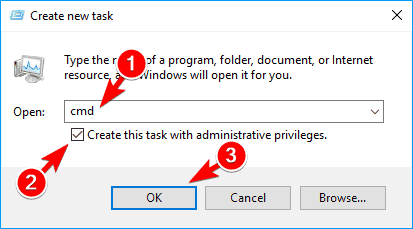
- After ending the File Explorer process, Click the File option at the top and select Run new task.

- Enter cmd, check the Create this task with administrative privileges box, and click OK.
- When Command Prompt opens, locate the problematic file or directory and remove or edit it using the Command Prompt.
- After deleting the file, enter explorer.exe in Command Prompt to start Windows Explorer again.
As you can see, sometimes Windows Explorer can interfere with Command Prompt and cause the the action can’t be completed because the folder or a file in it is open in another program error and other issues to appear. However, you should be able to avoid it by using this solution.
Remember that this solution requires you to be familiar with basic Command Prompt syntax, so you might want to learn a few basic commands before you try it.
Several users claim that you don’t even have to end Windows Explorer to delete the problematic file.
According to them, you just have to start Command Prompt with administrative privileges and use the command below: DEL /F /S /Q /A C:UsersUserNameDesktopFile.txt
Of course, use the correct path to the problematic file before running the command.
26. Use Process Explorer or Handle
If you’re an advanced user, you can try fixing this problem using Process Explorer or Handle. Process Explorer is similar to Task Manager, allowing you to see currently active processes along with the list of files they’re using.
Using this tool, you can easily find the process holding your file and close it. Simply choose Find > Find Handle or DLL option from the menu and enter the file or directory name that gives you this error.
Now you’ll see the process’s name and ID so you can quickly close it.
Another application that can help you fix this problem is Handle. This is a third-party command-line tool, and it’s more complex than Process Explorer. Below are the steps to follow to use Handle:
- Download the tool and start Command Prompt as admin.
- Type the command below and press Enter.
Handle64.exe > output.txt - After doing that, the output.txt file will be created. Minimize Command Prompt and open output.txt file.
- Search for the problematic file on the list and write the HEX number next to it. This is the ID of your file that you’ll need to use for future steps.
- Locate the parent row for your file and write down its ID.
- Go to the Command Prompt, type the command below, and press Enter.
handle.exe -c your_file_id -p your_process_id - Be sure to replace your_file_id and your_process_id with the correct HEX values.
If you perform this process correctly, you’ll successfully release the file without ending its process. This is an advanced solution, so if you’re a basic user, you might experience some difficulties performing it.
27. Disable inheritance for the problematic file/directory
- Right-click the problematic file or directory and choose Properties.
- Navigate to the Security tab and click on Advanced.
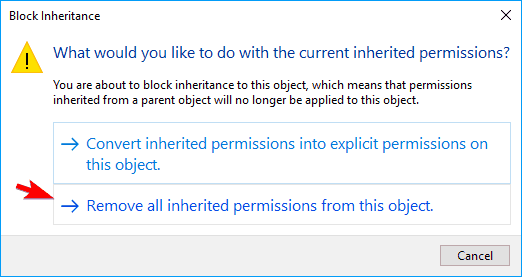
- Click on the Disable inheritance button.

- Choose Remove all inherited permissions from this object.
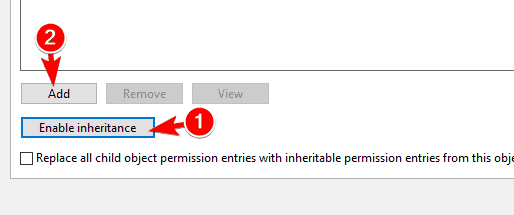
- Now click Enable inheritance button and then click on Add.
- Click on Select a principal.
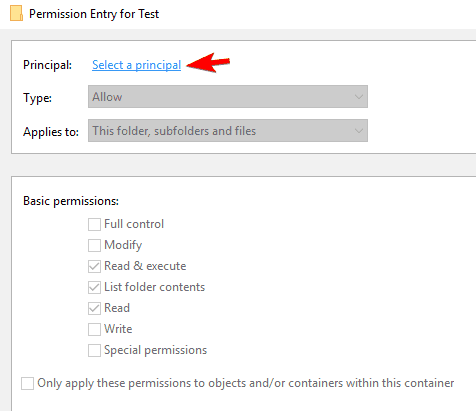
- Enter your user name in the Enter the object name to select and click Check Names.
- If everything is in order, click OK.
- Check the Full control option and click OK.
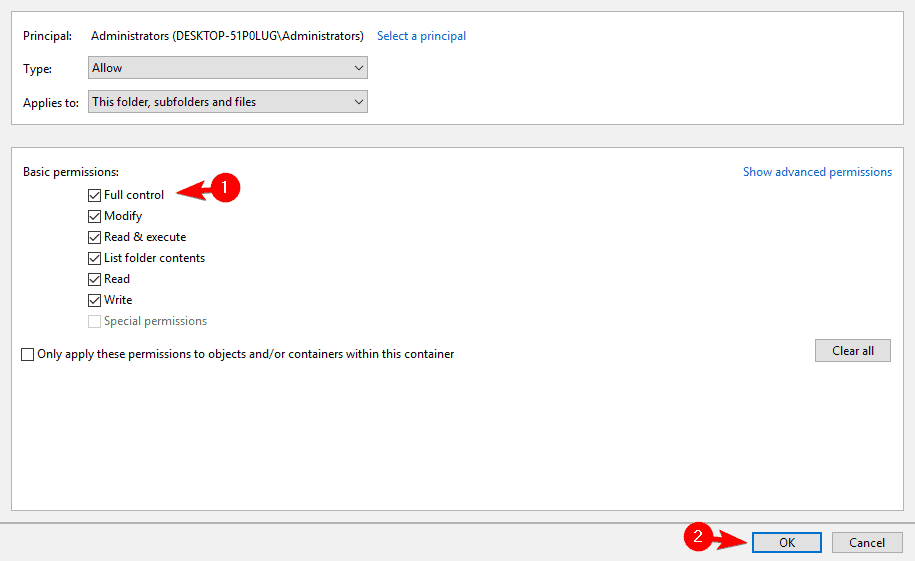
- Save changes.
After making the changes above, you should be able to delete files and folders without any issues. Remember that this is an advanced solution, so you should use it only for non-system files and directories.
This is because disabling inheritance for system files and directories can cause problems. So, you might want to use a different solution if you have this problem with system files.
28. Unmount all drives
- Open Magic ISO and go to Tools.
- Now navigate to Virtual CD/DVD ROM > Unmount All Drives.
Alternatively, you can unmount an ISO image right from the This PC. ISO images work as standard optical drives, and you can quickly eject them.
- Open File Explorer and go to This PC.
- Locate the ISO drive and right-click on it.
- Select the Eject option.
Few users claim that you can fix the file that is open in another program problem simply by mounting the ISO file and unmounting it from the application. MagicDisk can sometimes show your ISO file as mounted when it isn’t.
After unmounting it, all your mounted ISO files will be released, and you’ll be able to delete them without any problems.
29. Use Task Manager to close the problematic process
Sometimes this error message will tell you which program is holding your file. For example, many users reported this error while trying to remove Word documents.
If you’re having a similar problem, you need to start Task Manager and check if the problematic application is running in the background. If so, end its process, and the issue should be resolved entirely.
30. Rename the file
According to users, if you can’t delete a specific file, you can circumvent the problem simply by renaming that file. You have to locate and rename the problematic file to fix it.
After doing that, restart your PC. Once your PC restarts, try to delete the file again. If, for some reason, you can’t rename the file, restart your PC and try to delete or remove the problematic file.
31. Use Ubuntu Live CD
If you’re frequently getting this error message, you might be able to solve it simply by using Ubuntu Live CD. You can use any other version of Linux if you want, but we recommend using an Ubuntu distribution due to its simplicity.
Simply download the Ubuntu ISO file and create a bootable USB flash drive or Live disc. You need to boot from the USB flash drive or optical disc to start Ubuntu.
After doing that, you should be able to find the problematic file with ease and delete it.
32. Remove the metadata using the EXIFtool
According to users, sometimes metadata of your files can cause this problem to appear. You need to remove all metadata from the problematic file to fix the issue.
Users reported that they fixed the problem by using EXIFtool. This is a command-line tool, so you might have to learn its syntax before you can successfully remove the metadata.
After you remove the metadata, you’ll be able to delete the file without any problems.
33. Change the owner
- Right-click the problematic file or folder and choose Properties.
- Navigate to the Security tab and click on the Advanced button.
- You should now see the owner of the file.
- Click the Change option next to the owner’s name.

- Select User, or Group window will appear.
- Enter your user name in the Enter the object name to select field and click Check names.
- Now, click the OK button.
- Now, check the Replace owner on subcontainers and objects option.
- Click Apply and OK to save changes.

Sometimes you can fix this problem simply by changing the file owner or directory. Keep in mind that changing the owner of system files can cause specific issues, so use this solution only for non-system files.
If you’re interested in how to take ownership of a file or a folder in Windows 10, check out this fantastic guide.
34. Try to copy another file
One workaround that might help you with this problem is copying another file. To do that, locate any other file, right-click it, and choose Copy from the menu.
After that, locate the folder or file you couldn’t delete previously and try to delete it again.
By copying another file, you’ll release other files from File Explorer, allowing you to delete them. Remember that this is a workaround; you’ll have to repeat it for all affected files.
It’s also worth mentioning that this isn’t a universal solution, meaning that this workaround might not be able to fix the problem in all cases.
35. Make sure that the file isn’t set to read-only
- Right-click on the faulty file and choose Properties.
- Click the General tab from the top menu.
- Uncheck the box for Read-only in the Attributes section.
- Click on Apply and OK to save changes.
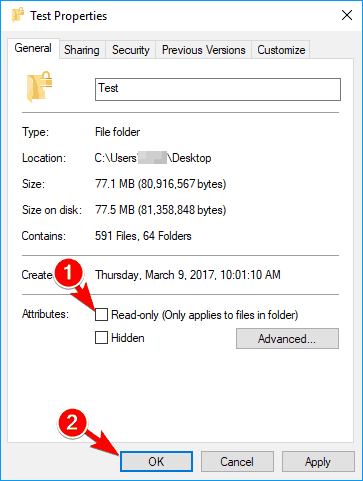
Sometimes this error message can appear if you’re trying to modify a file or directory to read-only mode. To fix the issue, you need to disable the read-only mode.
After making these changes, you should be able to modify the file or folder without any issues.
36. Be sure that your Windows is up to date
- Press the Windows key + I to open the Settings app.
- Click the Update & security option.

- Now, click on Check for updates button.

Sometimes, this error message can be caused by a bug in Windows 10. Most bugs are addressed via Windows updates. By default, Windows 10 automatically downloads the updates, but sometimes you might miss an important update.
After you update Windows to the latest version, the problem should be completely resolved. If your system is already up to date, you’ll have to use a different solution to fix this problem.
How do you force delete a file that is open in another program?
- Open File Explorer and go to the file location.
- Press Shift and right-click on any space in the location.
- Select the Open PowerShell window here, or Open Command Prompt window here as the case may be.
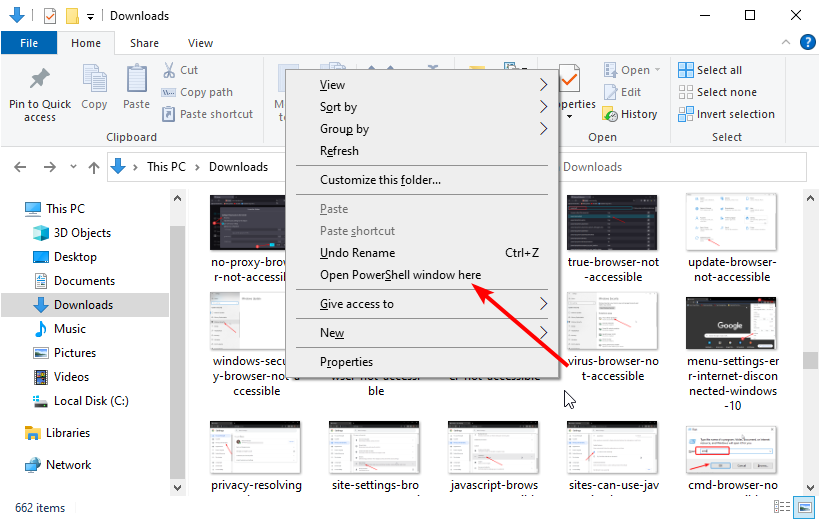
- Type del followed by the file’s name in the Command Prompt or PowerShell window.

- Hit the Enter key.
Note that using the del command like this completely deletes the file. With this, there will be no way to get the file back as it won’t be available in the Recycle Bin. But it is good if you cannot delete files because it says the file is open in another program.
The action cannot be completed because the file is open in another program error message can cause many problems on your PC. This error will prevent you from accessing or removing specific files. But you should be able to fix it using one solution.
Are you facing other problems, like an unexpected error stopping you from opening this file? Then, check our guide to fix it quickly.
If you have any other questions, don’t hesitate to leave them in the comments section below, and we’ll check them out.
Read our disclosure page to find out how can you help Windows Report sustain the editorial team. Read more


Improve this guide


User forum
7 messages