How to Add Alerts to OBS Studio with Stream Overlay
First, you need to choose an alert provider
3 min. read
Published on
Read our disclosure page to find out how can you help Windows Report sustain the editorial team. Read more

Adding alerts to your OBS Studio setup can significantly enhance your streaming experience by making it more interactive and engaging for your audience. Whether you’re celebrating new followers or thanking donors, these alerts provide real-time feedback that keeps your viewers hooked.
How do I add alerts in OBS Studio?
1. Choose and configure an alert provider
- Select an alert provider:
- Visit a site like Streamlabs, StreamElements, or NerdOrDie to choose the provider that best suits your needs.
- Follow the sign-up process on their website and connect your streaming account (Twitch, YouTube, etc.) to their service.
- Configure the alert overlay:
- Go to the alert configuration section on the provider’s website.
- Customize the alerts by choosing event types (follows, donations, subscriptions), images, sounds, and display settings.
- Save the settings, and the provider will generate an Alert URL for you.
With this setup, you can have customized alerts like new followers or subscribers displayed on your stream. This makes it engaging and interactive for your audience.
2. Add the Alert Overlay to OBS Studio
- Open OBS Studio
- In the Scenes panel, select the scene you want to add alerts to.
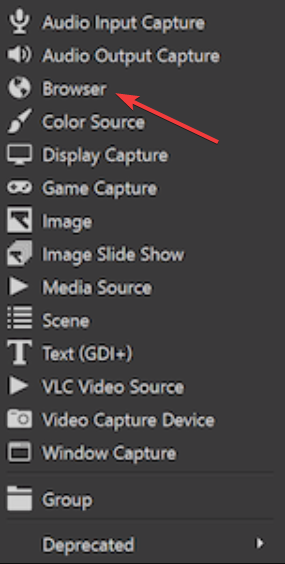
- In the Sources panel, click the + button and select Browser.
- Name the new source (e.g., Alerts) and click OK.
- In the new window, paste the Alert URL you got from your alert provider into the URL field.
- Adjust the width and height to fit your stream layout (e.g., width: 800, height: 600).
- Click OK to save the new source.
This will integrate your customized alerts directly into your OBS scene, ensuring your viewers see them in real-time.
3. Test and adjust alerts
- Go back to the alert provider’s website.
- Use their built-in test functionality to trigger a test alert.
- Look at your OBS preview window. The test alert should appear in the scene where you added the Browser source.
- If the alert does not appear, recheck the Alert URL and make sure it’s correct.
Testing ensures that your alerts are correctly set up and will appear during your live stream, giving you the confidence that everything is working as intended.
4. Troubleshoot visual issues
- In OBS Studio, go to Settings and then Advanced.
- Uncheck the Enable Browser Source Hardware Acceleration option and click Apply and OK.
- Click on the alert Browser Source in your Sources list.
- Use the red bounding box to reposition and resize the alert overlay as needed.
Disabling hardware acceleration and adjusting the source can fix issues where the alerts are not visually appearing, ensuring they show up properly during your stream.
5. Resolve audio but no visual issues for OBS alerts
- Copy the Alert URL from your alert provider.
- Open a web browser and paste the URL in the address bar to see if the alert visuals appear there.
- Right-click the Browser Source in OBS and select Properties.
- Ensure the width is set to 1920 and the height is 1080 (or the resolution you stream at).
Testing the URL in a browser and adjusting dimensions ensure that the alerts are correctly sized and positioned, solving issues where only audio plays without visuals.
By following these step-by-step solutions, you can effectively add and troubleshoot alerts in OBS Studio, making your streams more interactive and engaging for your audience.
For optimum streaming quality, check our guide on how to use the OBS Studio Multipass Mode. If you want to set up a timer in OBS, the highlighted guide will provide all the information you need.
Did you that you can make OBS only record game audio? That’s right, and it’s simpler than you think.
Should you require any additional information, check the comments section below.


User forum
0 messages