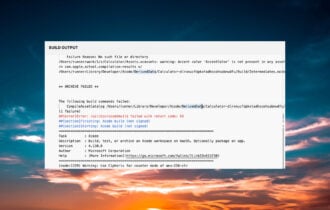
Apt-get command not found? Here's how to fix that
Key notes
- macOS is the default operating system on Mac computers, and it’s different from Windows in several ways.
- One of the key components of macOS is the Terminal, but many users reported apt-get command not found command message while using it.
- Are you having additional problems? If so, be sure to visit out Mac Issues section for more information.
- If you’re Mac user, you might want to check our Mac Hub for more news and guides like this one.

macOS is a popular operating system, but being a UNIX-based operating system, macOS heavily relies on the Terminal for certain functions.
Speaking of the command line, many users reported apt-get command not found while using the terminal, and in today’s article we’ll try to fix that.
How do I fix apt-get not found message on macOS?
1. Use Homebrew instead
- Open Finder and go to the Utilities Now start the Terminal from there.

- Run the following commands:
- xcode-select –install
- After the command is executed successfully, run this command:
-
- ruby -e “$(curl -fsSL https://raw.githubusercontent.com/Homebrew/install/master/install)”
- After the installation is finished, use the brew install package_name command to install the desired software.
The apt-get command is designed to work with Linux operating systems, most notably Debian, and it doesn’t work in macOS. As an alternative, you need to use the brew command instead.
Brew command isn’t available out of the box, but after installing the components from the above, it should start working on your macOS. It works as an alternative to apt-get and it should work with all of its packages.
2. Use MacPorts
- Open App Store from the Dock.
- Locate Xcode in the App Store and install it.
- Start the application and agree to the Terms of Service.
- Start Terminal.
- Run the following command:
- xcode-select –install
- Go to the MacPorts website and download the version for your operating system.

- Once you install MacPorts, restart the Terminal and run the following command:
- sudo port selfupdate
- After doing that, you can install packages by using the sudo port install package_name
Apt-get command not found message appears because the apt-get command doesn’t exist on macOS, but you should be able to circumvent this limitation by using one of our solutions.
Learn more about macOS
- Can I use apt get on Mac?
No, macOS doesn’t support apt-get command. Instead, you can use Homebrew or MacPorts to achieve the same results.
- What is the equivalent of APT get on Mac?
The equivalent of apt-get on Mac are brew install or sudo port install commands.
- What is apt get on Mac?
Apt-get is a command that you can use in Terminal to install software packages. This command is available on Linux, but Mac has its own alternatives.
- Is Homebrew safe?
Yes, Homebrew is perfectly safe to use. It’s advised to be cautious when using this tool and only install the packages that you trust.
[wl_navigator]
Read our disclosure page to find out how can you help Windows Report sustain the editorial team. Read more


Improve this guide

User forum
0 messages