Fix: Canon PIXMA MP160 issues on Windows 10
Key notes
- Some users have reported issues when using Canon PIXMA MP160 in Windows 10.
- There might be a wide range of issues with the Canon printer but if you follow this guide you will solve any issues.
- If you have any other trouble with your computer or peripherals, go for our Tech Troubleshooting section for solutions.
- Explore our Windows 10 Hub for plenty of information on the most popular OS.
Windows 10 is without a doubt a great operating system, but it has certain flaws. One of the biggest flaws of Windows 10 is its hardware compatibility, and certain older devices might have problems working with Windows 10.
Canon PIXMA MP160 is a great printer, but here are some of the most common problems that users reported with the device:
- Canon MP160 error 5 – If you encounter this problem with your printer, you might be able to fix it by updating your drivers. Alternatively, you can try installing the latest drivers and check if that helps.
- Canon PIXMA MP160 error 2, 5, 16, 5100 – There are various issues that can appear with your printer, and if you encounter any of these problems, you should be able to fix them using our solutions.
How do I fix Canon PIXMA MP160 issues on Windows 10?
1. Reinstall the drivers
- Turn off your printer and unplug it.
- Press Windows Key + X to open the Power User Menu and select Device Manager from the list.

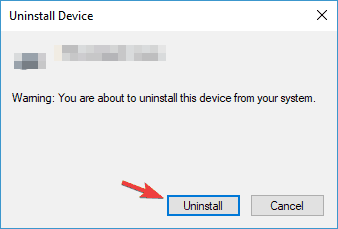
- Locate your printer driver, right-click it, and choose Uninstall.
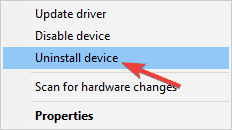
- If available, check to Delete the driver software for this device and click Uninstall.
Update the driver automatically
Manually searching for drivers can be tedious and even dangerous if you decide to look for it on a problematic website.
That’s why it’s so much easier, safer, and quicker to use third-party tools such as PC HelpSoft Driver Updater to automatically download the missing drivers.
The first step is to download and install PC HelpSoft Driver Updater. Next, start the tool. It will begin to scan your PC immediately for any problems with your drivers and will find the best solutions.
After it finishes scanning, all you need to do is to choose which driver to install from the list. Of course, there is also the much easier option to click on the Select All checkbox from the top and install all the drivers simultaneously.
⇒ Get PC HelpSoft Driver Updater
2. Download Easy-WebPrint EX Ver. 1.7.0

If Canon PIXMA MP160 isn’t working on your Windows 10 PC you can try downloading Easy-WebPrint EX Ver. 1.7.0.
After that, you should be able to launch the MP Navigator 3.0 and your device should start working.
3. Start scanning from Control Panel
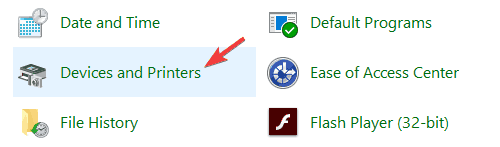
- Press Windows Key + S, type control panel, and click on Control Panel from the list of results.

- Navigate to Devices and Printers.
- Go to the Printers section and locate Canon PIXMA MP160.
- Right-click your printer and choose Scan.
Create a shortcut on your desktop
Unfortunately, you’ll have to repeat these steps every time you want to scan a document. To make this process a bit easier you can create a shortcut on your Desktop.
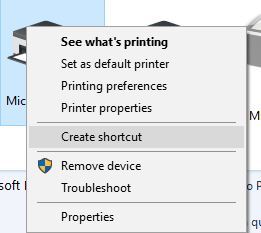
To do that simply go to Devices and Printers, locate your printer, right-click it, and choose the Create shortcut option.
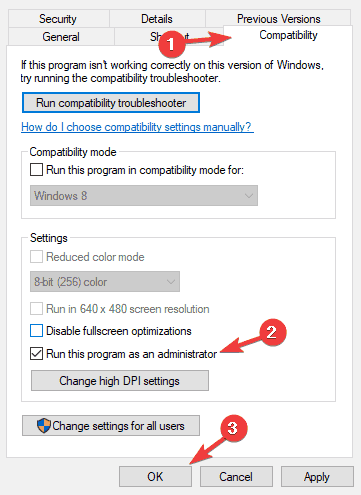
4. Install the drivers in Compatibility Mode
- Download the latest drivers for your device.
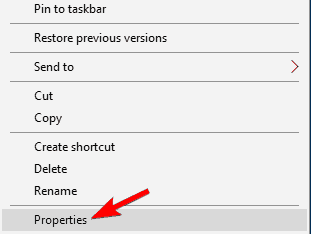
- Find the driver setup file, right-click it, and choose Properties.
- Go to the Compatibility tab and check Run this program in compatibility mode for and then select Windows 10 or the version you are running.
- Click Apply and OK.

- Run the setup file and install the drivers.
5. Temporarily remove ink jets
- Turn off your printer.
- Wait for a few seconds and then turn the printer back on again.
- Press and hold the Reset button for 5 seconds and then let it go (the Reset button is labeled Stop/Reset and it has a red triangle inside the circle).
- Now open your printer cover and wait for the ink jets to shift to the left side.
- Take both of them out. Wait for a few seconds and insert the ink jets again. Close the printer cover.
- Wait while your printer starts.
- Now press the Black button. The button is labeled Black and it has a vertical line in a diamond as its icon.
After doing that, the E4 error should be fixed.
6. Run the printer application as administrator
- Locate the TWAIN application and right-click it.
- Choose Run as administrator from the menu.

Set the application to always run with administrative privileges
- Right-click the application and choose Properties from the menu.
- Navigate to the Compatibility tab and check Run this program as an administrator. Click on Apply and OK.
7. Install the latest updates
- Press the Windows Key + I to open the Settings app.
- Navigate to the Update & Security section.

- Now click the Check for updates button.
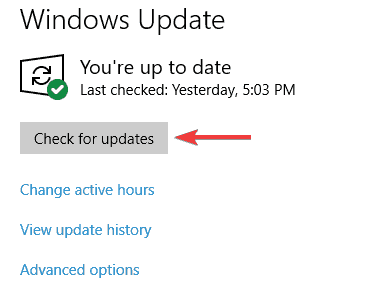
Windows will now check for available updates and download them in the background. Once the updates are installed, check if the problem with your printer is still there.
8. Disconnect the printer and shut down your PC
- Disconnect the printer from your PC.
- Shut down your PC, and disconnect its power cable from the power outlet.
- Wait for a few moments and turn your PC back on again.
- Once your PC boots, connect the printer once again.
Note: This is a simple workaround, but several users reported that it worked for them, so you might want to try it out. Keep in mind that this is just a temporary solution, so if you encounter this problem again, you might have to repeat it.
9. Clean your ink cartilages
- Remove the ink cartridges from your printer.
- Turn the printer off by pressing the Power button on it.
- Use a kitchen tissue or any other non-fibrous tissue to clean the contacts on the front of the cartridge.
- After doing that, press the power button to turn your printer back on again.
- Insert the cartridges.
We hope that you managed to fix the problems with your Canon PIXMA MP160 after using one of our solutions. If you have any other suggestions or comments, please leave them in the Comments section below.
Read our disclosure page to find out how can you help Windows Report sustain the editorial team. Read more


Improve this guide


User forum
0 messages