How to Change Network Type to Private or Public in Windows 11
Want enhanced security and privacy? Switch out your network profiles
Key notes
- Did you know that your network profile determines whether you can share files across devices?
- There are three different types of network profiles and each is suitable in different environments.
- Keep reading to find out how and when to change your network profile.

Setting up a wireless network is common and quite easy. However, choosing or changing the network type can be confusing, especially if you don’t know the repercussions.
If you’re looking for advice on changing the network type from public to private or vice versa in Windows 11, read on for some useful information.
Windows 11 comes with several network profiles, which are essentially sets of settings that can be used to configure various network connections.
This is useful if you have multiple connections at home or in the office, so you don’t have to go through all the settings whenever you connect to a new network.
Private and public network profiles are the two common types in Windows 11, but generally, there are three:
- Public – This profile is used when connecting to untrusted networks, where there’s no way to verify the identity of other computers or devices. If you must connect to untrusted networks you can turn on the strict NAT network type which acts as a firewall.
- Private – This is the default mode for the network profile. In this mode, the computer is connected to a private home or work network and can only see other devices.
- Domain – This is an assigned network profile and is used when a computer is joined to a domain. It includes settings for authentication, encryption, and caching. The domain profile also includes settings for user logon and resource access.
Now that you know the different scenarios where you’d apply these networks, let’s highlight a few differences
| Private | Public | Domain | |
| Trusted network | Trusted | Untrusted | Trusted |
| Sharing | Enabled | Disabled | Limited within the domain |
| Discoverable | Enabled | Disabled | Limited within the domain |
| Security | Fairly secure | Unsecured | Highly secure |
Network profiles are a powerful tool as they can be used to control the behavior of Windows computers in your network as they move from one environment to another.
Equipped with this information on the different types of network profiles, if you ever need to change it, below is how to tweak your Windows 11 network settings.
How can I change my network profile in Windows 11?
1. By using the Settings app
- Hit the Windows key and click on Settings.

- Select Network & internet settings on the left pane, then click on Wi-Fi (Select Ethernet connection if connected).

- Choose one of your Wi-Fi networks and click on it.

- Under Network profile type, switch to your preferred profile.

In some instances, you may find that the network profile type is missing. This is most likely a case of outdated drivers, so a quick driver update should resolve this issue.
2. By using the PowerShell command line
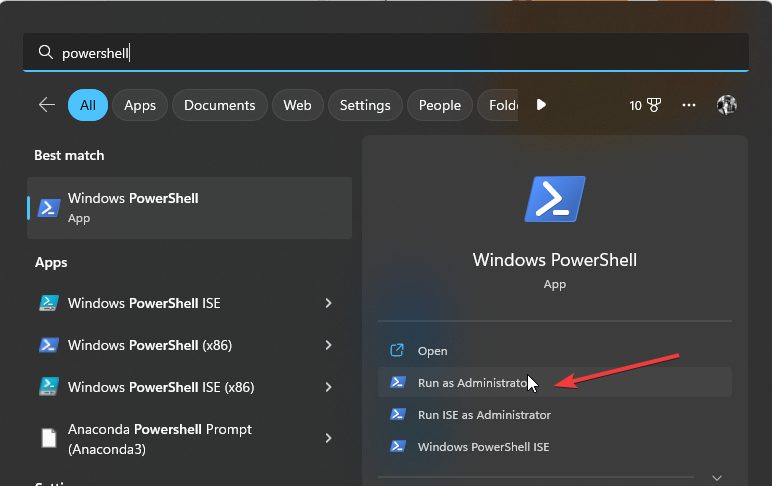
- Hit the Windows key, type Powershell in the search bar, and click Run as administrator.
- Type in the following command and hit Enter:
Get-NetConnectionProfile - Note down the name of the network you want to change and type in the following command. Remember to replace network name with the one you noted and Type with a network profile such as Public, Private or Domain :
Set-NetConnectionProfile -Name "network name" -NetworkCategory <Type>
3. By using the Registry Editor
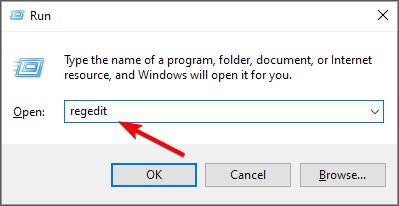
- Hit the Windows + R keys to open the Run command.
- Type regedit in the dialog box and hit Enter.
- Navigate to the following location:
HKEY_LOCAL_MACHINE\SOFTWARE\Microsoft\Windows NT\CurrentVersion\NetworkList\Profiles - Click on Profiles to expand the subkeys. Each will have its profile name listed on the right as the last entry.

- Double-click on Category, and in the Value data, enter 0, 1, or 2 to change to Public, Private, and Domain respectively, then hit OK.

- Close the Registry Editor and restart your PC to effect the changes.
Remember editing the registry can be catastrophic if anything goes wrong, so ensure you back up or create a restore point prior to making any changes.
4. Use the Local Security Policy
- Hit the Windows + R keys to open the Run command.
- Type secpol.msc in the dialog box and hit Enter.

- Click on Network List Manager Policies, and on the right, double-click on your chosen network.

- In the Network properties dialog box, navigate to the Network Location tab, and under the Location type option, choose Private or Public profile.

- Also, set the User cannot change location under User permissions, then hit Apply and OK to save the changes.
It is important to note that this solution may be limited as the Local Security Policy is not available in all Windows versions. However, you’re safe if you’re using the Windows 11 Pro, Enterprise, and Education editions.
Some users complained that they encountered network issues after changing their current network type. Windows cannot connect to this network was the most common, so if you’re in the same predicament, check out our expert article on resolving this issue.
Hopefully, now you better understand how and when to change your network profile in Windows 11 to either public or private. To learn more about your network connection, we advise you to check network connection details for more information.
When managing different network profiles across devices, you can also review the Network and Internet settings in Windows 10 to keep older systems configured correctly.
Let us know what network profile you use, in what setting, and why it’s your choice.
Read our disclosure page to find out how can you help Windows Report sustain the editorial team. Read more


Improve this guide


User forum
0 messages