Chris Titus Debloat Windows 11 - Free Up Space With This Tool
![]() 5 min. read
5 min. read
![]() Published on
Published on
Share this article
Improve this guide
Read our disclosure page to find out how can you help Windows Report sustain the editorial team. Read more

You can use the Chris Titus debloat tool on Windows 11 to ditch unnecessary services, visual elements, and Windows Update features. That way, you can speed up your PC for gaming or any other high-performance tasks.
Windows 11 is an extremely bloated operating system compared to Windows XP or Windows 7. Therefore, it automatically consumes about 5% of the CPU, 20% of the Memory, 5% of the GPU, and 10% of the Network even when you don’t run any Microsoft UWP or third-party desktop apps.
To stop it from unnecessarily eating up system resources, read this guide until the end. I’ve tried and tested the Winutil app from Chris Titus Tech for over a week. Here’s what I discovered!
What Is the Chris Titus Debloat Tool?
Chris Titus offers a debloat method to remove unwanted pre-installed apps and settings from your Windows 11 system. Think of it like cleaning out your digital drawers! These apps, often called “bloatware,” can take up space and run in the background, potentially slowing down your PC.

You can customize your Windows 11 experience to focus on the programs you actually use by following Chris Titus’s recommendations. The tool can make your PC run faster.
However, debloating can be risky if you’re not careful. So, only do it if you’re comfortable navigating critical Windows settings and understand what different built-in Microsoft services do.
The main tool behind the Windows 11 debloat technique is the Winutil software. Its source code is available on GitHub for free download, re-packaging, personal use, and more.
If you wish to use the debloater for free, you must use the Windows PowerShell terminal software to add it to your PC’s UI shell. I’ll demonstrate the process later in this article.
Don’t want to run any PowerShell script? You can buy the premium Winutil or Windows Toolbox installer package from the Downloads section of the Chris Titus Tech website. When I reviewed the app, it was priced at $10 per download.

Tips to Run the Chris Titus Debloat Windows 11 Tool
Before you begin to run the actual tool and tweak your PC, check out these expert tips for the best results with the Winutil tool:
- If you’ve just installed a fresh copy of Windows 11, apply the tweaks just before creating the first administrator user account.
- You should also use the tool after applying a major features update.
- Backup all data from Desktop and Downloads folders to avoid unexpected deletion of important files.
- Connect the device to a trusted power source, use UPS if it’s a desktop PC.
- Use a broadband Ethernet or Wi-Fi network of moderate bandwidth for communication between the tool’s repository and PC.
How To Use Chris Titus To Debloat Windows 11
Here’s how to apply the Windows 11 debloating features of Winutil.
Getting and Opening the GUI on Your PC
- Right-click on the Start Menu to open the Power User context menu.
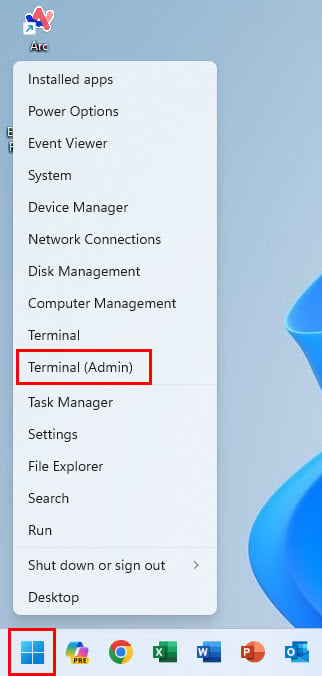
- There, click on the Terminal (Admin) option to launch PowerShell.

- Now, copy and paste the following command inside the Terminal and hit Enter:
iwr -useb https://christitus.com/win | iex- Winutil will open in a new PowerShell UI.

Performing System Tweaks
- On the Winutil or Windows Toolbox UI, the default selection will be the Install tab.
- Navigate to Tweaks.

- There, you can choose any of the following debloating options:
- Standard
- Minimal
- Clear.

- As you pick an option from the above, the user interface will automatically checkmark appropriate customizations.
- You can personally modify some selections if you know how those changes will impact the debloating.
- Scroll down and hit the Run Tweaks button.

- Wait some time as the tool runs some codes.
- Reboot the PC once all the codes have run.
Getting Rid of Microsoft Edge
If you don’t want Edge, try these steps on Winutil:
- Open the Winutil tool and go to the Advanced Tweaks section in the Tweaks tab.
- Mark the checkbox for Microsoft Remove Edge.
- Hit the Run Tweaks button.

Performing Windows Update Tweaks
- Go to the Updates tab after launching the Winutil tool.
- There, you should find the following three options for Windows Update optimization to debloat Windows 11:
- Default settings
- Security settings
- Disable All Updates.
- If you wish to reduce the frequency of Windows Update without compromising security updates, choose the second option.
- Click OK on the Set Security Updates button.
- Restart the PC.

How To Reverse These Changes
If you wish to go back to the original Windows 11 settings, perform these steps:
- Launch the Winutil tool and navigate to the Tweaks tab.
- Scroll down until you find the Undo Selected Tweaks button.
- Click on that.

- Reboot your PC once the tool executes the necessary scripts.
Summary
So, now you know how to apply the Chris Titus Debloat Windows 11 method to enhance PC performance. You should try it out right now if you fulfill any of the following conditions:
- You exclusively use your Win 11 PC for high-end gaming.
- The default Microsoft Edge browser is buggy when you view online PDFs or click on any redirect links on Word, Excel, etc.
- You’ve upgraded a dated PC to Windows 11 and you’re facing an extremely slow performance.
- You don’t want to receive frequent Windows Updates due to internet data restrictions.
Additionally, you can apply the same steps on a Windows 10 PC.
Did this article help you speed up your device? Share your thoughts in the comment box.


User forum
0 messages