Easily Fix Chromebook Camera Not Working (HP, Asus, Lenovo)
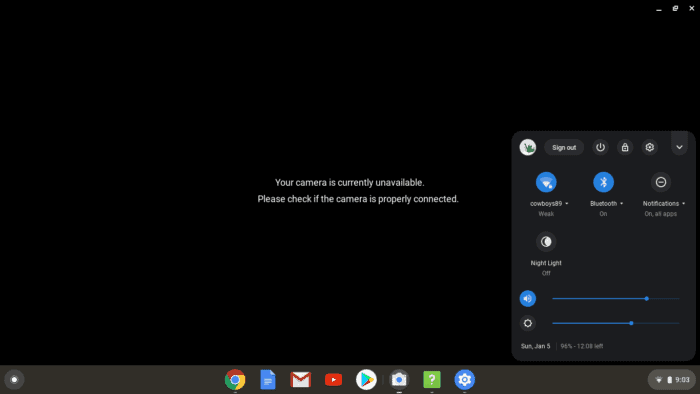
A Chromebook’s built-in camera is essential for video calls, online classes, or recording quick clips. But sometimes the camera fails to work properly, showing a black screen or refusing to connect to apps like Google Meet or Zoom.
This problem can happen due to:
- software glitches
- permission errors
- hardware issues.
The good news is you don’t always need professional help to fix it. Let’s walk through step-by-step solutions to get your Chromebook camera working again.
Table of contents
- How To Fix My Chromebook Camera Not Working On My Laptop?
- 1. Restart Your Chromebook
- 2. Check App Permissions
- 3. Reset Camera Permissions
- 4. Update Chrome OS
- 5. Check for File System Errors
- 6. Use Diagnostics to Test the Camera
- 7. Try Another App
- 8. Check Microphone and Audio Settings
- 9. Test With a Microphone Tool
- 10. Perform a Hardware Reset
- Extra Tips for Stable Camera Use
- Fixing Camera Issues on Chromebook
- FAQs
How To Fix My Chromebook Camera Not Working On My Laptop?
The Chromebook camera may stop working for several reasons, such as permission restrictions, outdated software, or temporary system errors. In some cases, you might even notice camera-related file system errors if the system cache is corrupted.
1. Restart Your Chromebook
A quick restart often resolves temporary glitches. Close all apps, click the clock in the bottom-right corner, and choose Shut down. Turn it back on and test the camera.
2. Check App Permissions
If your camera isn’t working inside specific apps like Meet or Zoom, permissions may be blocked. Here is how to unblock the permissions:
Time needed: 2 minutes
- Open Chromebook Settings
Open Settings > Security and Privacy > Site settings.
- Select Camera
Under Permissions, select Camera.
- Toggle on and select camera
Ensure the toggle is on and the right camera is selected.
3. Reset Camera Permissions
Sometimes, apps fail to detect the camera because of old permissions. You can reset them:
- Go to Settings > Privacy and Security.
- Choose Clear browsing data.
- Select Cookies and site data, then clear.
This forces apps to ask for fresh camera access.
4. Update Chrome OS
Outdated software can break camera functionality.
- Go to Settings > About Chrome OS > Check for updates.
- Install any pending updates and restart.
5. Check for File System Errors
If your Chromebook camera fails to save or open pictures, the system may be experiencing storage issues. Learn how to troubleshoot Chromebook camera file system errors to restore proper functionality.
For detailed fixes, follow our complete guide on how to screenshot on Chromebook if you also want to capture your screen while testing your camera.
6. Use Diagnostics to Test the Camera
Chrome OS includes a diagnostics tool:
- Press Search + Esc or open the Launcher and type “Diagnostics.”
- Go to the Camera section and test if it activates.
If the test fails, you may be dealing with hardware damage.
7. Try Another App
Sometimes the default Camera app crashes while others work fine. Try using online apps or extensions to record video on Chrome to see if the camera responds.
8. Check Microphone and Audio Settings
Camera issues often overlap with audio errors. If your mic isn’t working, video apps may fail to detect the camera properly. Follow our guide on Chromebook microphone not working for additional troubleshooting.
9. Test With a Microphone Tool
If video calling apps can’t access both the mic and camera, run a quick check using a browser-based tool. You can easily test your mic on Chromebook, which also confirms if the system correctly recognizes input devices.
10. Perform a Hardware Reset
If none of the above works, perform a hard reset:
- Turn off your Chromebook.
- Hold Refresh + Power until the device restarts.
This resets the hardware controller, which often fixes camera detection problems.
Extra Tips for Stable Camera Use
- Keep your Chromebook updated regularly.
- Avoid running too many extensions, as they may block hardware access.
- Use a soft cloth to clean the camera lens.
- Disconnect external webcams when troubleshooting the built-in one.
Fixing Camera Issues on Chromebook
Most camera problems on Chromebook are tied to permissions, temporary glitches, or software updates. By following the steps above, you should be able to restore camera functionality quickly and continue using apps without interruption.
FAQs
This usually happens if the app doesn’t have camera permissions or if Chrome OS has a temporary glitch. Restart your Chromebook and recheck permissions.
Yes, but it requires technical expertise. In most cases, external USB webcams are easier to use.
Powerwash resets your Chromebook to factory settings. It can fix persistent issues, but only use it after trying other solutions.
Some apps may block camera access by default. Check app permissions and ensure Chrome OS is updated.
Read our disclosure page to find out how can you help Windows Report sustain the editorial team. Read more
Improve this guide

User forum
0 messages