Windows 11 Telemetry: How to Permanently Disable it
Tweak your Registry to turn off this feature forever
Key notes
- When upgrading your PC to Windows 11, the telemetry and data collection feature is enabled.
- Telemetry is an automated procedure that involves data collection at remote locations and transmission back to the parent.
- In order to disable telemetry in Windows 11, do not hesitate to turn off optional diagnostic data.

When you upgrade your PC to Windows 11 or install a fresh copy of it, the telemetry and data collection feature is enabled.
Because this is automatically activated, it collects information about all types of user activity and sends it to Microsoft.
Telemetry is critical technical data collected from Windows devices and provides information about the device and how the operating system and related software are working in the background.
However, while the aims of collecting telemetry data may be noble, many businesses and organizations are concerned about Windows privacy issues and believe that their privacy is being violated, and they may wish to prevent the collection and uploading of this telemetry data.
Individual users want their data to be safe and secure as well, thus, they must disable this option, which can be done through the settings menu.
Besides that, using a VPN is also recommended as it can hide your location, one of the best options we recommend is Private Internet Access.
Unfortunately, Microsoft has not offered a straightforward method of turning it off. However, the built-in Settings app includes a number of choices for disabling telemetry and diagnostic data collecting.
We will go over the various techniques for disabling telemetry in Windows 11 right after we understand a little bit more about what it consists of.
What does telemetry do?
Telemetry is an automated procedure that involves data collection at remote locations and transmission back to the parent, who then uses the information to measure, monitor, and improve services.
Microsoft collects data from computers, aggregates it, and utilizes it to keep Windows devices secure, improve the quality of its services, and improve the overall performance of the Windows operating system. This is true for Windows 11, 10, and now for Windows 8 and Windows 7 as well.
The information that Microsoft collects complies with the company’s security and privacy policies, as well as applicable national and international laws and regulations.
Among its many applications are the provisioning of, improvement of, and personalization of experiences, security, health, quality, and performance analysis.
But it may share aggregated, anonymized telemetry data with third parties for restricted purposes, or it may share business reports with partners, depending on the circumstances.
You can read more about system diagnostics to understand how Windows collects and processes this information.
How to disable telemetry in Windows 11?
1. Turn off optional diagnostic data
- Press the Windows key + I to open the Settings app, then go to Privacy & security, followed by Diagnostics & feedback.
- Under the Diagnostic data section, make sure the Send optional diagnostic data is switched off.
- Now go back to Privacy & security and choose the Activity history option.
- Uncheck the box for Store my activity history on this device, then go to Speech and click on Stop contributing my voice clips.
- Now go under the General panel and switch off all the options that collect user data and send it to Microsoft.
Following the procedures outlined above, you will now send less data to Microsoft, so exposing yourself to less risk. Telemetry will not be fully eliminated as a result of this method, but it will be significantly reduced.
2. Use Registry Editor
1. Press the Windows + R key shortcut on your taskbar.
2. The Run dialog window will open.
3. Type regedit in the Run box.
4. Hit Enter to run the command.
5. The Registry Editor menu will open.
6. Now navigate to the following path by copying and pasting it in the search bar at the top:
HKEY_LOCAL_MACHINE\SOFTWARE\Policies\Microsoft\Windows\DataCollection7. In the right panel, right-click on any empty space to bring up a list of options.
8. Choose New from the list and select DWORD value (32-bit) or the 64-bit option for those with a 64 bit system.
9. Name the new DWORD AllowTelemetry.
10. Now, double-click on it and set the Value data to 0.
11. Restart your computer in order for the modifications to take effect. Your machine will no longer be subjected to telemetry.
A permanent solution to disabling telemetry on your Windows 11 device involves using the Registry Editor. By making a few modifications in it, you can disable the feature altogether, without having to manually configure other settings.
3. Use services.msc
- Press Windows + R keys to open the Run command window. On the Run command window, type services.msc and click on the OK button.
- In the Services window, scroll down and double-click on Connected User Experiences and Telemetry. Disable Connected User Experiences and Telemetry by setting Startup Type to Disabled. Now click on Apply to make changes.
- Now find another service by pressing the Ctrl + F keys and typing in dmwappushsvc, then double click on it.
- Here, disable the dmwappushsvc service by setting the Startup Type to Disable and click on Apply.
It is necessary to restart your computer in order for the changes to take effect. Your machine will no longer be subjected to telemetry beyond this point.
4. Use Task Scheduler
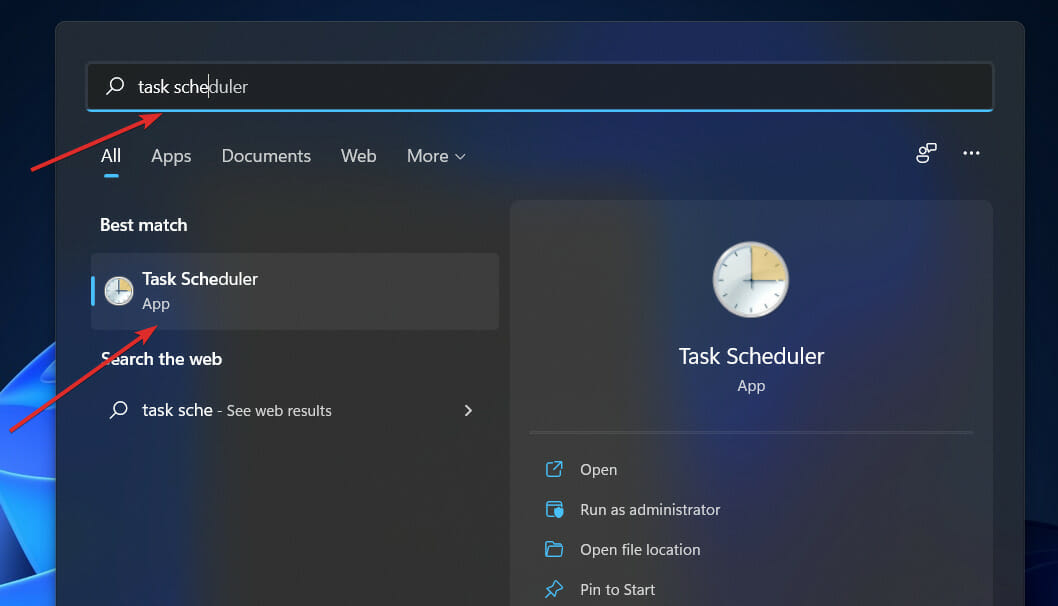
- Open the Start Menu and type Task Scheduler in the search bar. Click on the option that’s most relevant.
- In this tab, go to the following destination, right-click on the task named Consolidator and disable it. Repeat the process with all other tasks mentioned in this panel: Task Scheduler Library, followed by Microsoft, then Windows and Customer Experience Improvement Program.
5. Use Group Policy
- Open Group Policy with the run command. Press the Windows key+ R to open the Run box and type gpedit.msc. Next, click on OK or press Enter.
- This opens a new window named Local Group Policy Editor. Here you need to navigate to the following destination: Computer Configuration, followed by Administrative Template, then Windows Components and Data collection and Preview Builds.
- Double click on the Data Collection and Preview Builds, and you will see options on the right pane. Now double click on Allow Telemetry, then click on the Disabled option. To apply the changes applied, click Apply.
In order for the modifications to take effect, you must restart your computer. Beyond this point, your system will no longer be subjected to telemetry monitoring.
Can I change the levels of telemetry?
For those looking for strategies to reduce the number of times your Windows computers communicate with Microsoft, the telemetry and data collection settings in Windows 11 can be configured.
There are four different levels of telemetry:
- Security – Exclusively the telemetry data necessary to keep Windows devices secure is gathered at this level, and it is available only in the Windows 11 Enterprise, Windows 11 Education, and IoT Core editions of the operating system.
- Basic – This level collects a bare minimum of information that is necessary for understanding the device and finding problems later in the process.
- Enhanced – The next one collects information on how you interact with Windows and its apps, which is used to help Microsoft enhance the overall user experience.
- Full – This layer collects all of the information mentioned above, as well as any additional information that may be required to detect and assist in the resolution of problems.
The fact that Security is the level that sends the least amount of information can be seen in the list above. As a result, Security is the degree of protection I recommend to all of our customers who work in enterprise situations.
At the same time, the model is organized in such a way that new information is received with each level that is completed. In other words, everything collected in Security is likewise collected in Basic, Enhanced, and Full versions of the software.
Furthermore, additional information is provided based on the level selected. All of this information will be transferred to Microsoft, and in return the service will receive configuration information from Microsoft’s data center servers, allowing it to collect hardware/device-specific information.
If you want to change the level of telemetry on your system, open Group Policy Editor and navigate to the following setting:Computer Configuration\Administrative Templates\Windows Components\Data Collection And Preview Builds\Allow Telemetry
Here select Enabled and then from the drop-down, select Basic or any level which your version of the operating system allows.
For the Windows enthusiasts out there, we recommend that you take a look at the five best security and privacy features in Windows 11, to find out more about the beautiful hidden facets of this operating system.
If you’ve been encountering issues with malware or viruses on your computer, check out our article on what to do if Windows Defender is not working properly in Windows 11.
Alternatively, make sure to read our post on the five best antiviruses for Windows 11 to safeguard your PC and avoid any negative consequences.
Let us know in the comments section below which solution worked best for you as well as how many security measures you have taken so far.
Read our disclosure page to find out how can you help Windows Report sustain the editorial team. Read more


User forum
0 messages