Turn ON/OFF Cloud Delivered Protection in Windows
Find out all you need to know about this feature
Key notes
- Windows 10 Creators Update brings a bevy of new features and improvements, such as the Cloud-Delivered Protection for Windows Defender.
- However, if you want to disable the Cloud security scan, change the settings using Group Policy Editor.
- You can also deactivate the Defender's Cloud-Based Protection by adding certain registry keys.
- Make sure to check the StartUp programs if you want to stop these features from opening alongside your OS.

While the Windows 10 Creators Update brings a bevy of new features and improvements, not all users actually like them.
As a matter of fact, many users don’t want to use Windows Defender‘s Cloud-Based Protection and also refuse to turn on Automatic Sample Submission.
However, if you don’t enable these features, Windows Defender displays a yellow triangle with an exclamation mark in the Notifications tray.


What is Cloud-delivered protection?
If you enable cloud protection, any patches for malware problems can be sent to your device over the cloud within minutes, rather than having to wait until the next update is released.
Actually, many users have been confused by this weird yellow triangle and couldn’t find a proper explanation as to why it constantly appeared on the screen.
Now that they know why the warning occurs, many want to simply disable Cloud-Based Protection and Automatic Submission notifications.
The problem is that turning off these warnings is a challenge in itself since there is no dedicated option for that.
We’ve scoured the almighty Internet and found a few solutions to disable Windows Defender’s Cloud-delivered protection notifications.
How do I turn off cloud-based and automatic submission?
1. Disable them from Task Manager
- To turn off Cloud-delivered protection is off managed by your administrator, right-click on the taskbar to open the Task Manager.

- Go to the Start-up tab – locate these two features.

- Disable them.
- Restart your computer.
Because these features start once your computer is up and running, you should be able to find them in the StartUp tab from Task Manager.
If Task Manager is not working on your Windows 10 computer, don’t panic. Check our dedicated guide and fix the problem with ease.
2. Use the Group Policy Editor
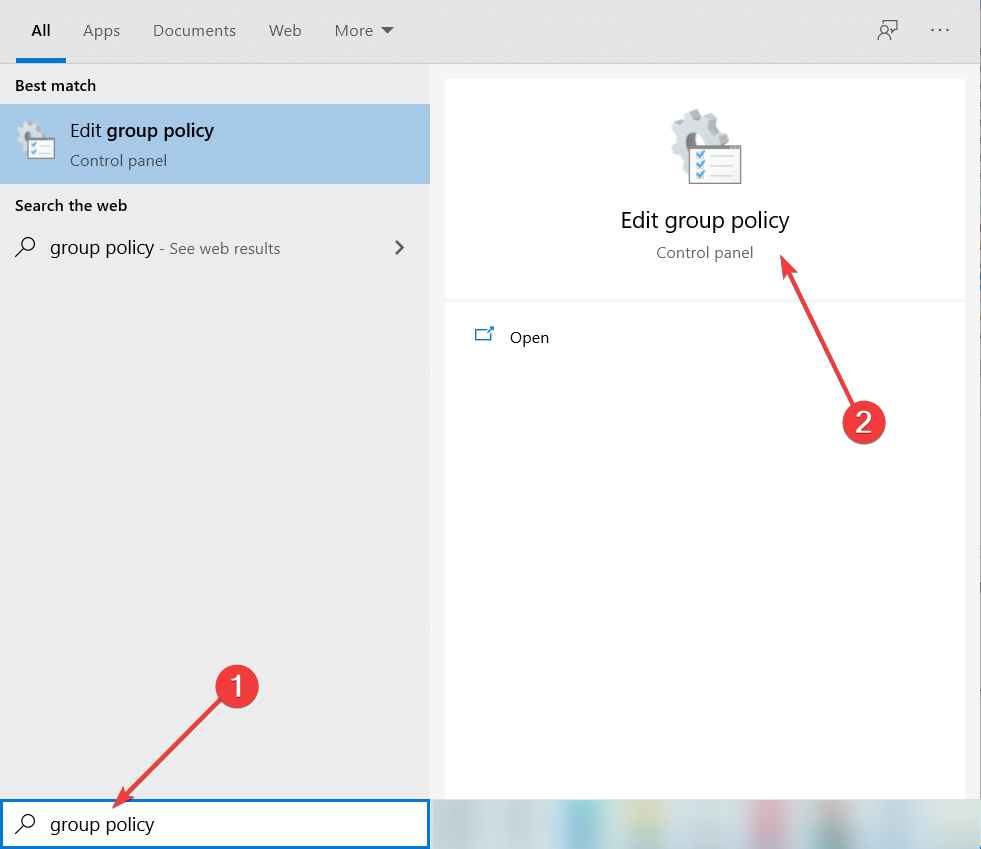
- Go to Start and type group policy.
- Select Edit Group Policy.
- Go to:
Computer Configuration - Administrative Templates - Windows Components - Windows Defender Antivirus - MAPS
- Disable the following features: Join Microsoft MAPS and Send file samples when further analysis is required.

- Press Windows + I keys combination to open Settings.
- Go to Update and Security.

- From the left pane select Windows Security.

- Click on Firewall and network protection.

- Disable Firewall profiles( domain, private and public).
- Restart your computer.
MAPS is the abbreviation for Microsoft Advanced Protection Service, and it is a cloud protection service, improving real-time protection.
It is also an online community, where users sent information about malicious software, PUPs, spyware, and other details to Microsoft. The purpose is to stop the spread of computer viruses.
Group Policy is an excellent method to modify computer settings. If you want to learn more about how to edit them, check our comprehensive guide.
3. Use the Registry Editor for Windows 10 Home
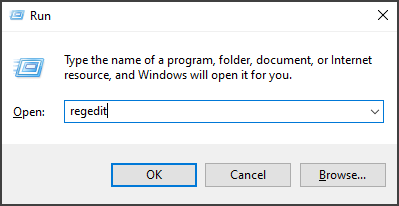
- Launch Run.
- Type regedit and hit Enter.
- Go to the following path:
HKEY_LOCAL_MACHINE/SOFTWARE/Policies/Microsof/tWindows Defender - Under the Windows Defender key, create a new key – name it Spynet.

- In the right-hand pane, create a new DWORD SubmitSamplesConsent – set its value to 2.
- Create a new DWORD SpynetReporting – set its value to 0
Windows 10 Home doesn’t support the Group Policy Editor. If you’re running this OS, use the Registry Editor for this task.
4. Prevent Defender from loading health reports
- Go to Start, type services, and launch Services.

- Locate these three services: Diagnostic Policy Service, Diagnostic Services Host, Diagnostic System Host.
- Right-click each service and select Properties.

- On each service, change Startup Type to disabled – click OK. If the services are currently running, click Stop to close the services and then disable them.
- Restart your computer.
These services aim to detect and troubleshoot the potential problems for the components of your Windows, and network connectivity issues.
We hope one of these solutions helps you get rid of Windows Defender’s yellow triangle warning along with the Cloud-Based and Automatic Sample Submission notifications.
Windows Defender is a great built-in security solution, but it offers only basic options. We recommend you to use any of these dedicated antiviruses compatible with Windows 10.
If you have any other solutions or suggestions that we should include in our guide, please feel free to write them in a comment below.
Read our disclosure page to find out how can you help Windows Report sustain the editorial team. Read more


Improve this guide


User forum
1 messages