Fix: DVD Player not Working After Windows 10/11 Upgrade
5 min. read
Updated on
Read our disclosure page to find out how can you help Windows Report sustain the editorial team. Read more

My DVD drive is not Working on my Windows PC/laptop. What to do?
- Check if your DVD drive is turned on
- Check if all necessary drivers are installed
- Manually fix corrupted registry entries
- Create a registry subkey
- Uninstall your PC’s CD/DVD drive
- DVD drive-related issues
Some Windows users have reported that their DVD drive has stopped working after upgrading the system from Windows 8 to Windows 8.1. Various factors could affect this issue, and we’ll try to cover all the possible solutions and help you solve this annoying problem.
How to fix your DVD-ROM if it is not reading disks after Windows 10 update?
1. Check if your DVD drive is turned on
Installing or updating software on your computer, in this case updating from Windows 8 to Windows 8.1 could sometimes disable some system features. This is because something happens during the installation process, and it may turn off your DVD drive without you noticing it. To check if your device is turned on properly, do the following:
- Open the DVD drive properties by clicking the Start button Picture of the Start button, clicking Computer, right-clicking the DVD drive, and then clicking Properties.
- Click the Hardware tab, and then click the DVD drive.
- Under Device Properties, click Properties, click the Driver tab, click Enable, and then click OK.
If your DVD drive is turned on, you might want to check if your drivers are up to date.
2. Check if all necessary drivers are installed
One of the first solutions for this problem you’re going to find anywhere is definitely to check if your drivers are up to date. You probably already know how to check if your drivers are updated, but if you don’t here’s what you should do:
- Go to Device Manager
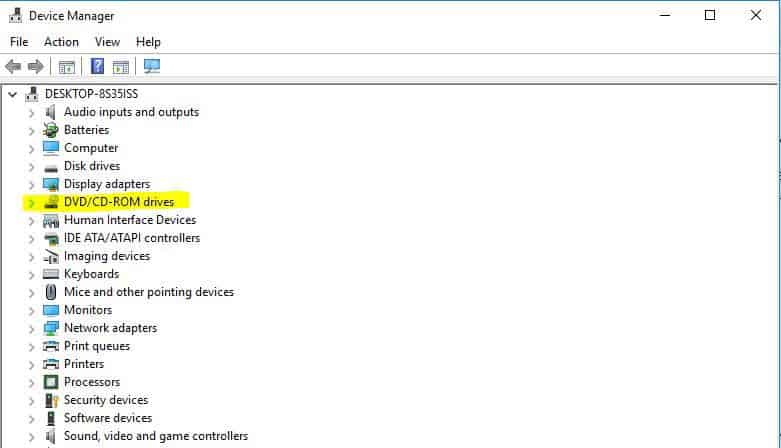
- Find your DVD drive under DVD/CD-ROM drives
- Double-click on your DVD device and go to Drivers tab
- Go to Update Driver and if your driver is not up to date, your computer will update it, otherwise, your driver version will stay the same
We often forget to update our drivers and that may cause a lot of confusion not only with DVD drive but with other parts of our computer or system, especially when the new system is installed. We recommend a third-party utility to automatically download all the outdated drivers on your PC.
This is necessary for an important reason: you will keep your PC safe from malfunctioning because of the wrong driver version. With a dedicated tool, you will be able to choose what drivers to install for which component as it will scan the manufacturer’s websites for the good driver versions.
In case updating your drivers didn’t help, then try some of these other solutions, listed below.
3. Manually fix corrupted registry entries
If the previous two solutions didn’t help, then maybe our problem lays in the registry of the system. In that case we’ll have to manually fix a couple of registry entries, in order to make our DVD drive work again. Here’s what you should do:
- Press the Windows key and R at the same time to open the Run dialog box
- Type regedit in the Run dialog box, then press Enter. If you are prompted for an administrator password or for a confirmation, type the password, or click Allow
- In the navigation pane, locate and then click this registry subkey:
- HKEY_LOCAL_MACHINESYSTEMCurrentControlSetControlClass{4D36E965-E325-11CE-BFC1-08002BE10318}
- In the right pane, click UpperFilters
- On the Edit menu, click Delete
- Click Yes when you’re asked to confirm the deletion
- In the right pane, click LowerFilters
- On the Edit menu, click Delete
- Again, click Yes when you’re asked to confirm the deletion
- Exit Registry Editor
- Restart the PC
If the problem is still present after this registry tweak, you’ll need to create one registry subkey.
4. Create a registry subkey
To create the registry subkey and enter it into registry, follow these steps:
- Press the Windows key and R to open the Run box.
- Type regedit in the Run box, then press Enter. If you are prompted for an administrator password or for a confirmation, type the password, or click Allow
- In the navigation pane, locate the following registry subkey:
- HKEY_LOCAL_MACHINESYSTEMCurrentControlSetServicesatapi
- Right-click atapi, point to New, then click Key
- Type Controller0, and then press Enter
- Right-click Controller0, point to New, and then click DWORD(32-bit) Value .
- Type EnumDevice1, and then press Enter
- Right-click EnumDevice1, click Modify
- Type 1 in the Value data box, and then click OK.
- Exit Registry Editor
- Restart the computer
5. Uninstall your PC’s CD/DVD drive
This might be an ultimate solution at the first sight, but it isn’t. After uninstalling your CD/DVD drive and restarting your computer, the CD/DVD drive and its drivers will be automatically reinstalled. So, here’s what you need to do in order to perform this ‘hard reset’:
- Right-click on the Start Menu
- WinX menu will open. Select and click Device Manager
- Select DVD/CD-ROM drives and expand it by clicking the arrow at the left of this option
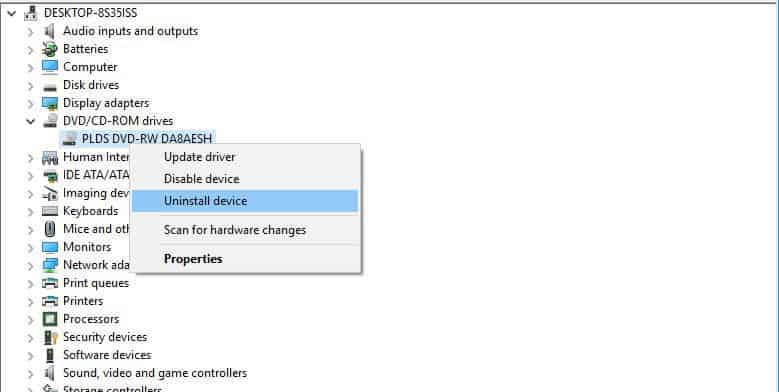
- Right-click on your DVD drive and select Uninstall
- If a warning pops-up, click OK
- After the drive was uninstalled, close all the windows and restart your pc
- After the restart, check if it can read CDs and DVDs
6. DVD drive related issues
There are plenty of DVD-ROM issues that we have written about. You can simply have the DVD drive missing on your PC or some specific players simply not working in Windows. You may also encounter a very annoying error that is CD/DVD-ROM eject button not working. If you are facing these issues and cannot play your DVDs, try to use one of the DVD player apps from this list.
Read Also: Fix: DVD Won’t Play on ASUS Laptop


User forum
0 messages