8 Ways to Fix Disk Defragmenter Won’t Run in Windows 10
Check out these solutions to fix Disk Defragmenter not working on your PC
10 min. read
Updated on
Read our disclosure page to find out how can you help Windows Report sustain the editorial team. Read more
Key notes
- The disk defragmenter is a vital component of any Windows PC.
- It allows you to rearrange memory clusters for faster access to data on your disk.
- Several users have reported facing Disk Defragmenter not working on Windows 10/11 issue.
- This guide lists down some popular solutions that will help you resolve the problem.

Performing disk defragmentation is always helpful, especially in Windows 10 Technical Preview. Because you get new updates almost every day, you should use disk defragmentation to keep your disk optimized.
However, several user reports claim that disk defrag is not working for them on their Windows 10/11 PCs.
If the disk defrag does not work, it becomes hard for you to optimize your disk, and it also fills the gap in the disk by bringing all parts of a file together.
Thankfully, this guide has listed many solutions to help you fix the disk defrag not working issue on Windows 10 and 11. So let us check it out.
Why is my Disk Defragmenter not working?
Well, the first thing you should know about is the common reasons that would trigger the issue. In our case, let us check out the most common reasons responsible for the Disk Defragmenter not working in Windows 10/11.
- The disk defrag service is disabled
- Some third-party applications are conflicting with the service
- The antivirus tool is blocking the service
- Corrupt system files can also cause the service to malfunction
- Your hard drive might have some errors
Does defragging speed up the computer?
If your PC loads from a hard drive, disk defragging will help speed up the PC. Also, you will witness a noticeable difference in speed if you haven’t performed the disk defragment process in quite a while.
However, it shouldn’t be done daily since that won’t help speed up your PC. When you defrag your hard disk, it arranges all the parts of a file in one place, thus speeding up your PC.
How do I fix a Disk Defragmenter that won’t run on Windows 10?
Many users frequently defragment their drive to achieve maximum performance; however, issues with Disk Defragmenter can sometimes occur.
Speaking of issues, these are some of the most common problems with Disk Defragmenter:
- Disk Defragmenter service missing Windows 10 – Many users reported that the Disk Defragmenter service is missing on Windows 10. If that’s the case, try running Disk Defragmenter from Safe Mode or a different user account.
- Windows 10 defrag optimization not available – This is another problem that can appear on Windows 10. However, you should be able to fix it using one solution.
- Windows Disk Defragmenter is not working – Many users reported that Disk Defragmenter isn’t working. This can be due to corrupted files, but you can fix that with SFC or DISM scan.
- Defrag won’t run in Safe Mode – Several users reported that they couldn’t defrag their drive in Safe Mode. This usually happens if your installation is corrupted. If SFC or DISM scan can fix this problem, you might have to reinstall Windows 10.
- Defrag won’t launch, work, open – There are various problems with defrag tool that can occur on your PC, and if you’re having any of these problems, you should be able to fix them using one of our solutions.
This issue might occur because of the corrupt installation of a third-party defragmenter or because the defragmenter isn’t compatible with Windows 10. To solve this problem, try the following solutions from this article.
1. Disable your antivirus
If your Disk Defragmenter won’t run on your PC, the problem might be your antivirus. Some antivirus tools can interfere with Windows components and prevent applications such as Disk Defragmenter from running.
To fix this problem, it’s advised to check your antivirus configuration and try disabling features that might interfere with Disk Defragmenter.
If that doesn’t work, you might want to try disabling your antivirus software entirely. Finally, in the last case scenario, you can try removing your antivirus and check if that resolves the problem.
If removing the antivirus fixes the issue, you might consider switching to a different antivirus solution.
There are many options available, and some of the best antivirus software offer full-featured free trials, so you can try out a few if you are unsure what to pick.
2. Use third-party tools
If you still can’t run Disk Defragmenter on Windows 10/11, you might want to consider using a third-party tool. Disk Defragmenter is a solid application but offers limited features compared to other tools.
If you need access to advanced features, you might want to consider using a third-party solution.
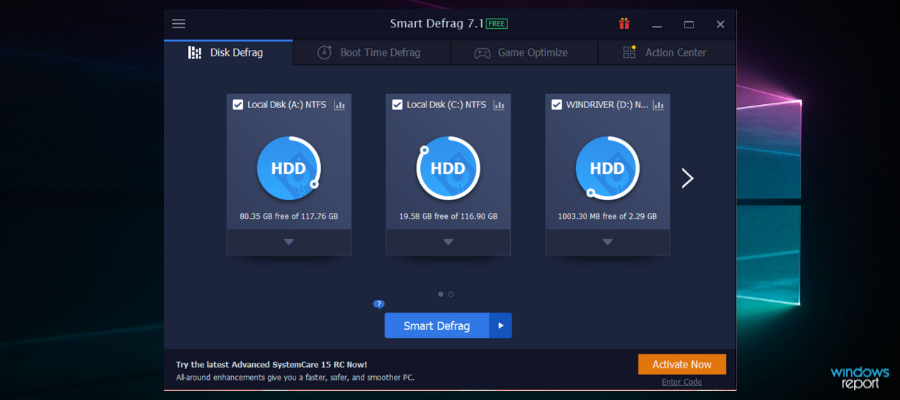
One great example of such a tool is IObit Smart Defrag 6, a dedicated tool made to rearrange the memory on your PC to improve its speed and responsiveness.
It boasts a simplistic UI, familiar with Windows 10/11’s native defrag tool, but with plenty of other features.
If none of these solutions work, you could try to change your defrag tool. Maybe our list of top five defrag tools for Windows 10/11 can help you.
Over time, your PC becomes clogged with unnecessary files and folders. Get rid of them with IObit Smart Defrag 6 to speed up your PC, reduce boot times and boost gaming performance.

IObit Smart Defrag
A doctor for your PC to make it run smoother than ever.3. Perform SFC Scan
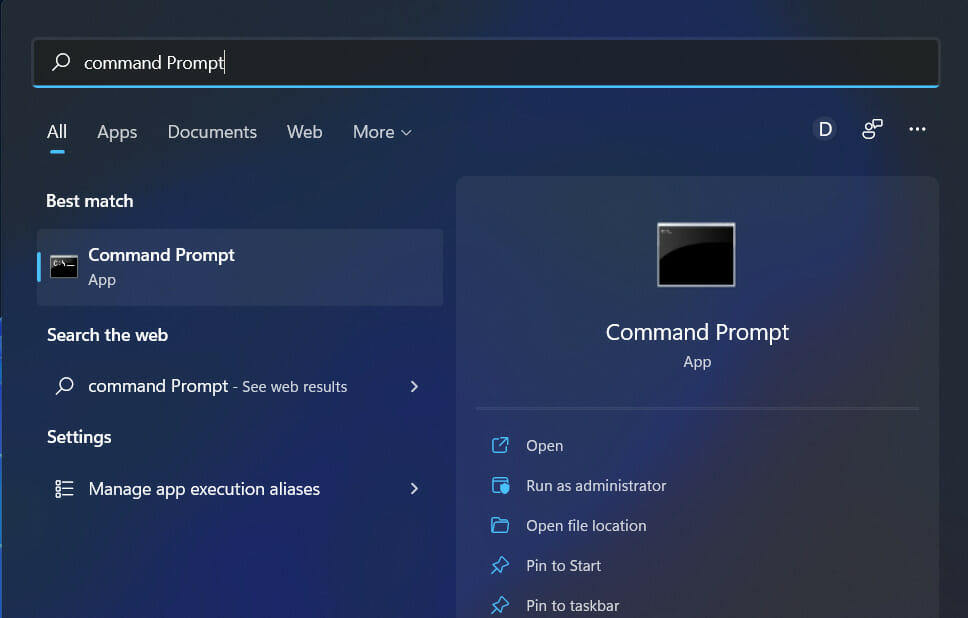
- Open the Start menu.
- Type Command Prompt and open it as an administrator.
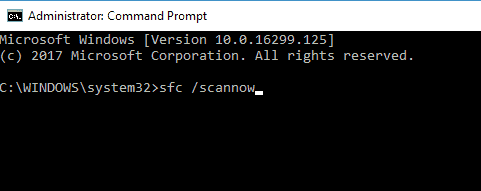
- Type the below and press Enter to run it.
sfc /scannow
- SFC scan will now start. The scan can take up to 15 minutes, sometimes more, so don’t interrupt it.
Once the SFC scan is finished, check if the issue persists. If you could not run the SFC scan or if the SFC scan didn’t fix the problem, you need to run the DISM scan.
To do that, follow these steps:
- Start Command Prompt as administrator.
- Type the below, and then press Enter to run it:
DISM /Online /Cleanup-Image /RestoreHealth
- DISM scan will now start. Remember that this scan can take up to 20 minutes or more, so don’t cancel it.
Once the DISM scan is finished, check if the problem persists.
If the issue is still present or you could not run an SFC scan before, try re-running it. Once the SFC scan is finished, the problem should be resolved.
Several users reported that the DISM scan fixed the problem on their PC, so feel free to try it out.
4. Check if the Disk Defragmenter service is running properly
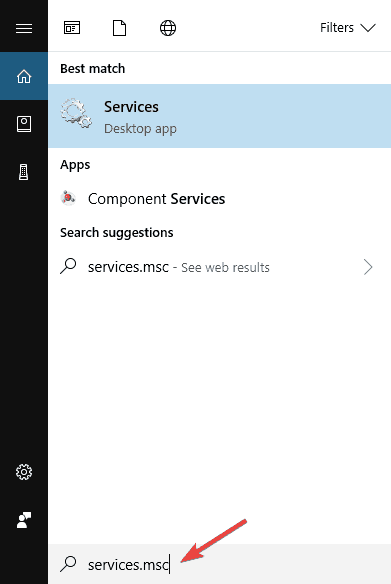
- Open the Start menu.
- Type services.msc and hit Enter.
- Make sure that the Disk Defragmenter service is set to Manual.
- Also, make sure that the following services are set to Automatic:
- Remote Procedure Call (RPC)
- DCOM Server Process Launcher
- RPC Endpoint Mapper
Maybe your Disk Defragmenter service is not running properly. This service is required for performing disk defragmentation; if it’s disabled, you won’t be able to run a defrag tool.
After making these changes, check if the problem is resolved.
5. Try using Safe Mode
- Open the Start Menu.
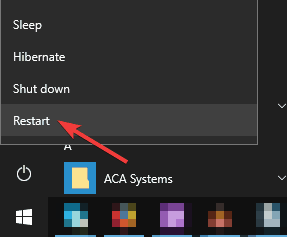
- Click the Power button, hold the Shift key and choose Restart from the menu.
- When your computer restarts, choose Troubleshoot.
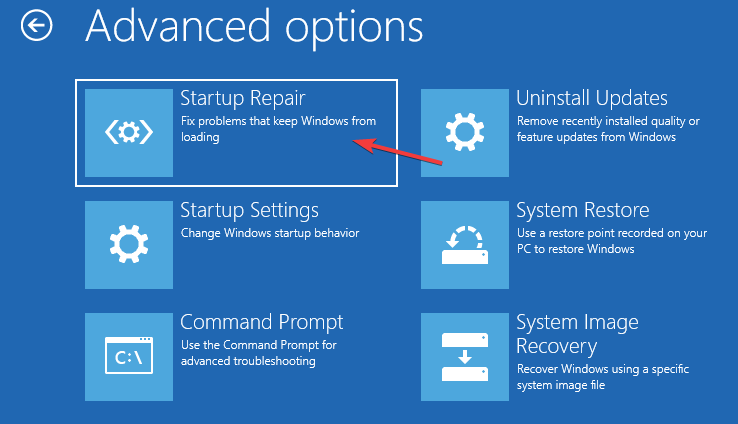
- Then click on Advanced options.
- Select Startup Settings and click Restart.
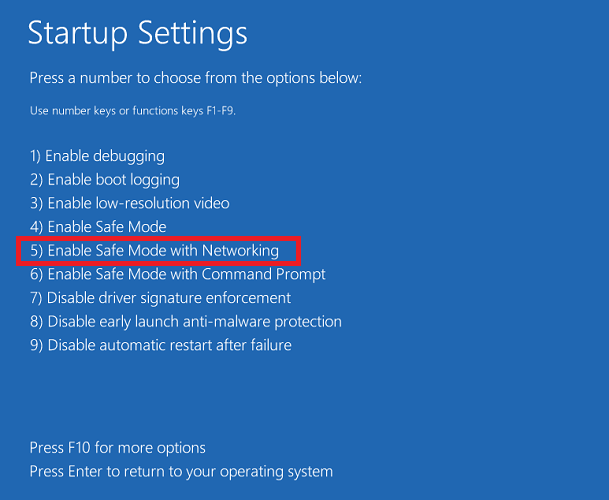
- Press F5 to select Safe Mode with Networking when your computer restarts again.
If Disk Defragmenter doesn’t run on Windows 10, you might be able to fix the issue by running it from Safe Mode.
If you’re unfamiliar, Safe Mode is a segment of Windows that runs with default settings and drivers, so it’s perfect for troubleshooting.
Sometimes specific applications, such as Disk Defragmenter, won’t work because your settings or third-party applications interfere with it. You need to start Windows 10 in Safe Mode to circumvent the problem.
Once you enter the Safe Mode, start Disk Defragmenter again; it should work without any problems.
Keep in mind that this is just a workaround, and if Disk Defragmenter doesn’t work on Windows 10, you’ll always have to start it using this method.
6. Make sure that other applications aren’t running
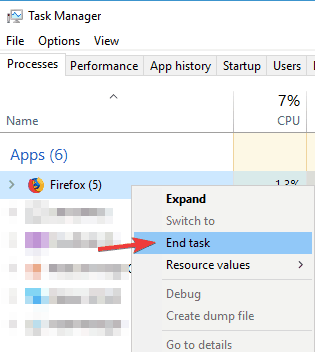
- Press Ctrl + Shift + Esc to start Task Manager.
- Go to the Processes tab, and locate the application you want to close.
- Right-click it and choose End task from the menu.
- Repeat the previous step for all running applications.
If you cannot run Disk Defragmenter, the problem might be other applications running in the background. In addition, many applications can interfere with Disk Defragmenter causing specific issues to appear.
To prevent any potential problems, it’s advised that you disable all third-party applications that can interfere with Disk Defragmenter.
You can manually close these applications, but if you want to do it faster, you can try using Task Manager.
After that, try running Disk Defragmenter and check if it works properly.
7. Create a new user profile
- Press Win + I to open the Settings app.
- When Settings opens, navigate to the Accounts section.
- In the left pane, select Family & other people. In the right pane, choose to Add someone else to this PC.
- Select I don’t have this person’s sign-in information.
- Choose Add a user without a Microsoft account.
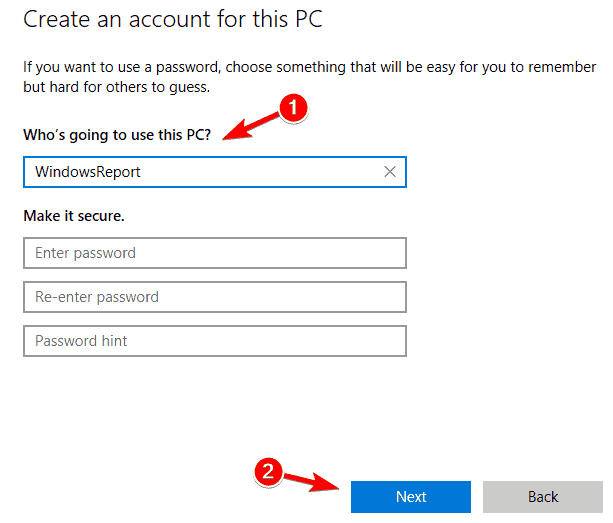
- Enter the desired user name and click Next.
After creating a new user account, switch to it and check if Disk Defragmenter works. If it works on a new profile, the issue is caused by your old profile.
8. Use CHKDSK utility
- Open command prompt as an administrator.
- Type the below command and press Enter.
chkdsk /f X:- Remember that you need to replace X with the letter representing your drive.
- If you choose to scan the C drive, press Y to schedule a restart and restart your PC.
- The CHKDSK scan should now start.
- Keep in mind that a CHKDSK scan can take 20 minutes or more, depending on your partition size.
If you can’t run Disk Defragmenter, the issue might be caused by corrupted files on your hard drive. To fix that problem, first, you need to try to repair those files.
This is relatively simple, and you can do it using the CHKDSK command. After the process is finished scanning your drive, try to defragment that drive again.
What can I do if defrag is not working on Windows 11?
There could be several reasons why the disk defrags are not working for your Windows 11 PC—however, some of the common reasons behind this issue, which are troubling users, are mentioned below.
- Disable or close all background apps: Some third-party or background app/process is interfering with the disk defragmenter service on your PC.
- Fix corrupt system files: There are some underlying corrupt system files on your Windows PC.
- Disable antivirus: Your antivirus or firewall is blocking the disk defrag service.
- Sort out hard drive issues: The presence of hard drive issues can also trigger the problem.
- Enable the service: You haven’t enabled the disk defrag service in the first place.
- Disable all third-party apps: A third-party program has disabled the service.
Does Windows 10 need defragging?
Every iteration of the OS, including Windows 10, needs defragging, but that isn’t what’s of concern here. The primary aspect you should identify before considering defragging is whether you are using an HDD (Hard Disk Drive) or SSD (Solid State Drive).
The HDDs require regular defragging, some recommend a minimum of once a month or if the fragmentation is higher than 10%. SSDs, on the other hand, do not require defragging. Moreover, defragging an SSD can cause unnecessary wear and tear.
How do I force defrag?
- Open the Start menu.
- Search for Command Prompt and open it as an administrator.
- Execute the below command and press Enter.
defrag C: - This will force your system to start the disk defrag process.
As you can see, there are plenty of options for solving this issue once and for all, so try them out individually.
If you have any suggestions, contact us by using the comment section below this guide.







User forum
3 messages