Fingerprint reader not working after sleep in Windows 10/11
7 min. read
Updated on
Read our disclosure page to find out how can you help Windows Report sustain the editorial team Read more
Key notes
- Some users happen to leave their PC asleep just to see that the fingerprint reader stops working.
- Some productive tips include grabbing the latest fingerprint reader drivers and updating your BIOS.
- Unauthorized access may be prevented when using a password too. Feel free to check out these great password managers.
- Prevent issues from affecting your PC performance by vising our Windows 10 Troubleshooting Hub.

One of the best ways to protect your Windows 10 device from unauthorized access is to use a password, or better yet – a fingerprint.
Unfortunately, few users have reported that the fingerprint reader is not working after Windows 10 wakes up from sleep, so let’s fix that.
This issue is particularly common on the following manufacturers’ devices: HP, Lenovo, Asus, Dell.
What can I do if the fingerprint reader is not working?
- Download the latest drivers for your fingerprint reader
- Check power management settings
- Disable and enable Credential Manager service
- Disable and enable your fingerprint reader
- Lock your device manually
- Switch to local account / create a new account
- Prevent your PC from turning off USB devices
- Uninstall fingerprint software
- Remove and recreate your PIN
- Update your BIOS
1. Download the latest drivers for your fingerprint reader
If the fingerprint reader isn’t working after you wake up your computer from sleep, maybe it’s time to perform a driver update.
To perform this task, you basically need to go to your laptop manufacturer’s website, look for the most recent drivers, and download them.
If you’d like to avoid the hassle of searching for drivers on your own, you can use a dedicated tool that will do this for you automatically.
After the scan is complete, you get a report on all drivers that need your attention, so feel free to update only the fingerprint reader drivers or the complete driver’s batch.
2. Check power management settings
- Press Windows Key + X and choose Device Manager from the list.
- When Device Manager opens, locate your fingerprint reader. It should be located in Biometric Devices section.
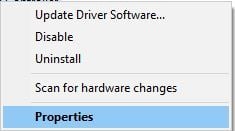
- Right-click your fingerprint reader and choose Properties.
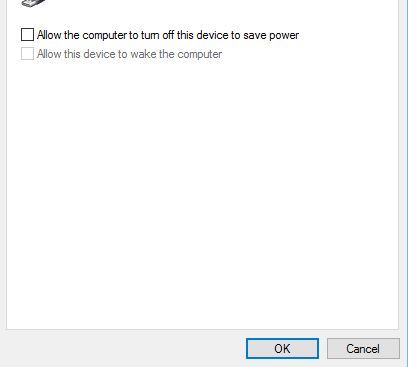
- Navigate to the Power Management tab and uncheck Allow the computer to turn off this device to save power.
- Click OK to save changes.
If your fingerprint reader isn’t working after you wake up Windows 10 from Sleep Mode, you might want to check its power management settings. To do that, follow the above steps.
3. Disable and enable Credential Manager service
- Press Windows Key + R shortcut to open the Run dialog. Type services.msc and click OK or press Enter.
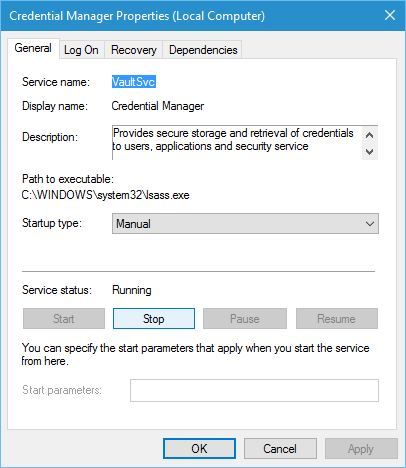
- When the Services window opens, locate Credential Manager service and double click it.
- The Credential Manager Properties window will open. Go to the Service status section and click on Stop.
- After you’ve stopped the service, click on Start to restart the service.
- Click Apply and OK to save changes.
Sometimes problems with fingerprint readers can be fixed if you restart certain services.
Users have reported that they have managed to fix this issue by disabling and enabling the Credential Manager service, and you can do that as well if you follow the above steps.
4. Disable and enable your fingerprint reader
- Open Device Manager.
- Locate the Biometric Devices section and expand it.
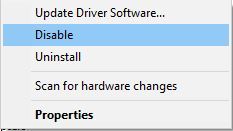
- Find your fingerprint reader, right-click it, and choose Disable from the menu.
- Right-click the fingerprint reader again, but this time choose Enable.
Certain problems with the fingerprint reader can be fixed simply by disabling it and enabling it back again. To do that, follow the given procedure.
5. Lock your device manually
This is a simple workaround if your fingerprint reader isn’t working after sleep mode.
In order to avoid any problems with the fingerprint reader, just lock your laptop (by pressing Windows Key + L on your keyboard) before you close the lid.
Users have reported that using the Windows Key + L shortcut on the lock screen fixes the problem with the fingerprint reader.
However, we have to mention that you’ll have to use this shortcut every time you put your computer to sleep. This might not be the most practical solution, but users are reporting that it works.
6. Switch to local account / create a new account
- Go to Settings and click on the Account icon.
- In your account click Sign in with a local account instead.
- You’ll be asked to enter the current password. Now click on Next.
- Set your user name, the password for your local account. After doing that, click on Next.
- Now click on Sign out and finish.
Some users reported that switching to a local account resolves this issue. And that’s exactly what we’re going to try now. Use the above steps to switch from your regular Microsoft account to a local account.
7. Prevent your PC from turning off USB devices
- Open Device Manager.
- Go to the Universal Serial Bus controllers section and double click USB Root Hub.
- Navigate to the Power Management tab. Now uncheck Allow the computer to turn off this device to save power. Click on OK to save changes.
- Repeat these steps for all USB Root Hub devices that you have on your PC.
There’s a chance your computer is set to automatically disable USB devices. If that’s the case, you’ll have to change that.
8. Uninstall fingerprint software
- Open the Settings app. You can do that quickly by using Windows Key + I shortcut.
- The Settings app will now appear. Navigate to the Apps section.
- Locate the fingerprint reader software on the list and select it. Now click the Uninstall button.
- Follow the instructions on the screen to complete the uninstallation process.
Reinstallation is a good old solution for just about any problem. And we’re going to give it a try. Uninstall your fingerprint software by following the above procedure.
9. Remove and recreate your PIN
- Open the Settings app and navigate to the Accounts section.
- Select Sign-in options from the menu on the left. In the right panel go to the Windows Hello section and click on the Remove button under Fingerprint.
After removing fingerprints, you need to remove your fingerprint driver. Now you need to download and install the latest driver for your fingerprint reader.
Lastly, you need to register two new fingerprints. To do that, follow these steps:
- Go to Settings app > Accounts > Sign-in options.
- Make sure that you have a PIN set up. If not, set up your PIN now.
- Go to the Windows Hello section in the right pane and click on the Setup button.
- Follow the instructions on the screen to set up your fingerprint.
- After adding a fingerprint, go to the Windows Hello section and click on Add another button.
- Follow the instructions on the screen to add another fingerprint.
10. Update your BIOS
And finally, if none of the solutions above resolved the problem, one final thing you can try is updating BIOS.
But remember, this should be your last resort, because updating BIOS is a risky business, and one wrong step can basically render your computer unusable.
If you want to find out more about updating BIOS, check out the link below. But still, if you’re not sure in what you’re doing, ask a professional for help.
Although the fingerprint reader provides the best security for your Windows 10 device, some problems, such as this one, can occur.
If you have any problems with the fingerprint reader and sleep mode, feel free to try some of our solutions.
As always, for more suggestions or questions, Don’t hesitate to reach out for the comments section below.


