Fix Video Streaming Problems on Windows 10 [Woes, Buffering]
Find all the solutions to fix Windows 10 streaming buffering problems
11 min. read
Updated on
Read our disclosure page to find out how can you help Windows Report sustain the editorial team. Read more
Key notes
- Video streaming has become a popular alternative to downloading and storing media on your computer.
- Playback issues arise either because of the website, the type of video file, or your internet connection.
- We covered all potential culprits so that you can fix video streaming problems in no longer than a few minutes.
The advantage of video streaming is that you’re able to start watching the videos once the download commences, as the file is sent in a constant stream, so you don’t need to keep waiting.
The benefits include the ability to do live broadcasts or webcasts, so you need to deliver it from a specialized streaming server.
Video streaming problems may occur due to several factors including Internet speed and the type of media player you’re using.
Why is my streaming not working?
If you’re experiencing video streaming problems in Windows, there are a few checks you need to consider before troubleshooting, including:
- Slow Internet connection: A slow Internet speed or random loss in connection is the primary reason users face video streaming issues in Windows 10.
- Issues with the browser: Oftentimes, it’s the browser or corrupt browsing data to blame for the problem.
- Video file format and quality: Certain file formats are difficult to stream and could lead to compatibility issues. Even a very high-quality video could make streaming difficult on a poor connection.
- Problems with the website: In many cases, it’s an issue with the website’s server or in its code that leads to streaming issues.
- Background applications: The more background applications consume data, the lesser the speed available for streaming. So, check that. And especially look for any ongoing OS updates since these are usually prioritized.
- Misconfigured device settings: Hardware acceleration or other browser and device settings could trigger video streaming issues in Windows 10.
If your Internet network connectivity is constantly fluctuating, you may have video streaming problems such as slow and inconstant buffering.
However, if your Internet connection works fine but you still have video streaming issues, you need to check your media player, and change the buffer settings because each player has its own buffer settings.
Some of the most common video file formats used when creating video streams include Windows Media, Quicktime, MPEG-4, Adobe Flash, and RealMedia.
Ensure you check your wireless network card, the version driver you’re using, and the router model and firmware because you may have to upgrade the drivers, the router, and the firmware in some cases.
Why is my Internet fast but streaming slow?
Slow Internet speed on Windows 11 or any other operating system is a common problem, and in most cases, it’s related to your ISP or network hardware.
However, many reported issues with streaming services, and according to users, Twitch keeps buffering even if their connection is fast.
This isn’t the only service affected by this issue, and many reported Disney Plus buffering issues, but luckily, there are ways to fix this problem.
How do I fix video streaming issues on Windows 10?
Before we start making major changes, here are a few quick things to try:
- Check for any pending Windows updates and install them. An up-to-date OS is imperative for faster performance.
- Disable the antivirus and firewall, both built-in and third-party, temporarily and check whether the streaming issues in Windows 10 are eliminated. If yes, we recommend you switch to a more reliable and effective antivirus solution.
If none work, move the solutions listed next.
1. Run the Hardware and Devices troubleshooter
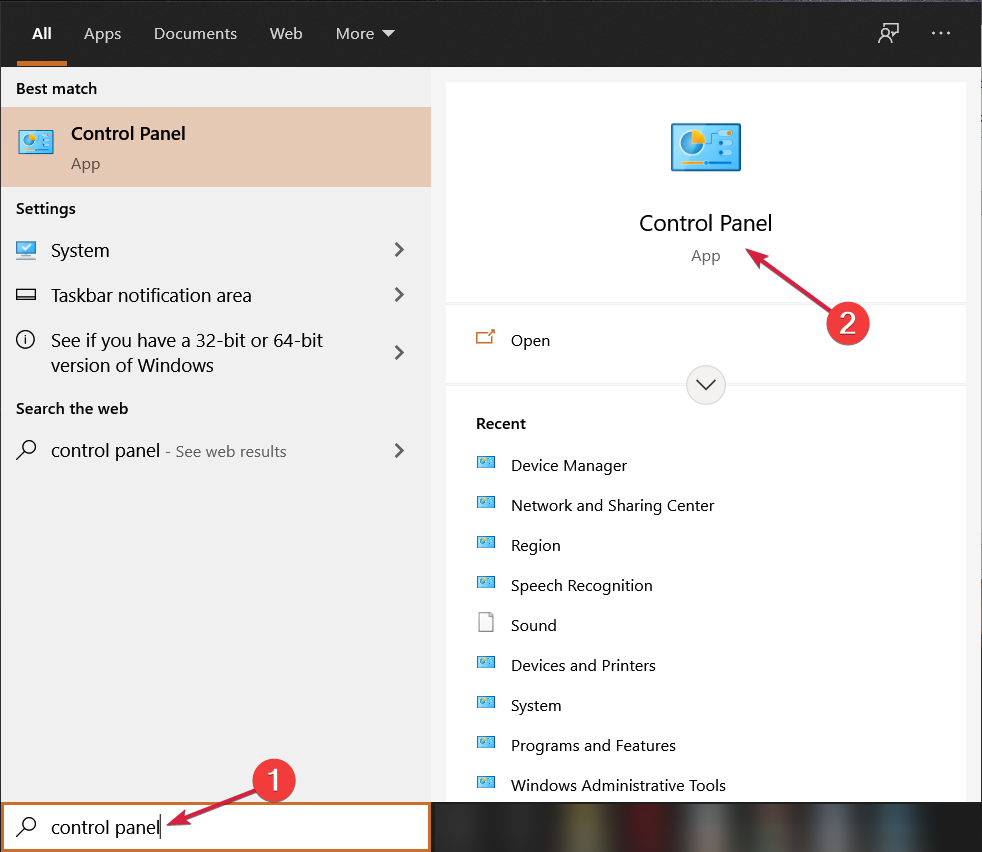
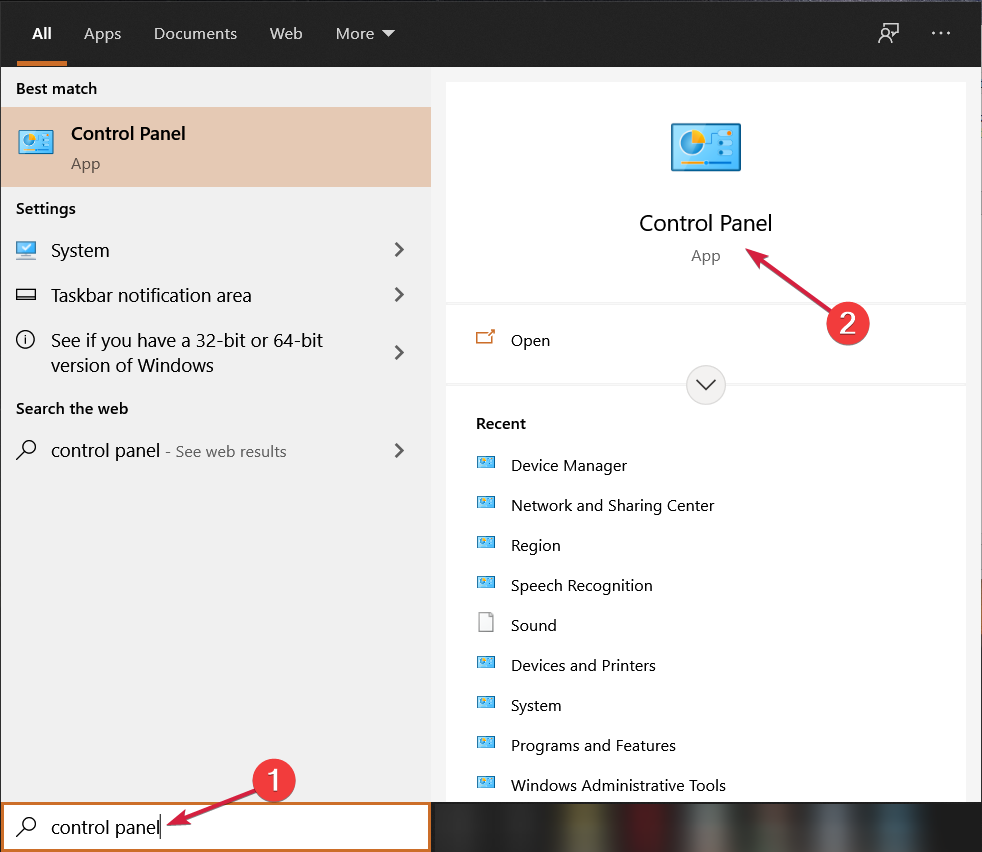
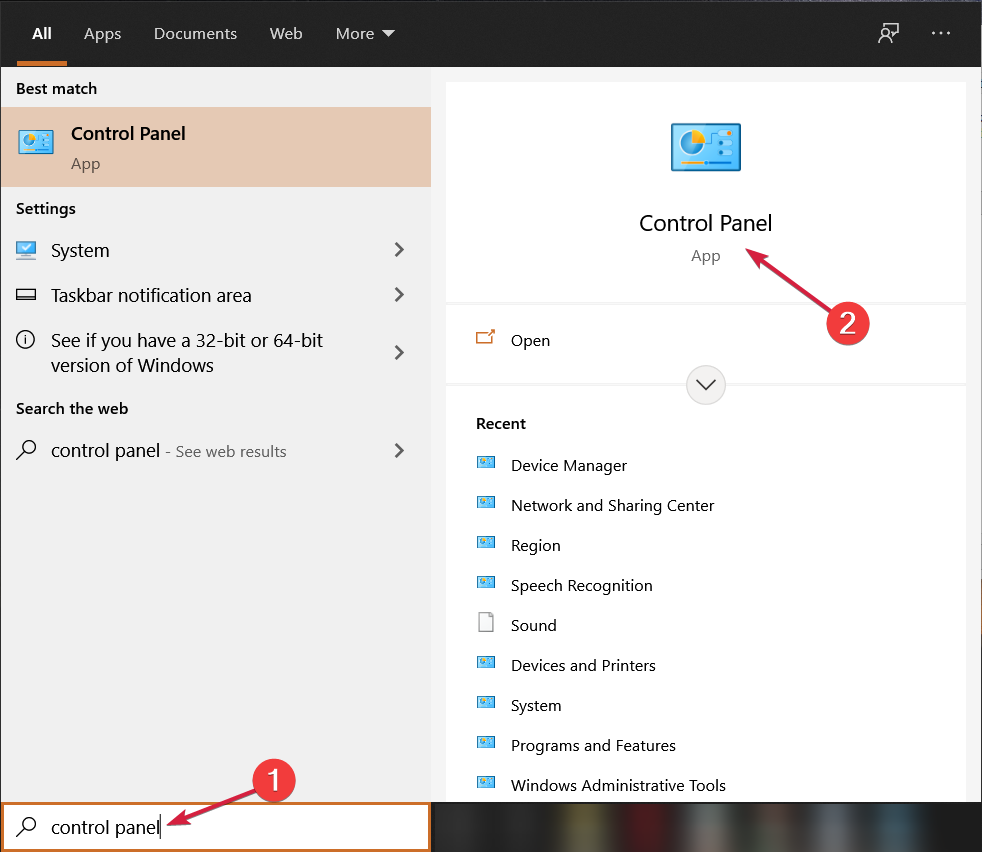
- Click the Start button, type control panel, and select the app from the results.
- Go to the View by option on the top right corner and select Large icons.
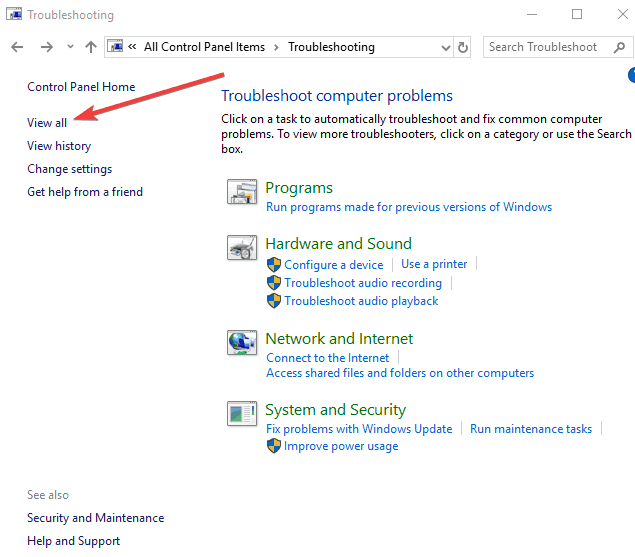
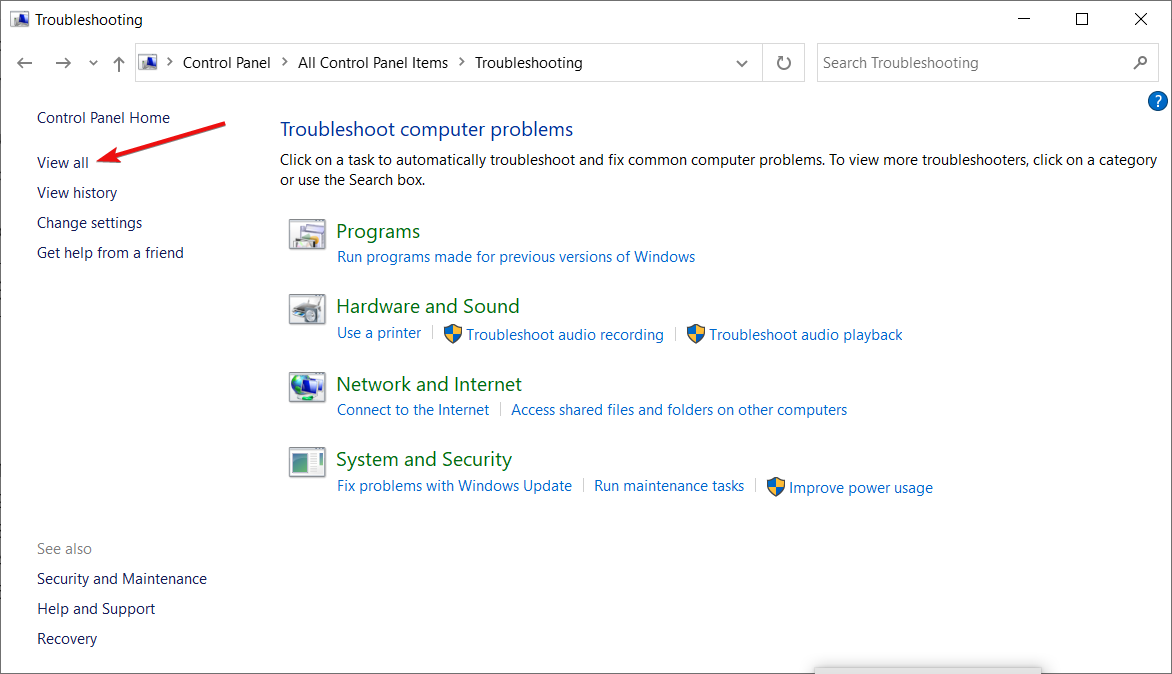
- Next, click Troubleshooting.
- Click View all option on the left panel.
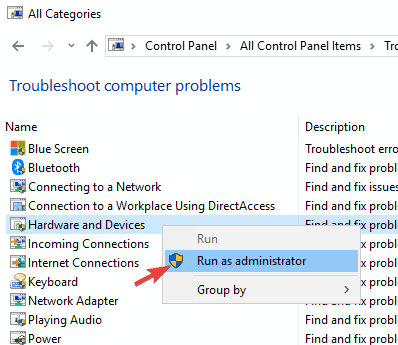
- Click Hardware and Devices and select Run as administrator.
- Finally, click Next to run the troubleshooter.
- Follow the steps on the screen.
If you’re experiencing problems with video streaming, then run the Hardware and Devices troubleshooter to resolve the issue.
This checks for commonly occurring issues and ensures any new device or hardware is correctly installed on your computer.
Follow the instructions to run the Hardware and Devices troubleshooter. The troubleshooter will begin detecting any issues that may be causing video streaming not to work as it should.
Hopefully, the troubleshooter will also optimize Windows 10 for streaming video and you will be able to enjoy your video.
2. Update display drivers
2.1 Start your PC in Safe Mode
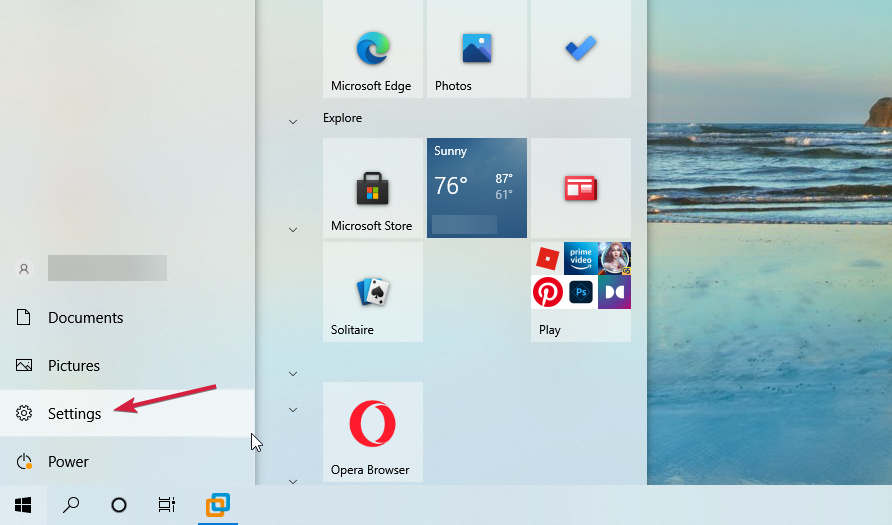
- Click on the Start button and select Settings.
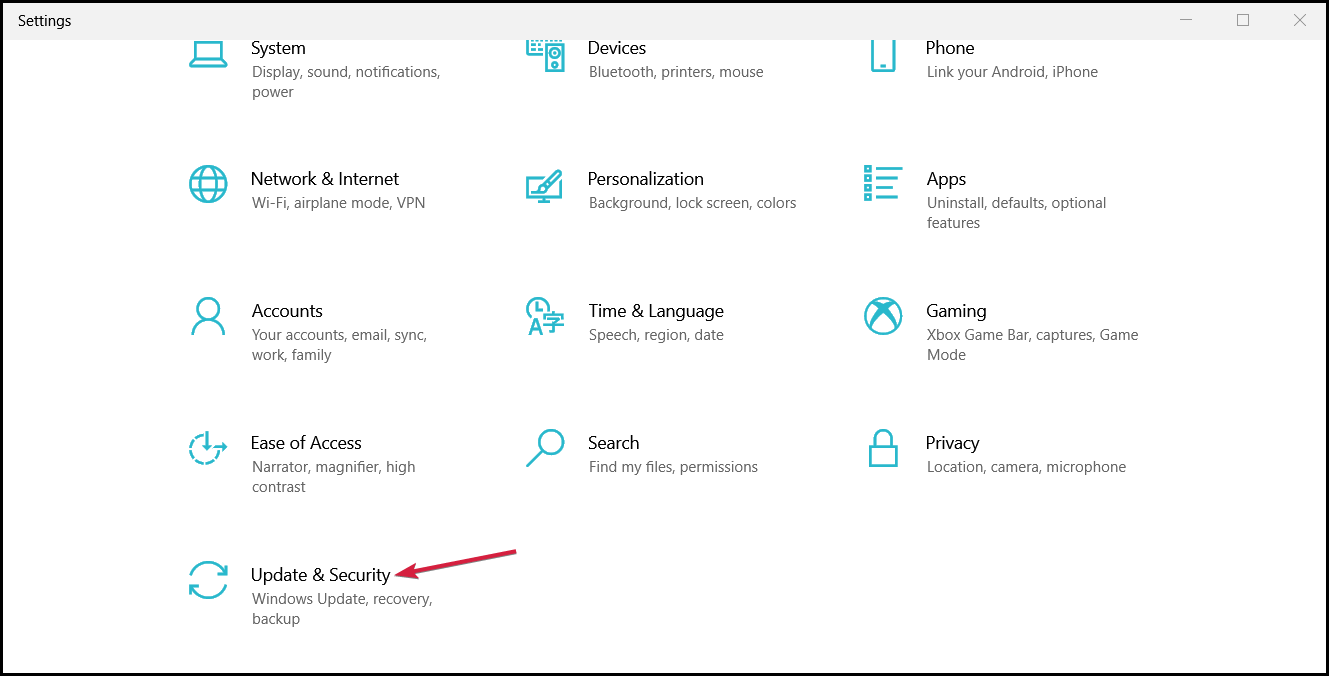
- Click Update & Security.
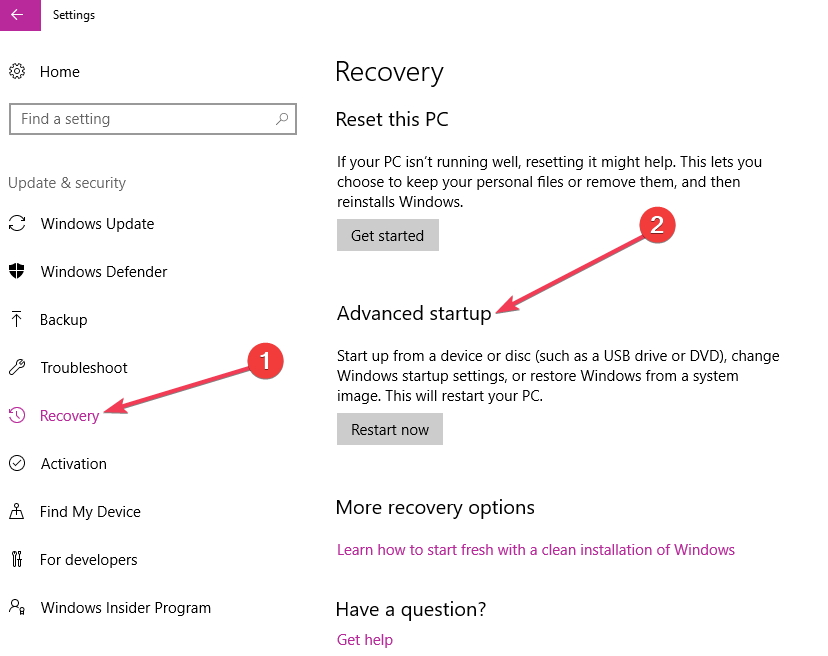
- Select Recovery from the left pane and go to Advanced startup.
- Click Restart now.
- Select Troubleshoot from the choose an option screen, then click Advanced options
- Go to Startup Settings and click Restart.
- Once your computer restarts, a list of options will come up.
- Choose 4 or F4 to start your computer in Safe Mode.
In order to update display drivers, you need to start your computer on Safe Mode, then uninstall your current display adapter, and finally check for driver updates.
Safe mode starts up your computer with limited files and drivers, but Windows will still run. To know whether you’re on Safe mode, you’ll see the words at the corners of your screen.
If the video streaming problem isn’t there while in Safe Mode, then your default settings and basic drivers are not contributing to the issue.
2.2 Use the Device Manager
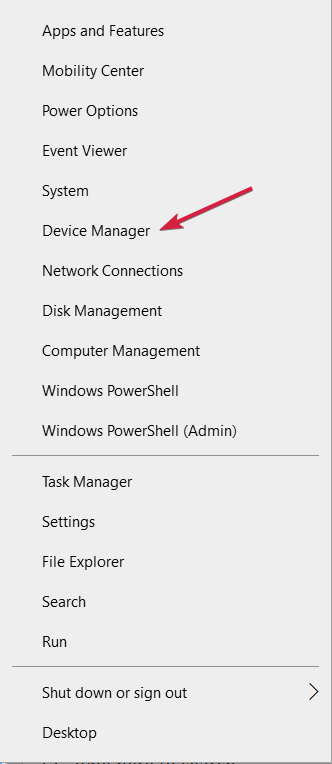
- Right-click the Start icon and select Device Manager.
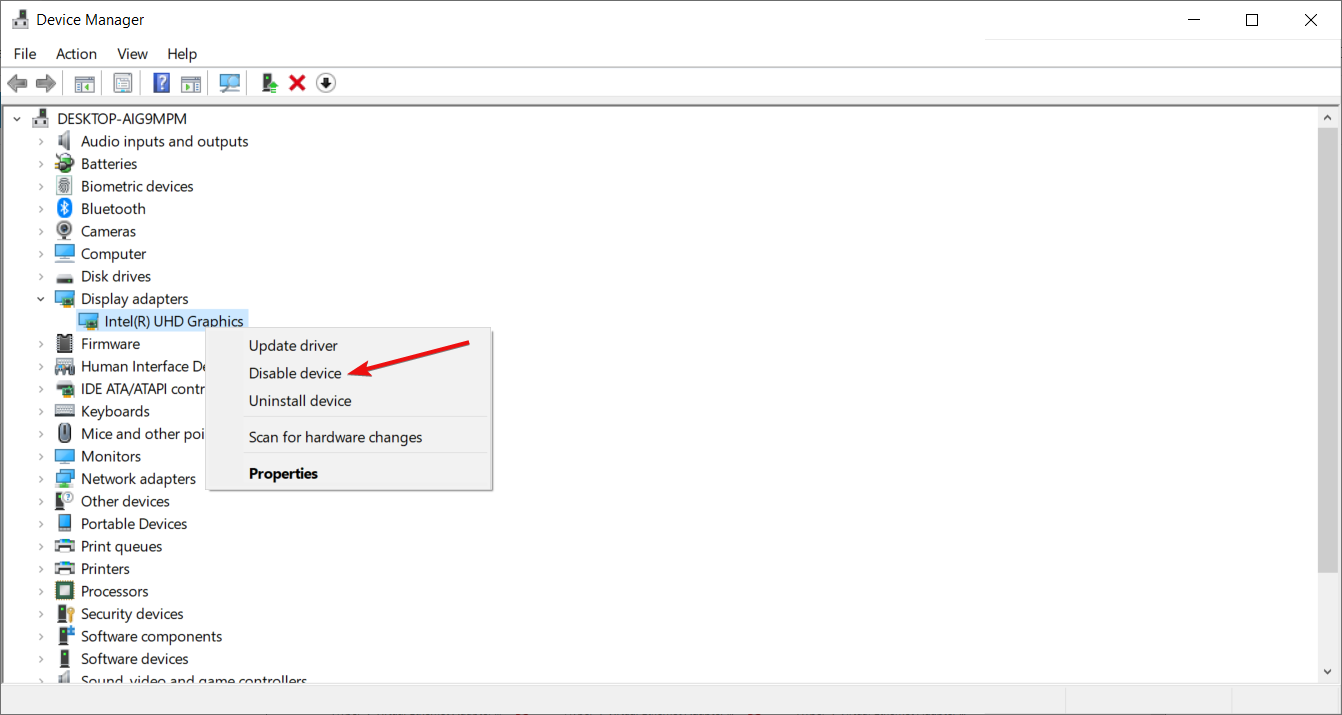
- Right-click the added adapter from Device Manager
- Select Disable and click Yes to confirm.
- Turn off your computer and disconnect any installation or recovery media if you’re using one.
- Turn on your computer and see if the problem has been resolved.
If you have many display adapters, you need to disable the added display adapter by performing the steps above.
If this doesn’t fix the video streaming problems, do the following:
- Restart in Safe Mode
- Re-enable the added display adapter
- Disable the other adapter
Once you’re through and the video streaming issue is sorted, exit safe mode so you can get your computer back to normal mode.
2.3 Exit Safe Mode
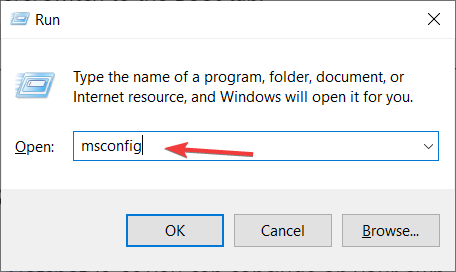
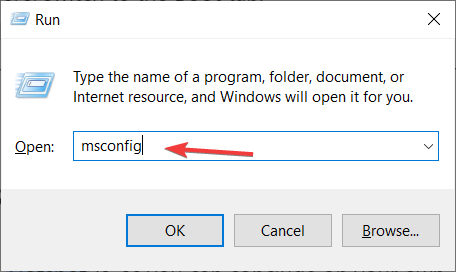
- Press the Windows key + R to start the Run console, type msconfig, and press Enter or click OK.
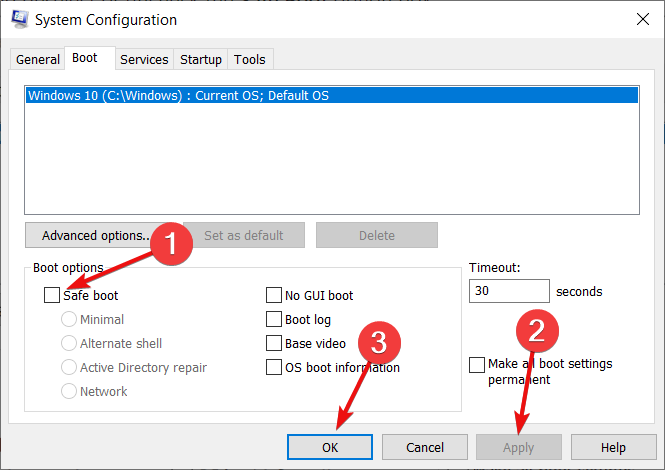
- Go to the Boot tab and deselect or uncheck the Safe Boot option box.
- Restart your computer.
2.4 Update your drivers automatically
Updating drivers manually is very annoying and could cause permanent damage to your PC by downloading and installing the wrong driver versions.
We strongly recommend using a professional driver updater tool to do it automatically.
Outbyte Driver Updater keeps your system running smoothly by upgrading its drivers. This utility analyzes your system for outdated drivers.
With a few clicks, the program will scan your PC’s hardware and peripherals for potential driver upgrades. We recommend using it to save yourself some time.
3. Disable Adaptive brightness
- Click the Start button, type control panel, and select the app from the results.
- Now, click Hardware and Sound.
- Click Advanced Power Options.
- Enable Adaptive Brightness then change the settings to Off.
Does the video streaming issue persist? Try the next solution if this didn’t help.
4. Update graphics card drivers
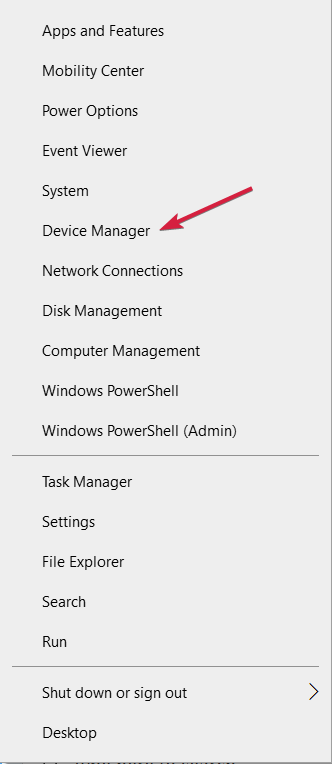
- Right-click the Start button and select Device Manager.
2. Click Display adapters to expand the section.
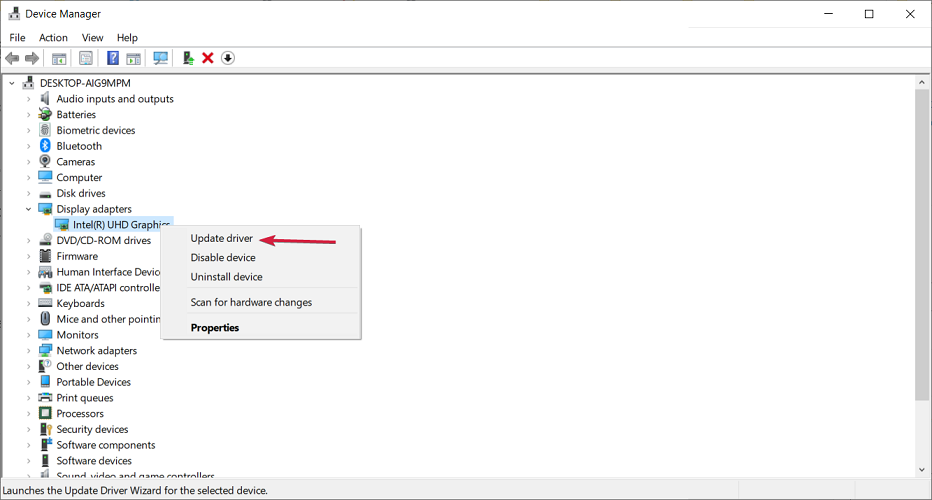
3. Right-click on the graphics card driver and select Update driver.
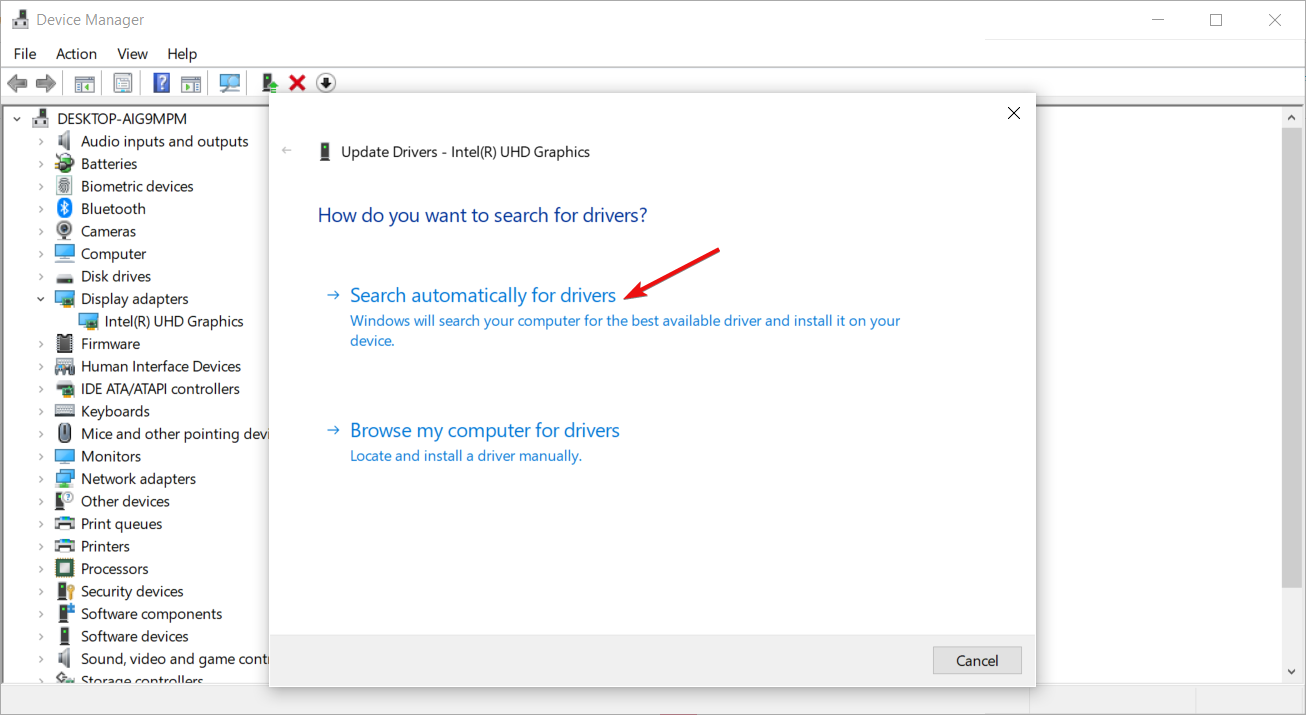
4. Choose Search automatically for drivers.
5. If the system finds a new driver, it will install it.
Graphic card drivers also play an important role when streaming videos. That’s why is important to keep them updated.
If you don’t want to complicate yourself with this task, there is an excellent tool called Outbyte Driver Updater that updates your drivers automatically.
Once you download and install it, the tool will scan your system, and find any problems with your drivers allowing you to fix them with just one click.
5. Uninstall and Install graphics card drivers
- Right-click Start and select Device Manager
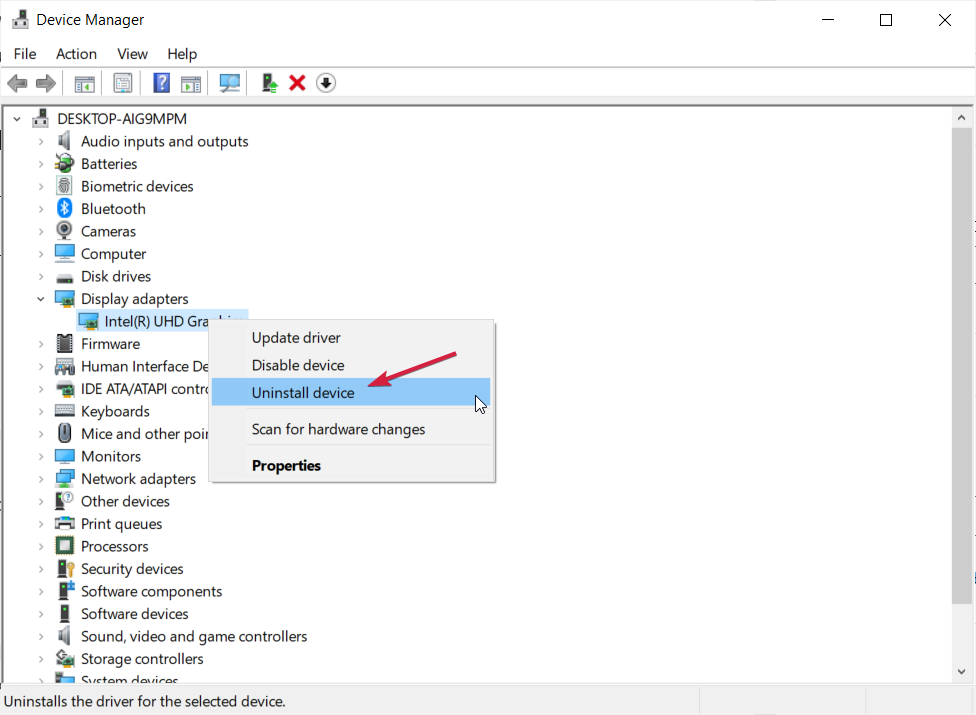
- Search for your graphics card from the list of devices, right-click on it then click Uninstall device.
- If you get an option to Delete the driver software for this device, click on it.
- Follow on-screen instructions to complete it and restart your computer if prompted.
- Visit the website of the graphics card manufacturer and download the latest drivers, then install them.
If your videos are not streaming or playing in Microsoft Edge, follow the steps above to uninstall and reinstall graphics card drivers.
Check if your video streaming function works again, and if not, try the next solution.
6. Install drivers in compatibility mode
- Download the latest driver from the manufacturer’s website and save it on your local disk.
- Right-click on the driver set up file and select Properties.
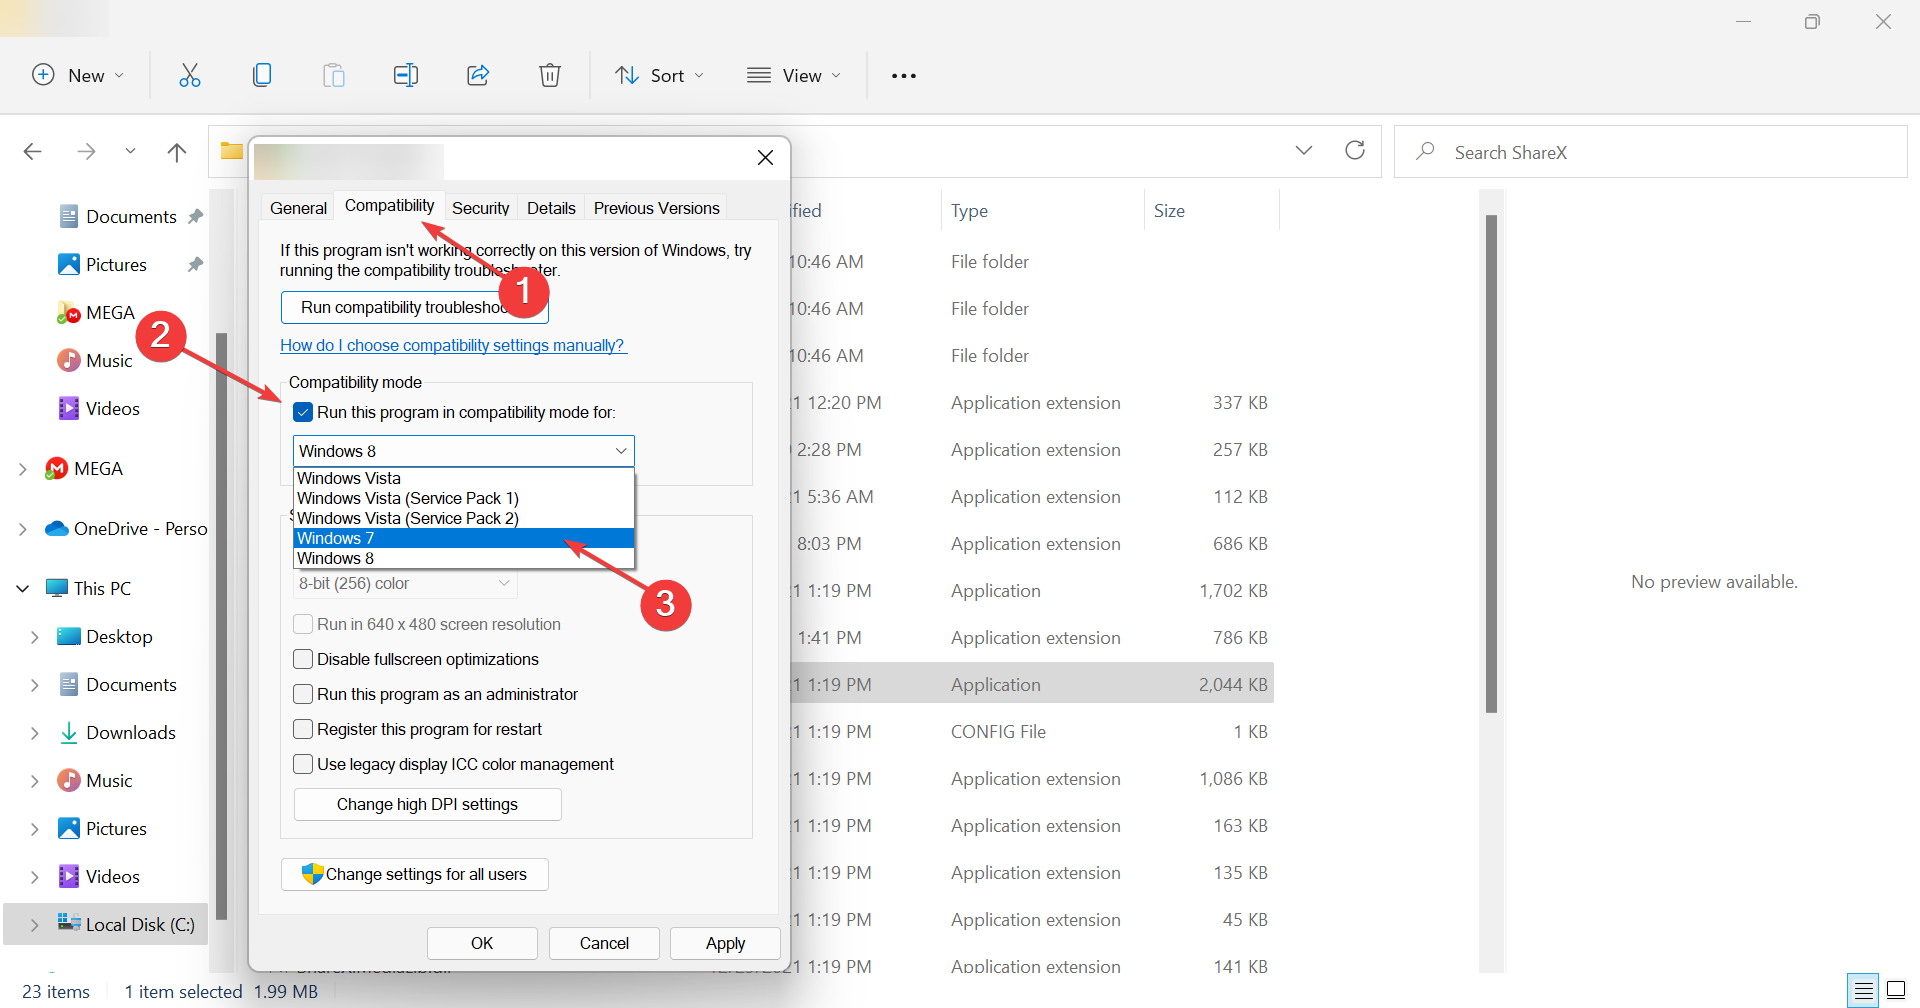
- Click the Compatibility tab, check the box next to Run this program in Compatibility mode, and select Windows 7 from the drop-down list.
- The driver will install, then check its functionality.
- Restart the computer and check if the issue persists
7. Perform a clean boot
- Press the Windows key + R to start Run, type msconfig, and press Enter or click OK.
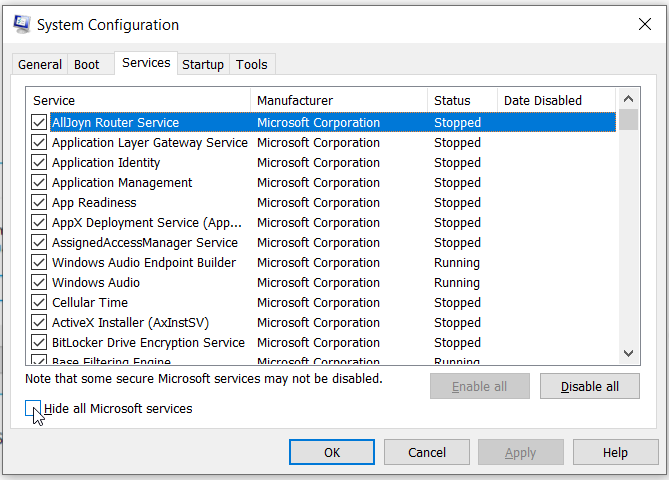
- Select the Services tab and check the Hide all Microsoft services box and click Disable all.
- Go to Startup tab and click Open Task Manager.
- Close Task Manager then click OK.
- Reboot your computer
Performing a clean boot for your computer reduces conflicts related to software that can bring up the root causes of video streaming failure.
These conflicts can be caused by applications and services that start up and run in the background whenever you start Windows normally.
In order to successfully perform a clean boot on Windows 10, you have to be logged on as the administrator.
You will have a clean boot environment after all these steps are carefully followed, after which you can try and check if the video streaming problem is gone.
If you want to know how to add or remove startup apps on Windows 10, check out this simple guide.
8. Run the Video Playback Troubleshooter
- Click the Start button, type control panel, and select the app from the list.
- Go to the View by option on the top right corner, click the drop-down arrow, and select Large icons.
- Now, click Troubleshooting.
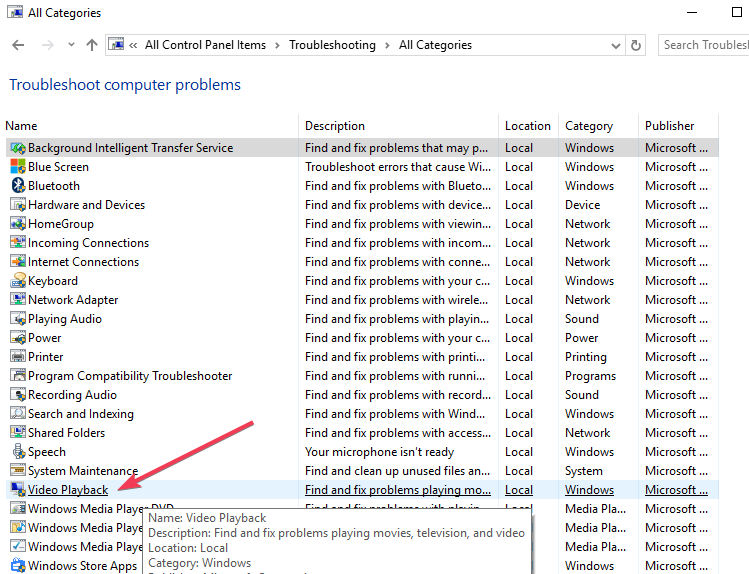
- Click View all option on the left pane.
- Select Video playback.
- Follow on-screen instructions to run the troubleshooter
The Video Playback troubleshooter tool is built-in on Windows 10 operating system so as to check and resolve any issues you may have.
9. Clear browsing data
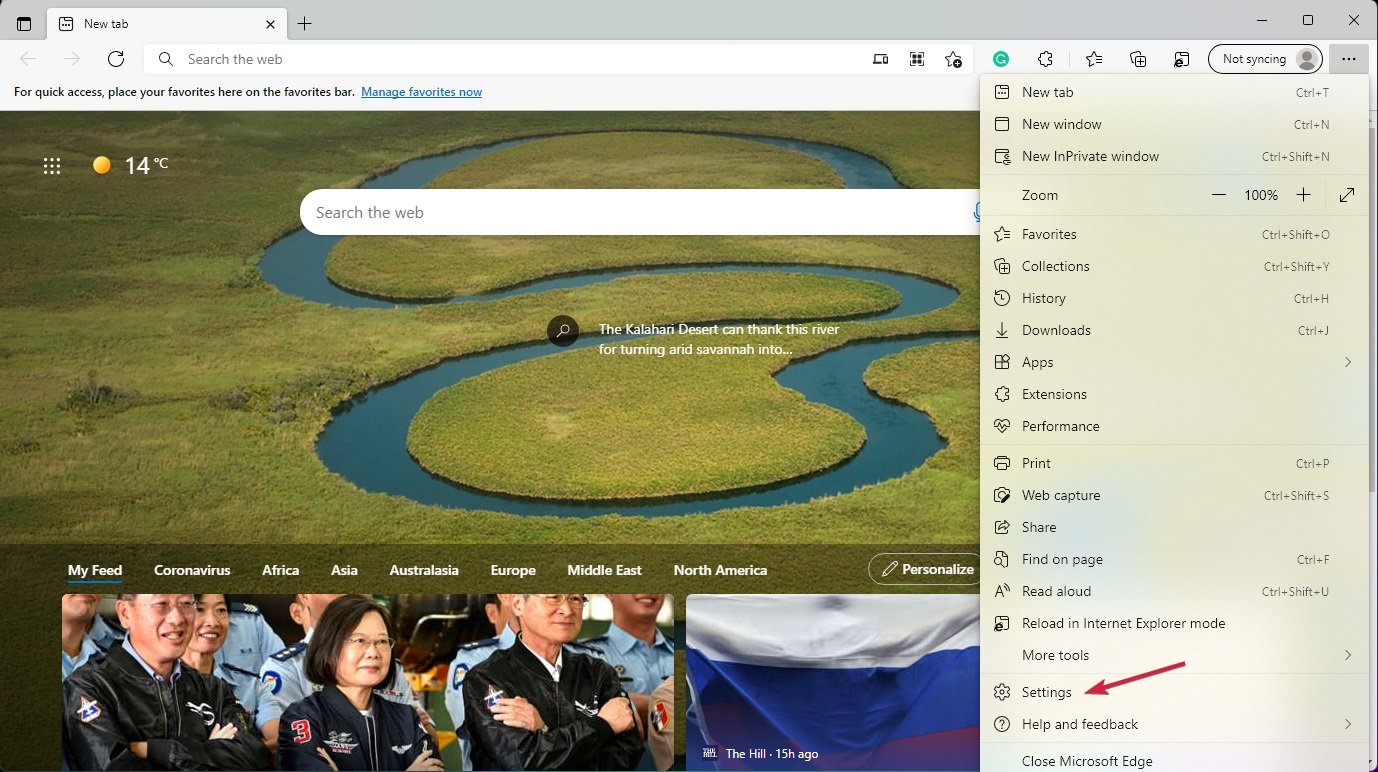
- Open Edge, click the three dots button from the upper-right corner of the window, and select Settings.
- Click on Privacy, search, and services from the left pane, then scroll down on the right and select Choose what to clear under Clear browsing data.
- Check the boxes Browsing history, Cookies and saved website data, and Cached data and files and click Clear.
We have shown you how to clear the browsing data in Edge, but the process is very similar in other browsers as well. Check if the video streaming issue persists or try the next solution.
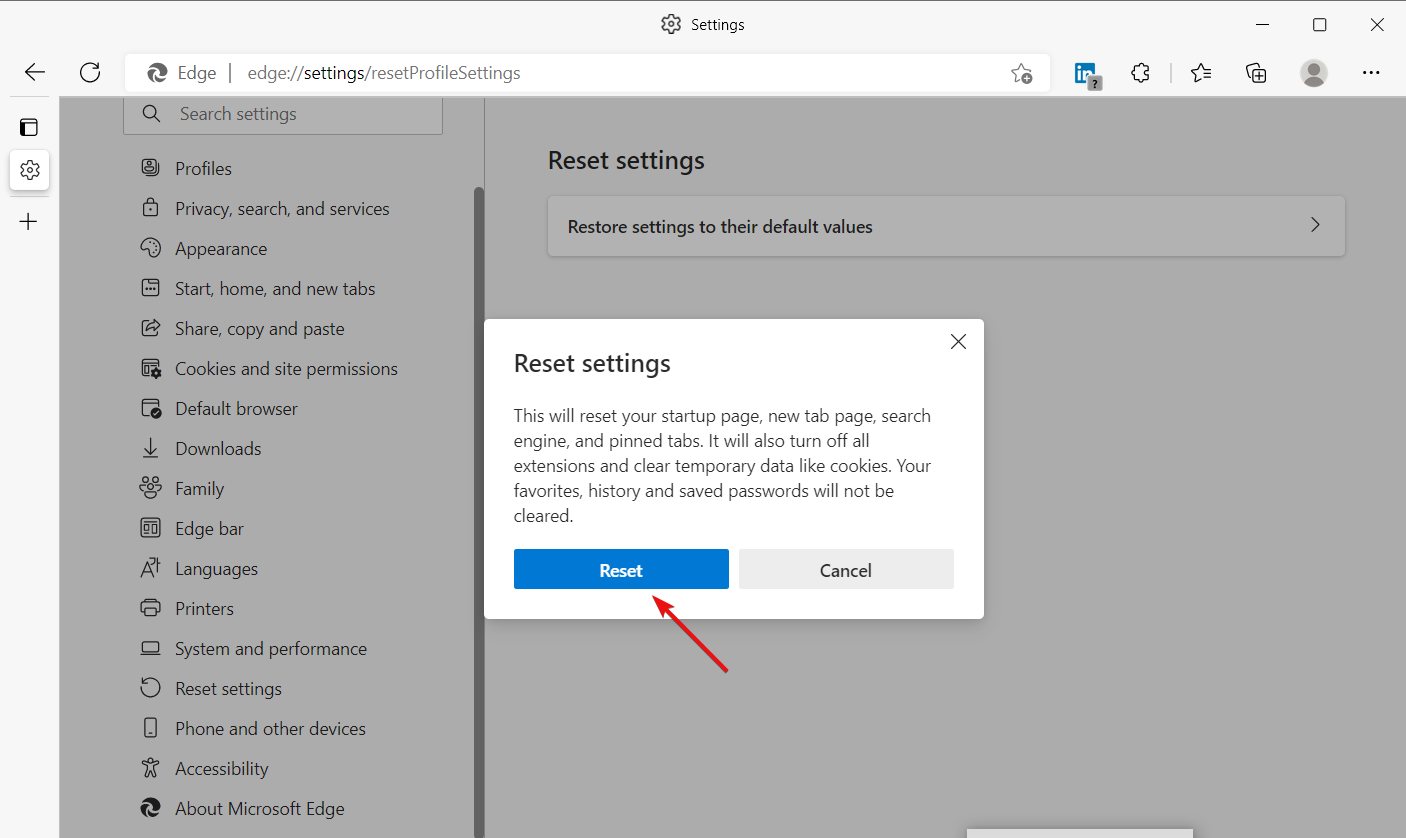
10. Reset your browser
- In Edge, click the Menu button from the top right and select Settings.
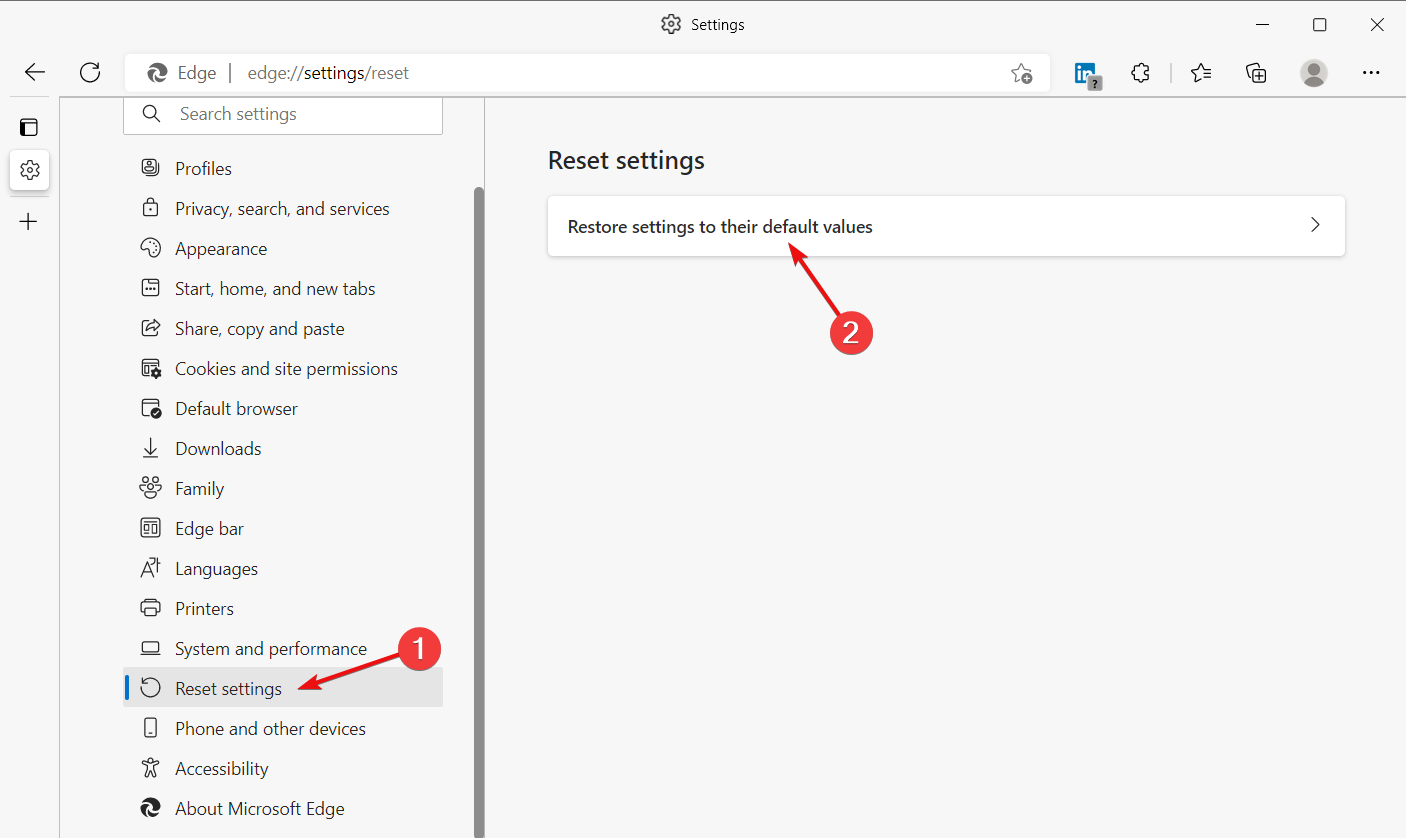
- Choose Reset settings from the left pane, then click on Restore settings to their default values.
- In the next pop-up window click on Reset.
- Restart your browser to apply the changes.
If you tried video streaming on a different browser and it worked, then the problem may be due to a corrupt add-on or compatibility issues of the website with Microsoft Edge.
In this case, you can reset the browser, but it is good to note that this feature might reset the security or privacy settings you added to your list of Trusted Sites.
It may also reset any parental control settings, so it is recommended you note the sites before resetting Explorer or Edge, then re-enable add-ons.
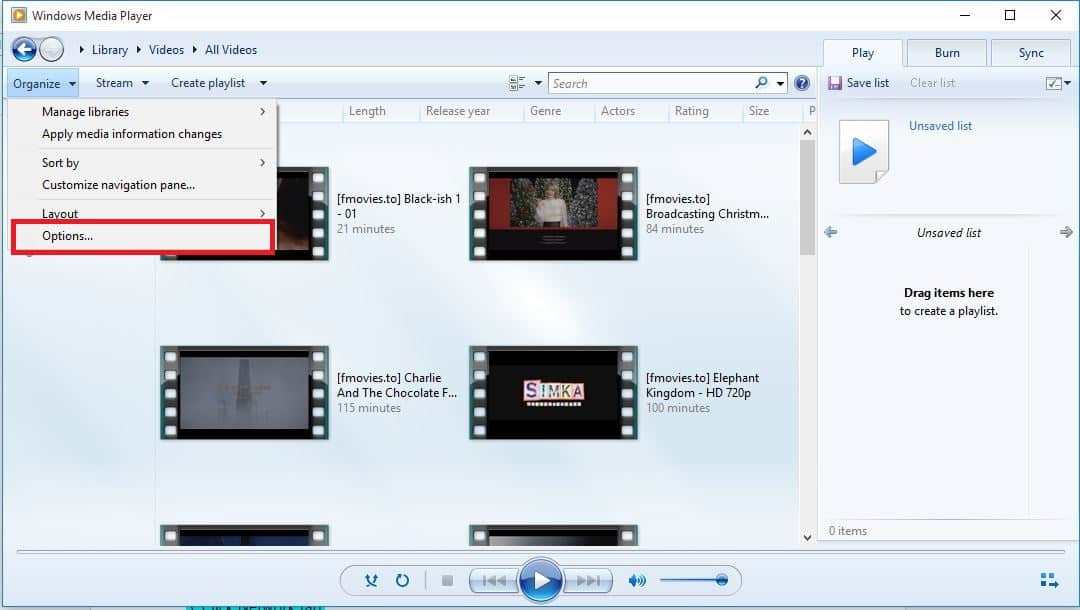
11. Change buffer settings in Windows Media Player app
- Open or launch Windows Media Player app.
- Click Organize on the top left corner.
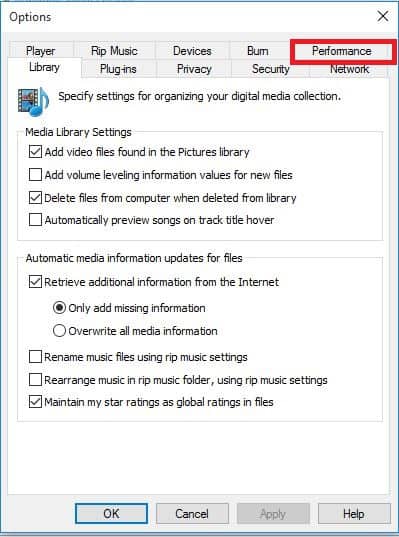
- Click Options.
- Go to the Performance tab.
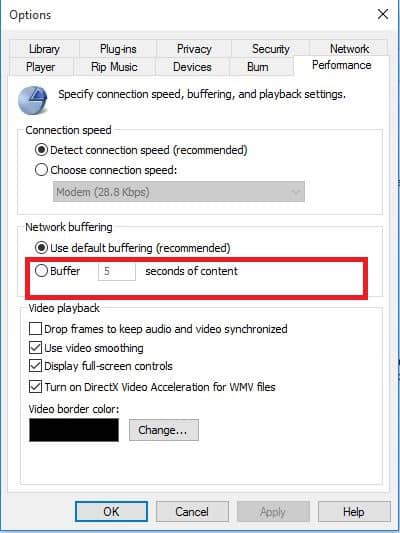
- Go to Network Buffering.
- Change the Buffer value from 5, to either 10, 20, or 30. The higher you set the buffer value, the more of your video will be loaded.
Windows Media Player is no longer the default video-playing app in Windows, but if you’re still using it, this solution will help you fix the Microsoft Edge streaming video problems.
How can I fix streaming problems on Windows 11?
Although Windows 11 has a different design and some new and improved features, it’s not all so different from Windows 10.
That is why all the solutions we outlined above in this guide will also work for the new OS.
Why do streaming videos keep buffering?
Buffering is downloading the video before the player plays it back, whether it’s a separate one or embedded one in the browser.
It does that all the time, but when the player can’t download the video faster than it plays is back, we actually call this effect buffering.
There are many reasons for this problem, but as you have seen from our guide, it usually comes from a bad or unstable Internet connection.
We hope these solutions helped resolve the video streaming issue on your computer.
You might also be interested in our selection of the best browsers for watching videos [YouTube, Netflix, Anime].
As always, if you have any other suggestions or questions, feel free to leave them in the comments section below, and we’ll be sure to check them out.








User forum
2 messages