Fix Windows Host Process using too much CPU

How can I fix Windows Host Process high CPU usage?
- Run a PowerShell script
- Install a software to fix high CPU usage
- Clean boot your computer
- Scan your computer for malware/virus infections
It seems that more and more users are having issues with their Surface Pro 3 devices running various Windows 10 OS versions. One of the main issues is the host process for the “Synchronization” setting. In most of the cases, it uses around 25 % or 30 % of the CPU on the Surface Pro 3 device. Following the instructions below, you will most certainly get your host process for setting synchronization fixed in Windows 10 so you don’t have to worry about the high CPU usage of the device.
 Most of Windows 10 users have tried turning off the Synchronization feature in the system. Unfortunately, this is only a temporary solution because it will pop up again after just a couple of minutes. In the tutorial below, we will implement a script that will check for the Synchronization feature inside your system and every time it pops up this script will shut it down. Note that this is only a temporary solution but is the only one we have until Microsoft updates Windows 10 system and prevent this from happening again.
SOLVED: Host process causes high CPU usage in Windows 10
1. Run a PowerShell script
- Right click or hold tap on an open space in your Windows 10 desktop.
- Left click or tap on the “New” feature present in the menu.
- From the “New” sub-menu left click or tap on the “Text Document”
- Now that you have created the text document, you can name it as you wish. For example: “High CPU Fix”
- Double click to open the new text document that you made.
- In the text document, please copy paste the lines presented below in bold:
- Get-ScheduledJob | ? Name -eq “Kill SettingSyncHost” | Unregister-ScheduledJob
Register-ScheduledJob -Name “Kill SettingSyncHost” -RunNow -RunEvery “00:05:00” -Credential (Get-Credential) -ScheduledJobOption (New-ScheduledJobOption -StartIfOnBattery -ContinueIfGoingOnBattery) -ScriptBlock {
Get-Process | ?{ $_.Name -eq “SettingSyncHost” -and $_.StartTime -lt ([System.DateTime]::Now).AddMinutes(-5) } | Stop-Process -Force
} - Left click or tap on the “File” button situated in the upper left side of the text document.
- From the “File” menu left click or tap on the “Save As” feature.
- Now right, next to the “File Name” option, you will need to delete the “.txt” extension of the folder and instead write the following: “.ps1” without the quotes.
- Left click or tap on the “Save” button situated in the lower side of the “Save As” window.
- Now go on your desktop where you saved the file and right click or hold tap on it.
- From the menu that pops up, you will need to left click or tap on the “Run with PowerShell” feature.
Note: You will need to have administrative privileges to be able to run this script so be sure to be logged in with your administrator account. - After the script has finished, the process you will have to check the Synchronization process if it is still active.
- If the process is still active, please reboot your Windows 10 OS and run again the PowerShell script as you did above.
2. Install a software to fix high CPU usage
If the problem persists, you can also install a dedicated software to fix high CPU problems. We already compiled a list of the best tools to use in order to fix high CPU usage issues. Read the description of each tool and download the one that suits your needs.
3. Clean boot your computer
Using this method, you’ll boot up your computer using only a minimum set of programs and drivers.
- Go to Start > type msconfig > hit Enter
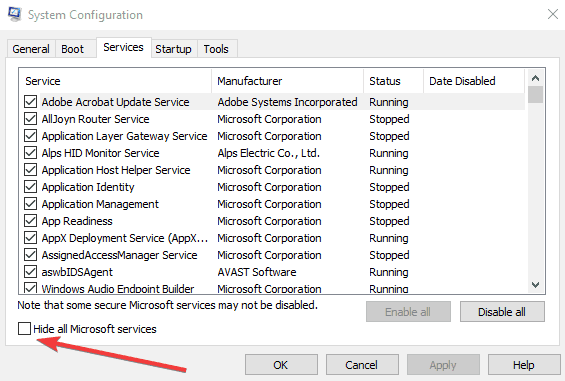
- Go to System Configuration > click on the Services tab > check the Hide all Microsoft services check box > click Disable all.
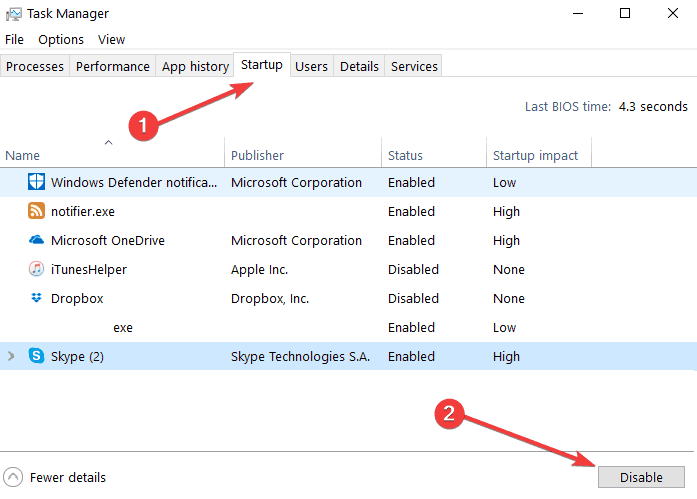
- Go to the Startup tab > Open Task Manager.
- Select each startup item > click Disable > close Task Manager > restart the computer.
4. Scan your computer for malware/virus infections
High CPU usage may also be triggered by malware or virus infections. You can run a full system antivirus scan using Windows 10’s built-in antivirus software or a third-party antivirus solution.
This is all you have to do in order to fix your CPU high usage for the Surface Pro 3 device running the Windows 10 operating system. We will get back to you as soon as Microsoft has released an update that will solve this issue. You can write us in the comments section below, if you have any further questions. We will help you as soon as possible.
RELATED STORIES TO CHECK OUT:
- High CPU but nothing in Task Manager? Here’s how to fix this conundrum
- Fix: High CPU when browsing the Internet
- MsMpEng.exe causes high CPU usage: 3 solutions to fix this issue
Read our disclosure page to find out how can you help Windows Report sustain the editorial team. Read more


Improve this guide


User forum
2 messages