Fix: Microsoft Windows Search Indexer High CPU Usage
The Windows Search Indexer is not a critical process
Key notes
- Windows Search Indexer’s high CPU usage can drastically impact your PC’s performance.
- To fix this issue, it’s advised to restart the associated services from the Services window.
- You can also fix this issue by adjusting the indexing settings, or simply disabling this service.

The Windows Search service is one that indexes files for the Windows search tool. That service is the SearchIndexer.exe or Windows Search Indexer process listed on Task Manager’s Processes tab.
However, some users have found that the Search Indexer process can hog a lot of system resources with high CPU and RAM usage.
Why is Microsoft Windows Search indexer running?
The Windows Search indexer can be a bliss just as much as it can be a nuisance and here’s why. Its role is to handle file indexing and thus speed up the search process on your PC.
When it’s running, you find whatever it is that you’re looking for faster. But it can also slow down your drive and affect your overall performance since it’s a relatively resource-intense process, to begin with.
Now, turning the Windows 10 indexing off in order to cut down on the Searchindexer.exe high CPU makes sense if you have a fast drive such as SSD as it can handle the search and retrieval of results on its own.
As always, the right configuration implies balancing different components, but if the Windows desktop search support high CPU becomes unbearable, you can rest assured that disabling the service -at least temporarily – won’t affect your system in any way.
You can always download Indexer Diagnostics to fix Windows Search issues, including high resource consumption instances. If not, feel free to check out our handy solutions to reduce the Windows search’s high CPU utilization.
? Microsoft Windows Search indexer high CPU on Windows 11
Before we move on with the solutions, let’s take a moment to see if and how the Windows desktop search support high CPU issue also applies to Windows 11. In short, yes, it does.
The good news is the solutions listed below will work just as well on the latest version of your OS. In addition, you can also perform these steps:
- Update your drivers on the Windows 11 OS
- Run SFC and DISM commands
- Perform a System Restore to a point previous to the issue
In some cases, the Windows 11 Search Indexing can be turned off completely, so might want to enable it again.
How do I fix Windows Search Indexer high CPU?
1. Use a third-party repair software
If you’re having issues with Search Indexer’s high CPU usage, you should be able to fix it using specialized repair software that can fix a wide array of PC issues automatically.
The software will scan your PC for any problems and give you a list of issues. You can fix all these issues with just a couple of clicks without any additional user input.
These tools can fix a wide array of Windows errors, missing DLL files, BSOD errors, freezes, crashes, and, most importantly high CPU usage, so be sure to check them out.
2. Restart the Windows Search Service
1. You can start by pressing the Win + R hotkey and entering services.msc in Run‘s text box.
2. Press Run‘s OK button to open the Services window.
3. Scroll down to Windows Search.
4. Double-click Windows Search to open its configuration settings shown directly below.
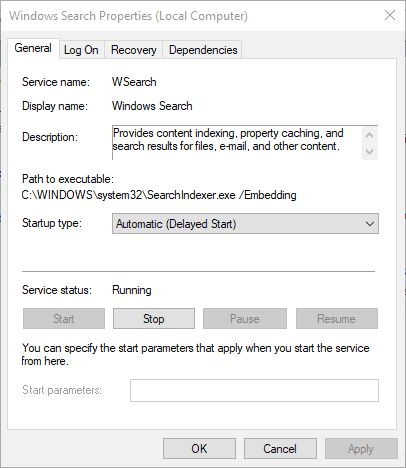
5. Select Disabled from the Startup type menu.
6. Press the Stop button.
7. Press the Apply and OK buttons.
8. Restart your PC.
9. Thereafter, open the Windows Search service window again.
10. Select Automatic (Delayed Start) from the Startup type drop-down menu.
11. Click the Start option, and then press the Apply and OK buttons to restart Windows Search.
Restarting the Windows Search service might reduce the Search Indexer’s CPU usage. You can do this using the built-in Run dialog, which allows you to access Windows Search Properties.
After restarting the services, the problem with searchindexer.exe high CPU usage should be resolved.
3. Run Search and Indexing Troubleshooter
- Click the Start button and select Settings.
- Now select Update & Security from the menu.

- Click on Troubleshoot from the left pane and Additional troubleshooters from the right.
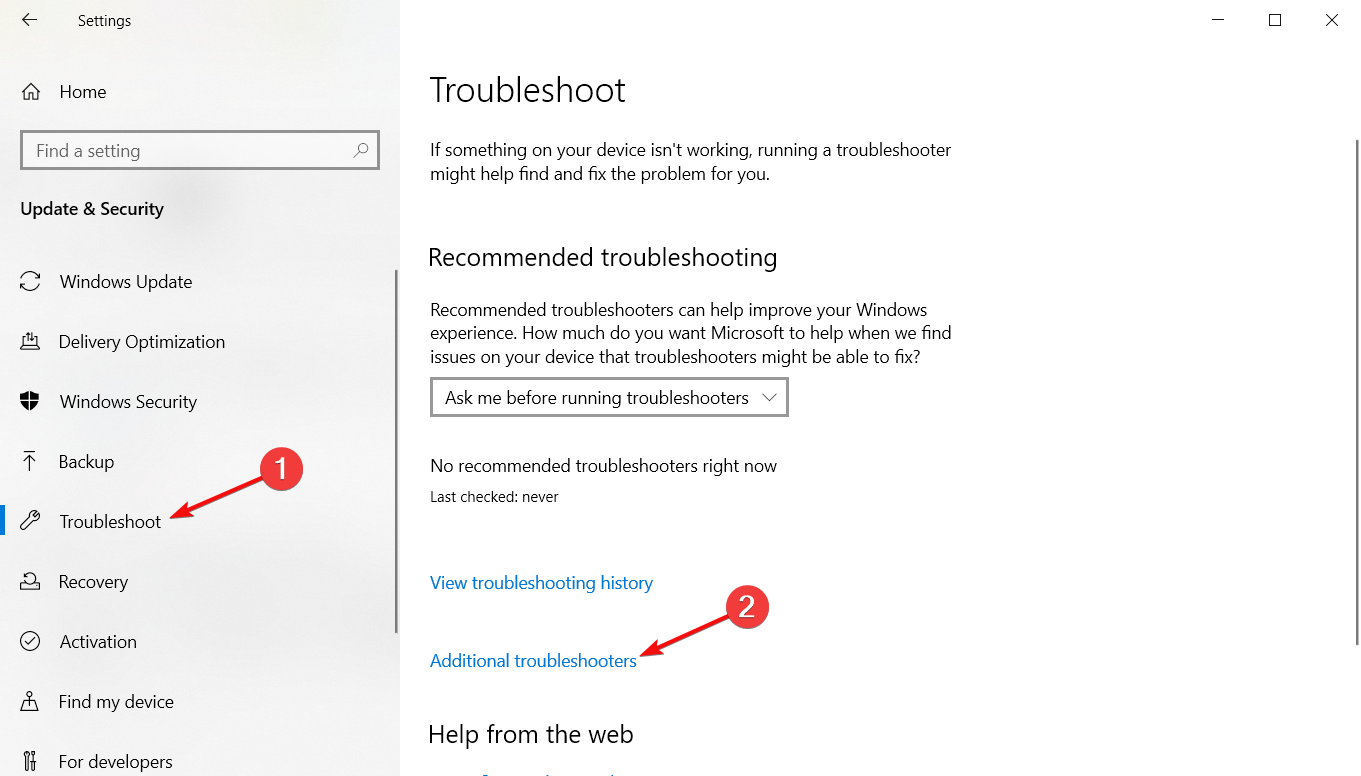
- Select the Search and Indexing troubleshooter and hit the Run the troubleshooter button.

- Follow the on-screen instructions to fix the issue.
This can help fix other issues like search results aren’t quite ready yet.
4. Reduce Indexed Locations / Data
- To open Indexing Options, press the Cortana taskbar button.
- Enter indexing in the search box. Then click Indexing Options to open the window shown directly below.

- Press the Modify button to open the Indexed Locations window.
- Click the arrow beside the C: drive to expand its folders. Now you can deselect some of the check boxes to remove indexed locations.

- Press the OK button on the Indexed Locations window.
- Click Close on the Indexing Options window.
Reducing the amount of data the Search Indexer is indexing is one of the best ways to fix Windows Desktop Search support high CPU usage.
Users also complained about the delayed write failed error but the highlighted guide will help you fix it.
5. Rebuild the Index
- Open Indexing Options as outlined above.
- Click the Modify button, and deselect all the selected locations except the C: drive, as shown below.

- Click OK to return to the Indexing Options window.
- Press the Advanced button to open the tab shown directly below.
- Press the Rebuild button on the Index Settings tab.

- That will open the dialog box shown directly below. Press the OK button to confirm and rebuild the index.
Users reported that rebuilding the index fixed the searchindexer.exe high CPU usage, so we encourage you to try that.
6. Disable Windows Search Indexer
- Enter the keyword windows features in the Control Panel‘s search box.
- Click Turn windows features on or off to open the window directly below.

- Deselect the Windows Search check box.
- Press the OK button to confirm the new settings.
- Reboot your desktop or laptop.
7. Run System File Checker
- Click the Start button, type cmd, and select Run as administrator from the results.

- Write or paste the following command and press Enter to execute it:
sfc /scannow
- The process will start and the system files will be repaired. Wait until it is finished, then restart your device.
Should I disable indexing in Windows 10?
Digital indexation allows you to locate content faster by using specific filters such as keywords or creation dates. Now, if you don’t really search for files that often or if you use an SSD that can quickly retrieve files, it does not make much sense to keep indexing on.
The same goes for Microsoft Windows Search Indexer high CPU cases as you can easily get stuck at 100% disk usage.
This might be a more drastic resolution, but it will help with the Searchindexer.exe high CPU consumption rates. Don’t worry, this does not mean you won’t be able to use Windows Search at all.
Plus, if you need a replacement for Windows Search after switching it off, there are plenty of alternative third-party search utilities.
For example, you can install the freeware Agent Ransack, Copernic Desktop Search Lite, or UltraSearch. Agent Ransack is a highly-rated search software that has Lite and Pro versions.
So that’s how you can cut the Windows Search’s CPU and RAM usage down to size. That will free up system resources for other software and might also speed up the Windows OS a little.
Read our disclosure page to find out how can you help Windows Report sustain the editorial team. Read more


Improve this guide


User forum
0 messages