How to use the Windows 11 HDR Calibration app for your monitor’s HDR display
4 min. read
Published on
Read our disclosure page to find out how can you help Windows Report sustain the editorial team. Read more

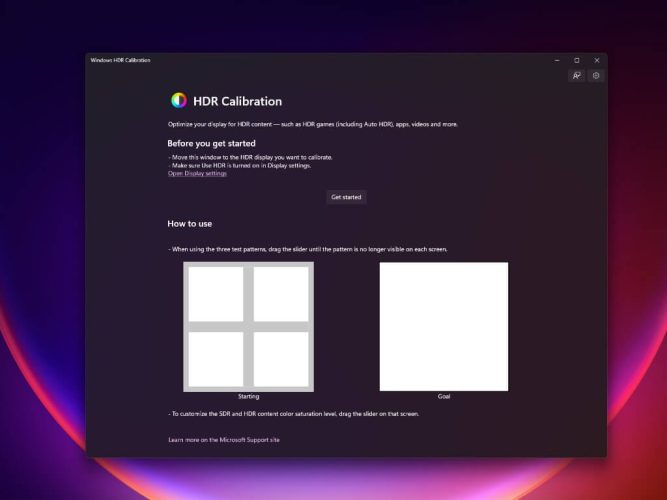
The Windows 11 HDR Calibration app lets you calibrate your monitor’s HDR (high dynamic range) display to optimize it for playing games and other HDR content on your PC.
This app tests how your monitor’s display functions by going through a series of tests to set the minimum and maximum brightness levels, color saturation levels, and create a new color profile made specifically for your display.
The app also customizes how vividly you want colors to appear for both HDR and SDR (standard dynamic range) content when HDR is enabled. The tool is available via the Microsoft Store for 22H2 and 21H2, but you can’t use it on Windows 10.
Windows 11 HDR requirements
Obviously, besides running Windows 11 on your PC and having an HDR display, you also need to be running the latest Intel and AMD processors and have HDR turned on in Windows Settings (Settings > System > Display > Use HDR). You also need to have a decent GPU to run the app’s tests; at least NVIDIA GTX 10xx or later (Pascal+).
Download and install Windows 11 HDR Calibration app
Here’s what you need to do to install and use the Windows 11 HDR Calibration app to configure your monitor’s display:
- Open the Windows HDR Calibration app you installed from the Microsoft Store.
- Click Get started button.
- Once you click Get started, you will be taken directly into the first of the app’s three HDR tests. As you can see the directions displayed within the app. You will need to “drag the slider until the pattern is no longer visible on each screen.”
- The first HDR test checks for Minimum Luminance which detects the darkest visible details. Drag the slider until you can no longer see the pattern and click Next when you are ready for the next test.
- The second test is for Maximum Luminance which detects the brightest visible details. Drag the slider until you can no longer see the pattern and click Next when you are ready for the next test.
- The third test is the Max Full Frame Luminance Test, which detects how bright your display can get. Drag the slider until you can no longer see the pattern and click Next when you are ready for the next HDR test.
- The fourth and final test is for Color Saturation. Drag the slider to adjust the saturation from less saturated (default on the left) to more saturated (image represented on the right). The change for color saturation might be more subtle and depends on your display’s characteristics. Click Next when finished.
- Finally, you will be taken to the last screen. Here you can review and save your new color settings. Here you can indicate a profile name where you want your new settings to be saved. Click Finish when you are ready to use your new color profile.
- Once you click Finish, you will see a confirmation that your new color profile “has been successfully associated with this display.”
- Click OK when you are finished.
If at any time you want to delete a color profile that you created, you can do it by using Color Management in Control Panel. Here’s what you need to do to get there.
- Select the Start button and type “color management” and select it from the list of results.
- In Color Management, select the All Profiles and pick the color profile you want to delete and select Remove.
3. Click Continue to confirm you want to delete and remove the indicated color profile.4. Close Color Management by selecting Close (located underneath the Remove button) when you are finished.
Microsoft notes that it is important to run the Windows 11 HDR Calibration app anytime you change your display setup. However, it is important to note that most HDR-certified displays typically work as intended right out of the box without any additional calibration. Check the display requirements for HDR video in Windows for more technical information.
If you have multiple displays, Microsoft notes that you should use the Windows 11 HDR Calibration app on your HDR-capable display first, before trying to calibrate other displays.
Do you think the Windows HDR Calibration app is a bad or good idea? Let us know in the comments!


 4. Close Color Management by selecting Close (located underneath the Remove button) when you are finished.


User forum
0 messages