How to Install Kali Linux on VirtualBox in 5 Simple Steps

Kali Linux runs well inside VirtualBox when you configure the VM correctly. This guide explains how to install Kali Linux on VirtualBox, create the virtual machine, attach the ISO, and complete the setup from start to finish.
Table of contents
How to install Kali Linux on VirtualBox?
Download the required software
You prepare your device by downloading VirtualBox and the official Kali Linux ISO. This step ensures a smooth installation process.
- Visit the VirtualBox download page and download the installer for your operating system.
- Install VirtualBox on your computer.
- Go to Kali.org and download the Kali Linux ISO file.

- Save the ISO somewhere easy to locate later.
If you experience problems running newer operating systems in a virtual machine, you can review this guide that explains why Windows 11 might not install correctly on VirtualBox and how to adjust your configuration.
Create a new virtual machine
You create the main VM structure so Kali has a dedicated environment to run in.
- Open VirtualBox and select New.

- Name the VM Kali Linux and choose Linux as the type.

- Select Debian 64 bit as the version.
- Allocate at least 2 GB RAM or 4 GB for smoother performance.
- Create a new virtual hard disk with at least 25 GB of storage.
After you finish the basic VM setup, you can improve file management between the host and guest systems by following this tutorial on how to configure VirtualBox shared folders in Windows 11.
Attach the Kali Linux ISO
You attach the ISO so the VM can boot into the Kali installer.
- Open Settings for your Kali VM.
- Go to Storage.
- Select the empty optical drive.
- Click the disk icon and choose Choose a disk file.
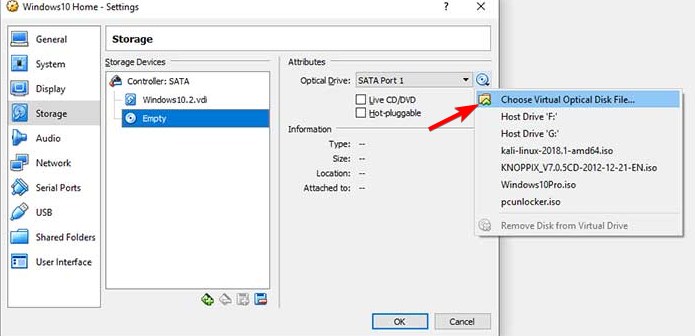
- Select your Kali Linux ISO.
- Click OK to save.
After installation, you can improve graphics, clipboard, and mouse integration by installing VirtualBox Guest Additions inside your Kali VM.
Start the VM and run the installer
You launch the VM and complete the standard Kali installer.
- Select the VM and click Start.
- Choose Graphical install.
- Pick your language, location, and keyboard layout.
- Enter a hostname and create your user account.
- Set a strong password.
- Choose Guided use entire disk for simple partitioning.
- Confirm the partition layout.
- Wait while the installer copies system files.
- Select your preferred desktop environment.
- Install GRUB to the virtual disk.
- Reboot when the installer finishes.
After the system restarts, you land on the Kali login screen and can sign in to your new environment.
Update and configure your Kali environment
You optimize stability by updating everything after your first login.
- Log into Kali with your credentials.
- Open a terminal.
- Run
sudo apt update - Run
sudo apt upgrade - Restart the VM.
When updates finish, your Kali installation includes the latest security patches and package versions.
FAQs
Yes, most modern PCs can run Kali Linux in VirtualBox if they provide at least 4 GB of RAM, a 64 bit processor, and hardware virtualization support.
Yes, you should enable Intel VT-x or AMD-V in BIOS or UEFI so VirtualBox can allocate hardware virtualization features to the Kali VM.
You should allocate at least 25 GB of virtual disk space, although 40 GB or more works better if you plan to install many tools.
Yes, running Kali inside a virtual machine creates an isolated environment, which works well for learning basic tools and workflows without altering your host system.
You now know how to install Kali Linux on VirtualBox, create the virtual machine, attach the ISO, and complete the installer. After you apply updates and fine tune resources, the VM provides a flexible environment for penetration testing labs, security training, or everyday experimentation with Kali tools.
Read our disclosure page to find out how can you help Windows Report sustain the editorial team. Read more


Improve this guide


User forum
0 messages