How to install and manage fonts in Windows 10 [Quick Guide]
Key notes
- If you're looking to install the best fonts for Windows 10, in our article we'll give you some unexpected and fun options.
- Going for something more sophisticated? then Adobe will surprise you with a multitude of features.
- Once you add your favorite fonts to Windows 10, learn to manage them efficiently in our excellent guide.
- You won't have to worry about potential errors regarding fonts, we have some great solutions for that too.

If you want to add some additional cool fonts to your Windows 10 OS, you don’t have to put much effort in it, because it’s very easy.
And in this article we’ll show you not only how to install fonts in your Windows 10 but we’ll also provide you with interesting data on how to manage them.
How can I install and manage new fonts in Windows 10?
1. Use the Fonts folder in Control Panel
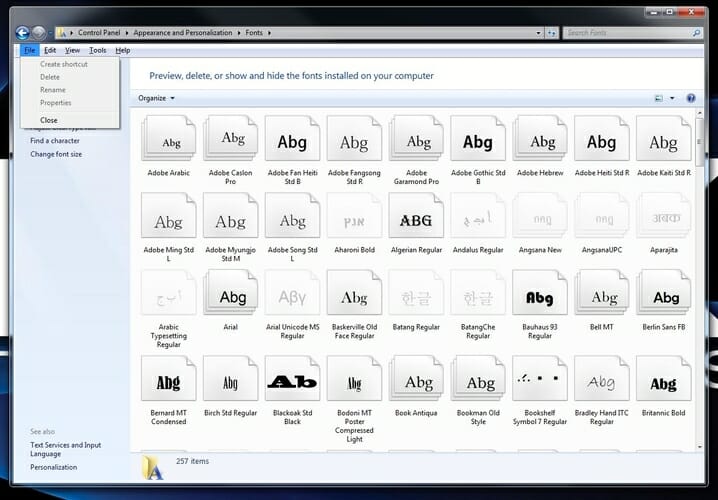
- Go to Search.
- Type fonts and open Fonts.
- Drag your font file to Fonts folder and wait until the installation is complete.
Your fonts are packed in .otf files and these files have an installing option, so just right-click on the font you want to install, and choose Install.
There are two ways to add fonts to Windows 10: you can add them simply by installing them or putting them in the Fonts folder in Control Panel.
2. Download fonts from the Microsoft Store
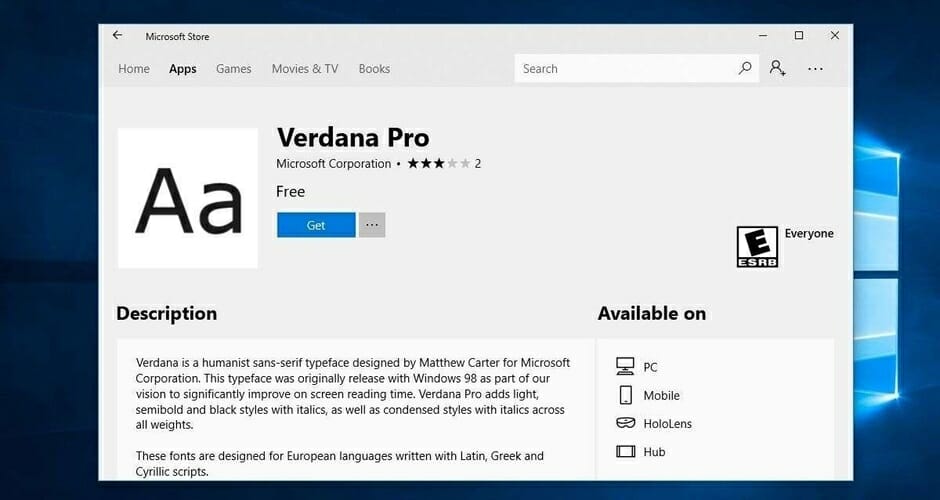
You can also download and install Windows 10 fonts from the Microsoft Store. There are many resources that you can use to add new fonts on your computer.
For example, the Fonts app lets you customize your posts and replies on social media using a wide variety of fonts.
You can write in different styles and your text will definitely stand out in the crowd. You can also rotate your text if you want to puzzle your friends.
3. Use Adobe Fonts

However, if you want to see what it is truly like to have all of the top-quality fonts at your disposal, then your best bet is with Adobe Fonts.
By using Adobe Fonts, you will get the fonts directly on the websites that you are using. More so, they become synced via Adobe Creative Cloud to applications installed on the subscriber’s PC.
Get ready to be amazed by the multitude of style fonts that can help you enhance the impact you make whether you’re an entrepreneur or a media content creator.
You have over 1.000 different options to choose from and they’re all one click away, all you have to do is switch the toggle button and you’re free to make the best of those amazing fonts.
The fonts you download with this smart tool can also be used with other editing programs, for example you can add the Adobe font to Photoshop in your Windows 10.
A great advantage of this high-quality tool is the fact it’s reliable so you won’t have to deal with bugs or other annoying errors.

Adobe Fonts
Get your hands of this amazing tool that provides you with the largest variety of professional fonts!4. Manage your fonts

Once installed, you can manage your fonts. You can preview them to make sure that you really like them, hide them if you’re not planning on using them any time soon or you can simply delete them.
All you need to do is go to Start, type fonts and double click on the first result. The fonts window will now open and you just have to select the font that you want to manage and click on the option of your choice.
There you go, with just a few simple steps, you have new fonts installed on your computer, ready to decorate your project or other kinds of work.
As we already showed you, managing your fonts is as easy as installing them. Just go to the above-mentioned Fonts folder in Control Panel, where you can preview, add, delete or even print your fonts.
5. Manage possible font issues

Upgrading to Windows 10 can also create some font-related problems. These are not some out-of-normal issues but can seriously obstruct you from using your PC.
Hopefully, we have managed to find the necessary fixes for the most faced font issues in Windows 10.
First of all, we have a great fix article if you encounter problems with installing fonts in Windows 10 that it’s definitely worth your attention.
Fortunately we managed to offer solution for one of he most common issues that users confront with and you can check it in our article on how to fix the font being too small in Windows 10.
If you’re having issues with changing the default font in Windows 10 Registry Editor, take a look at this guide that will help you handle the problem. Checking the fixing guides above will help you get rid of various font issues in Windows 10.
As you can there are plenty of sources if you want to install fonts in Windows 10 and we recommend you to try all of them.
Don’t forget that if you encounter any issues you can always check out the useful guides we mentioned about how you can fix potential errors.
If you have some additional comments or questions, please write them down in the comments section below, we would love to hear them.
Read our disclosure page to find out how can you help Windows Report sustain the editorial team. Read more


Improve this guide


User forum
1 messages