Installer Encountered An Error 0x800f0905: Solved
Check out tried and tested fixes that worked for most!

If you’re a Windows user, you’re probably familiar with the 0x800f0905 error while trying to update Windows. Below, we’ll explain how to fix this in just a few easy steps (applicable for Windows 10 &11).
The error message signals the operating system is unable to install the requested updates. This could happen ue to corrupt system files, update component errors, or misconfigured settings.
Here’s how to fix it:
How can I fix Installer encountered an error 0x800f0905?
Start by disabling any third-party antiviruses (some might interfere) and VPNs. You can use Windows Security until the updates are installed. If these tricks won’t help, keep reading.
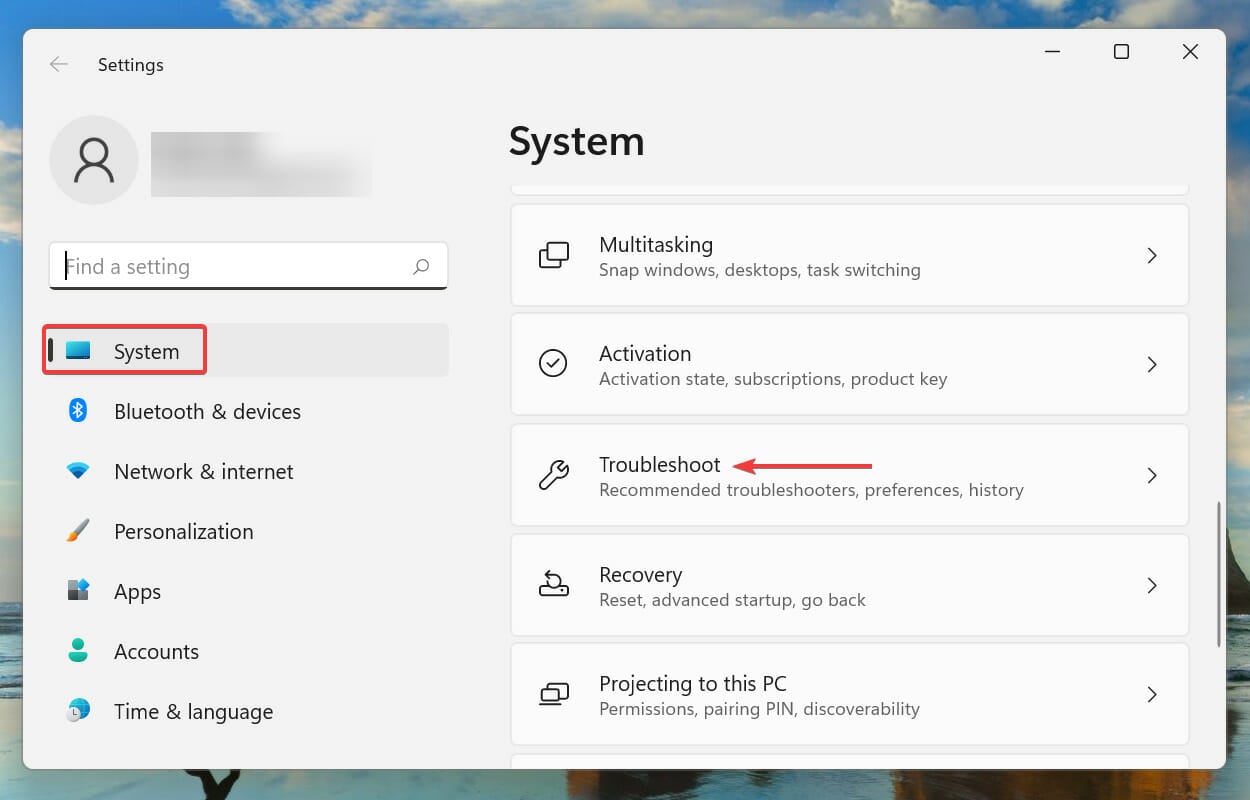
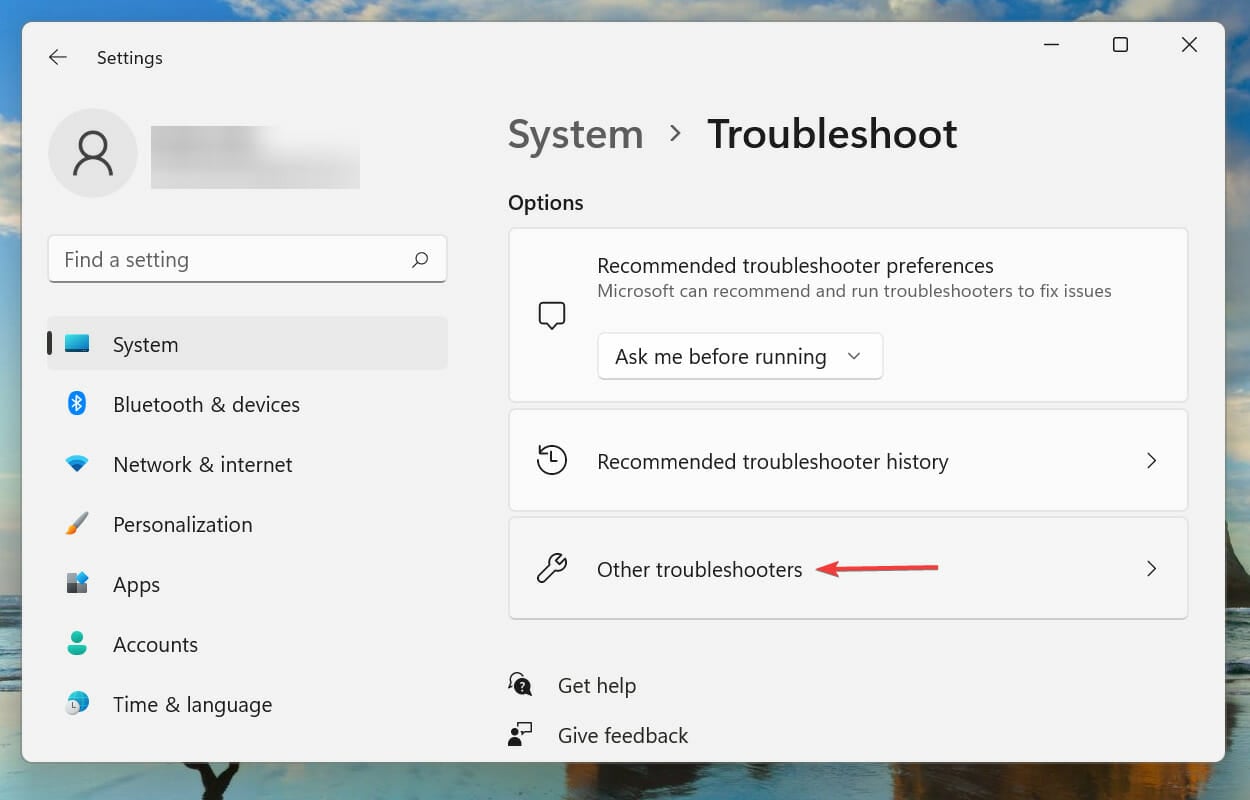
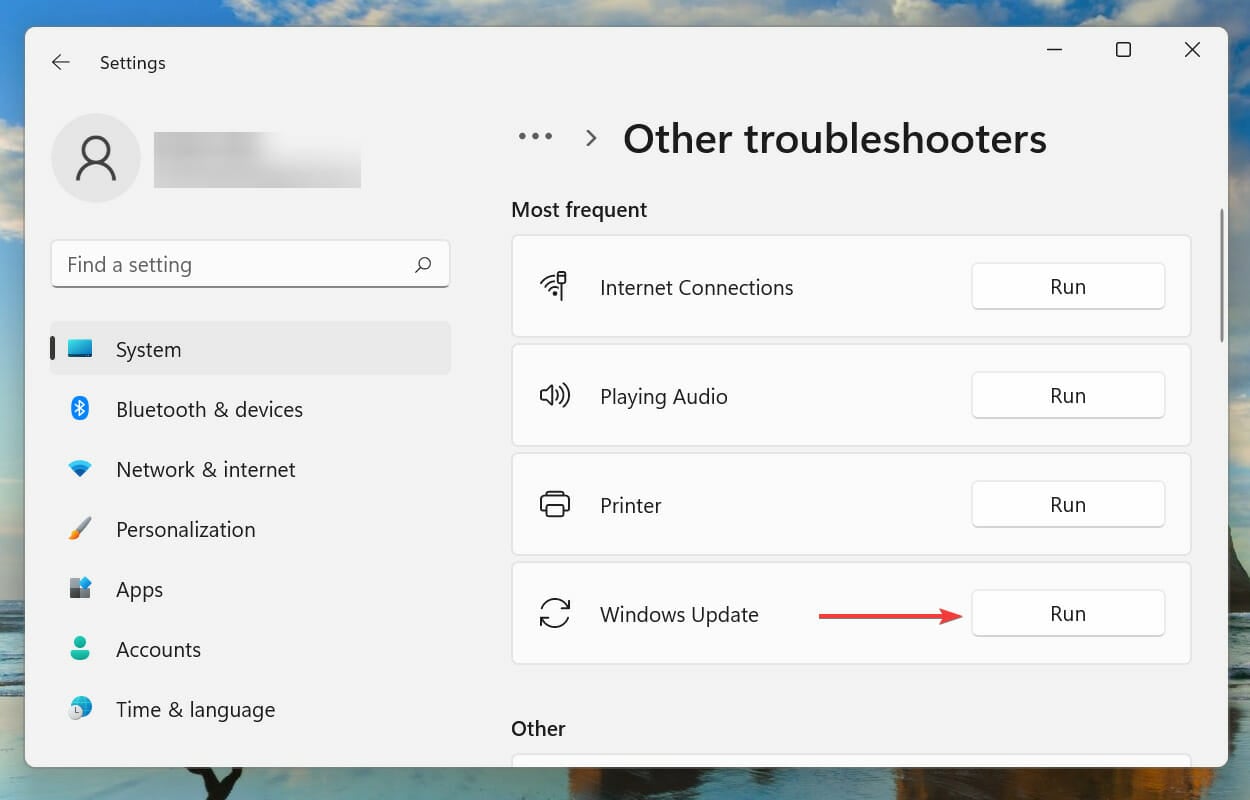
1. Run the Windows Update troubleshooter
- Press Windows + I to launch the Settings app.
- Click on Troubleshoot on the right in the System tab.

- Next, click on Other troubleshooters.
- Locate the Windows Update troubleshooter and click on the Run button next to it.
- Windows will now detect and fix problems that might be leading to the 0x800f0905 error encountered by the installer.
Alternatively, you can try dedicated third-party repair software to automatically fix Windows Update-related errors.
2. Reset Windows update components
1. Press Windows + S to launch the Search menu, enter Windows Terminal in the text field at the top, right-click on the relevant search result, and then select Run as administrator from the context menu.
2. Click Yes on the UAC (User Account Control) prompt that pops up.
3. Up next, click on the downward arrow at the top, and select Command Prompt from the list of options. Alternatively, you can press Ctrl + Shift + 2 to launch the Command Prompt tab.
4. Now, type/paste the following commands to stop the BITS and Windows update service, and hit Enter after each to execute them:
net stop bitsnet stop wuauserv5. Next, enter the following command to delete the qmgr*.dat files:
Del “%ALLUSERSPROFILE%Application DataMicrosoftNetworkDownloaderqmgr*.dat”6. Now, enter the following commands to rename some critical folders:
Ren %Systemroot%\SoftwareDistribution\DataStore DataStore.bakRen %Systemroot%\SoftwareDistribution\Download Download.bakRen %Systemroot%\System32\catroot2 catroot2.bakIf this is your first attempt at resetting Windows Update components, skip this step.
7. Paste the following commands and hit Enter to reset the BITS and Windows Update services:
sc.exe sdset bits D:(A;;CCLCSWRPWPDTLOCRRC;;;SY)(A;;CCDCLCSWRPWPDTLOCRSDRCWDWO;;;BA)(A;;CCLCSWLOCRRC;;;AU)(A;;CCLCSWRPWPDTLOCRRC;;;PU)sc.exe sdset wuauserv D:(A;;CCLCSWRPWPDTLOCRRC;;;SY)(A;;CCDCLCSWRPWPDTLOCRSDRCWDWO;;;BA)(A;;CCLCSWLOCRRC;;;AU)(A;;CCLCSWRPWPDTLOCRRC;;;PU)8. Next, paste the following command and hit Enter:
cd /d %windir%\system329. You will now have to execute each of the following commands to reregister the BITS and Windows Update files to fix the 0x800f0905 error encountered by the installer:
regsvr32.exe atl.dllregsvr32.exe urlmon.dll
regsvr32.exe mshtml.dll
regsvr32.exe shdocvw.dll
regsvr32.exe browseui.dll
regsvr32.exe jscript.dll
regsvr32.exe vbscript.dll
regsvr32.exe scrrun.dllregsvr32.exe msxml.dll
regsvr32.exe msxml3.dllregsvr32.exe msxml6.dllregsvr32.exe actxprxy.dllregsvr32.exe softpub.dllregsvr32.exe wintrust.dllregsvr32.exe dssenh.dllregsvr32.exe rsaenh.dllregsvr32.exe gpkcsp.dllregsvr32.exe sccbase.dllregsvr32.exe slbcsp.dllregsvr32.exe cryptdlg.dllregsvr32.exe oleaut32.dllregsvr32.exe ole32.dllregsvr32.exe shell32.dllregsvr32.exe initpki.dllregsvr32.exe wuapi.dllregsvr32.exe wuaueng.dllregsvr32.exe wuaueng1.dllregsvr32.exe wucltui.dllregsvr32.exe wups.dllregsvr32.exe wups2.dllregsvr32.exe wuweb.dllregsvr32.exe qmgr.dllregsvr32.exe qmgrprxy.dllregsvr32.exe wucltux.dllregsvr32.exe muweb.dllregsvr32.exe wuwebv.dll10. Execute the following command to reset Winsock: netsh winsock reset
11. Finally, execute these commands to restart the BITS and Windows Update service:
net start bitsnet start wuauserv


Resetting the Windows Update components is one of the best fixes for any issues related to updating the OS.
Though the process is slightly longer, it’s known to eliminate the install error – 0x800f0905 encountered by installer in Windows for a lot of users.
3. Fix file corruption with SFC
- Open the Command Prompt as an administrator.

- Type sfc /scannow and press Enter.

- Wait for the scan to complete.
- Try running the updates again.

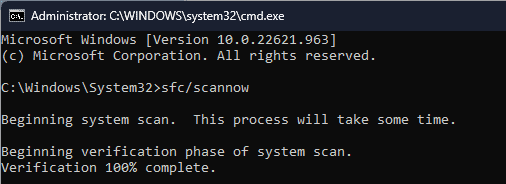
This command scans and fixes system file corruption which could very much lead to installer error 0x800f0905.
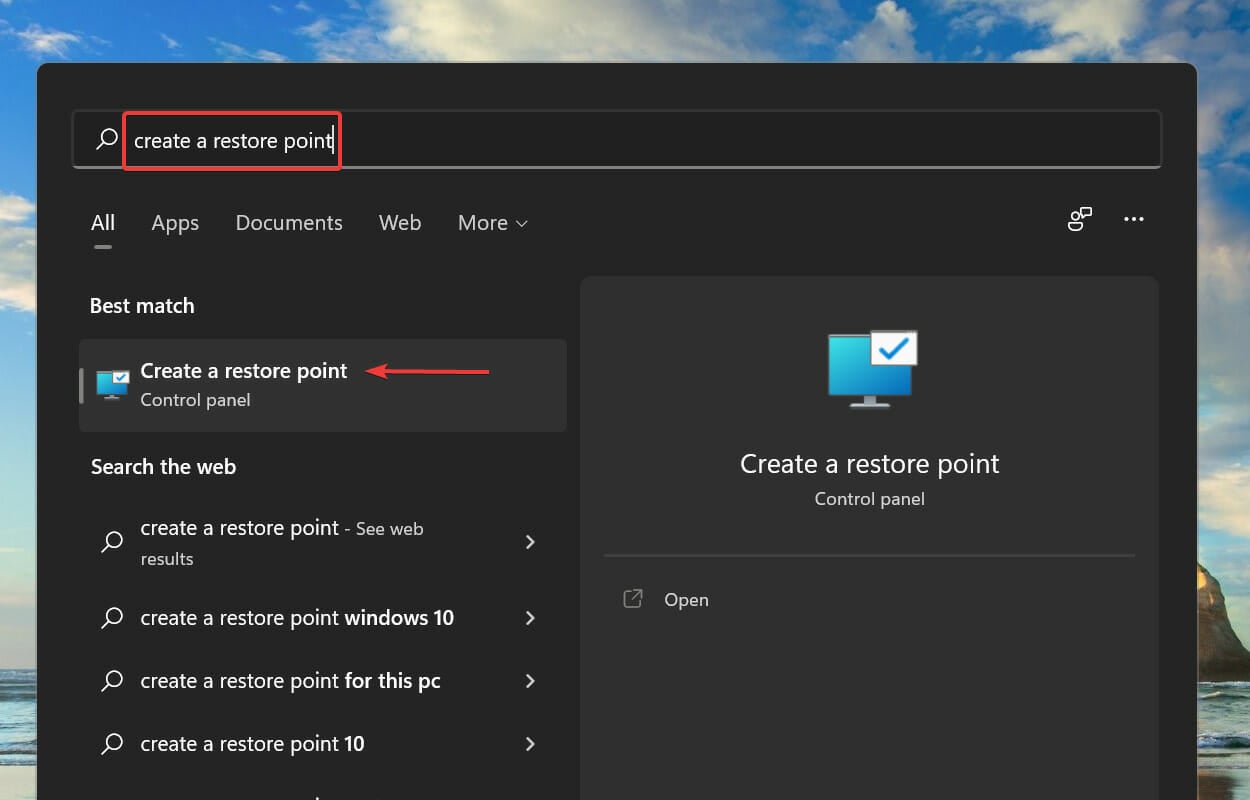
4. Perform a system restore
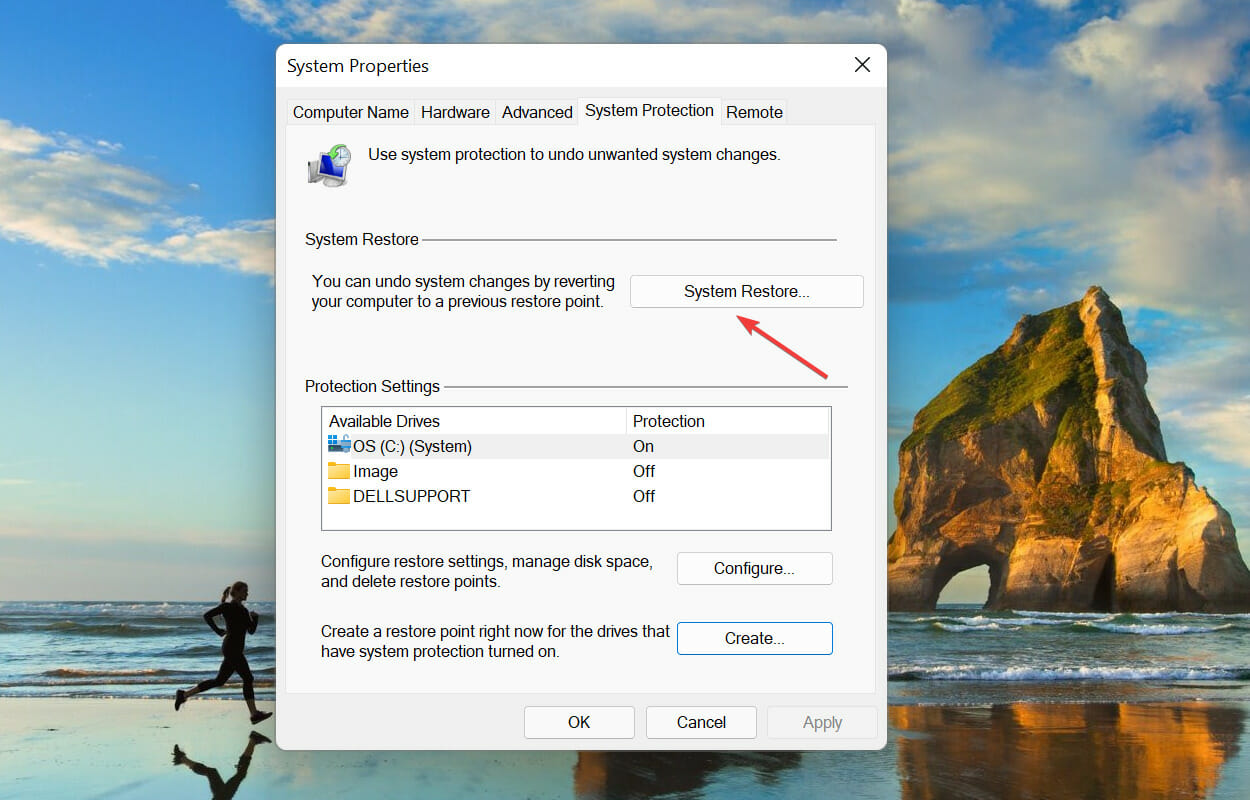
- Press Windows + S to launch the Search menu, enter Create a restore point in the text field at the top, and click on the relevant search result.
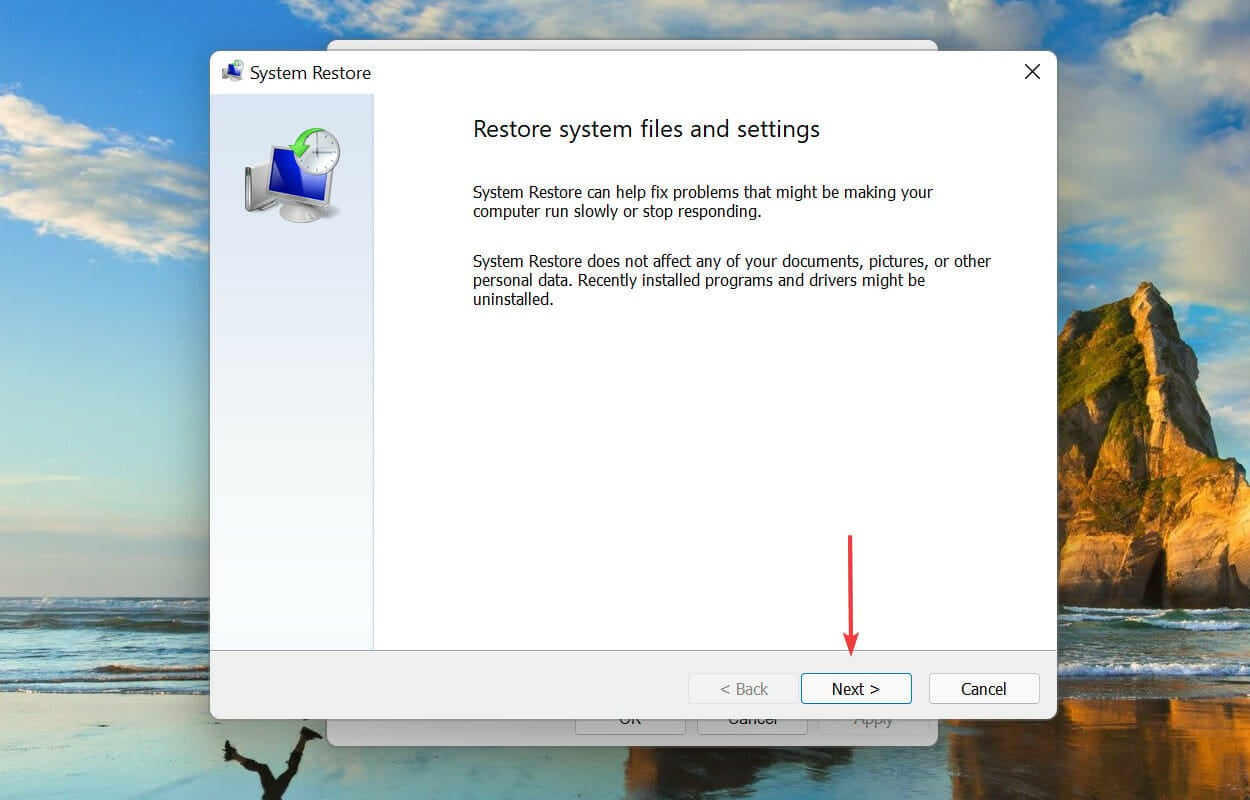
- Next, click on System Restore.
- If no recommended restore points are listed, click on Next.
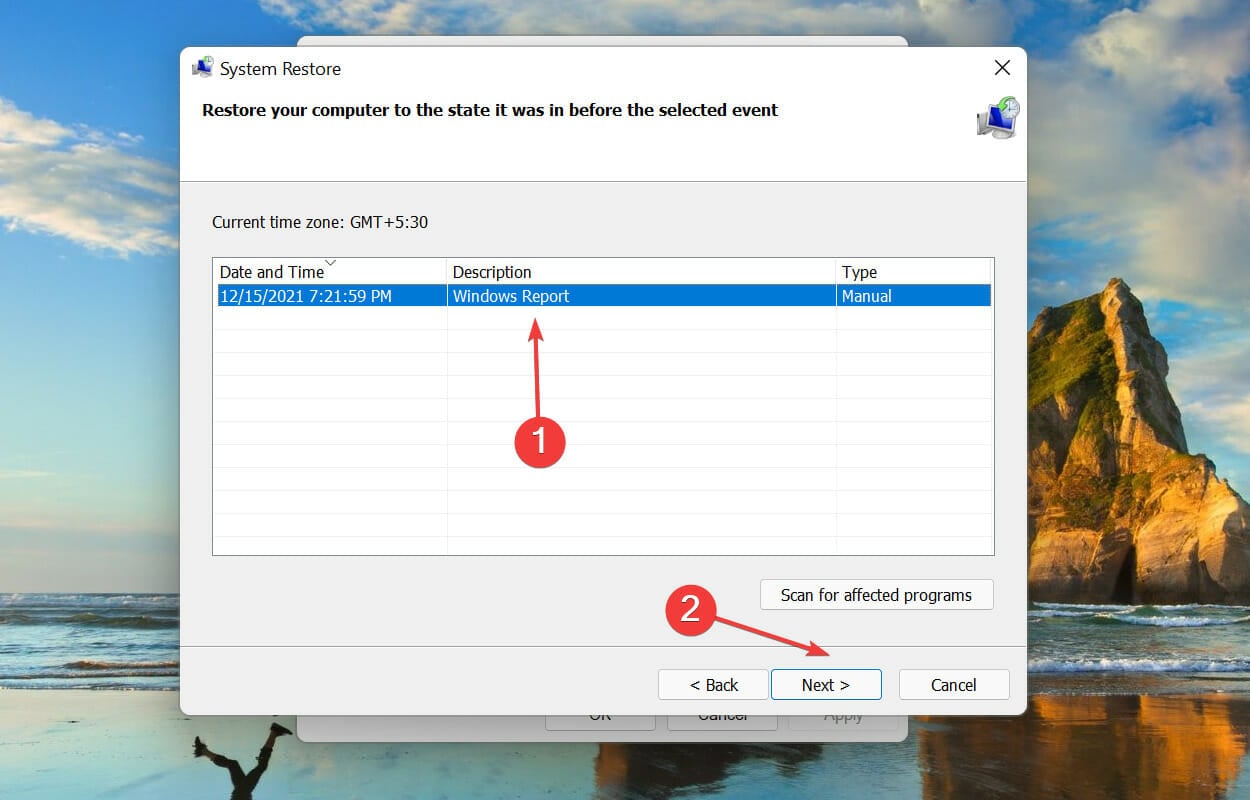
- Choose a restore point from the ones listed here and click on Next.
- Finally, review the restore settings and click on Finish to start the process.
- Your computer will restart during the process, so save any open files.
- After the computer restarts, check if the 0x800f0905 Windows Update error encountered by the installer is fixed.
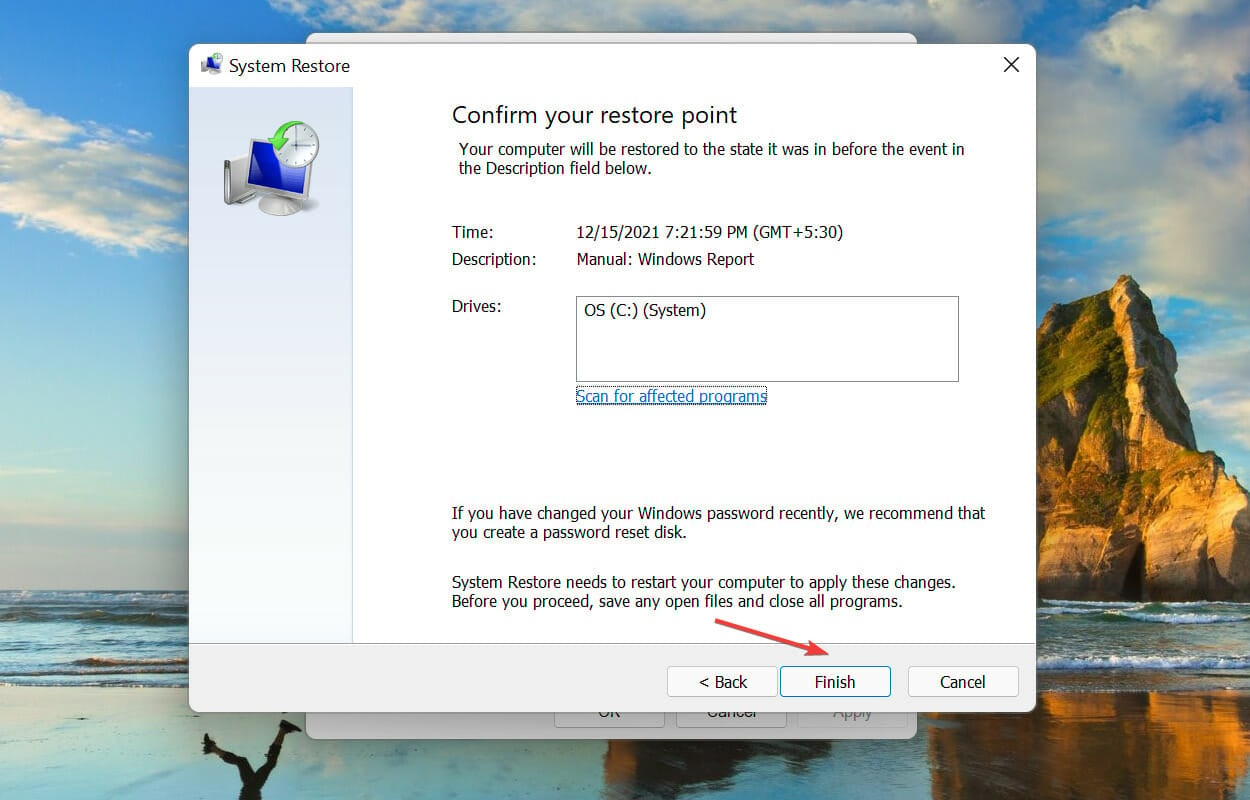
System restore takes your computer back to a state where the error didn’t exist altogether. For example, say it’s misconfigured settings or a conflicting application causing the error, and restoring the system works perfectly here.
5. Manually install the updates
- Go to Windows 11 update history and identify the latest version’s KB (Knowledge Base) number. The KB number below is for the last update when writing this article; it could be different for the update you install in the future.
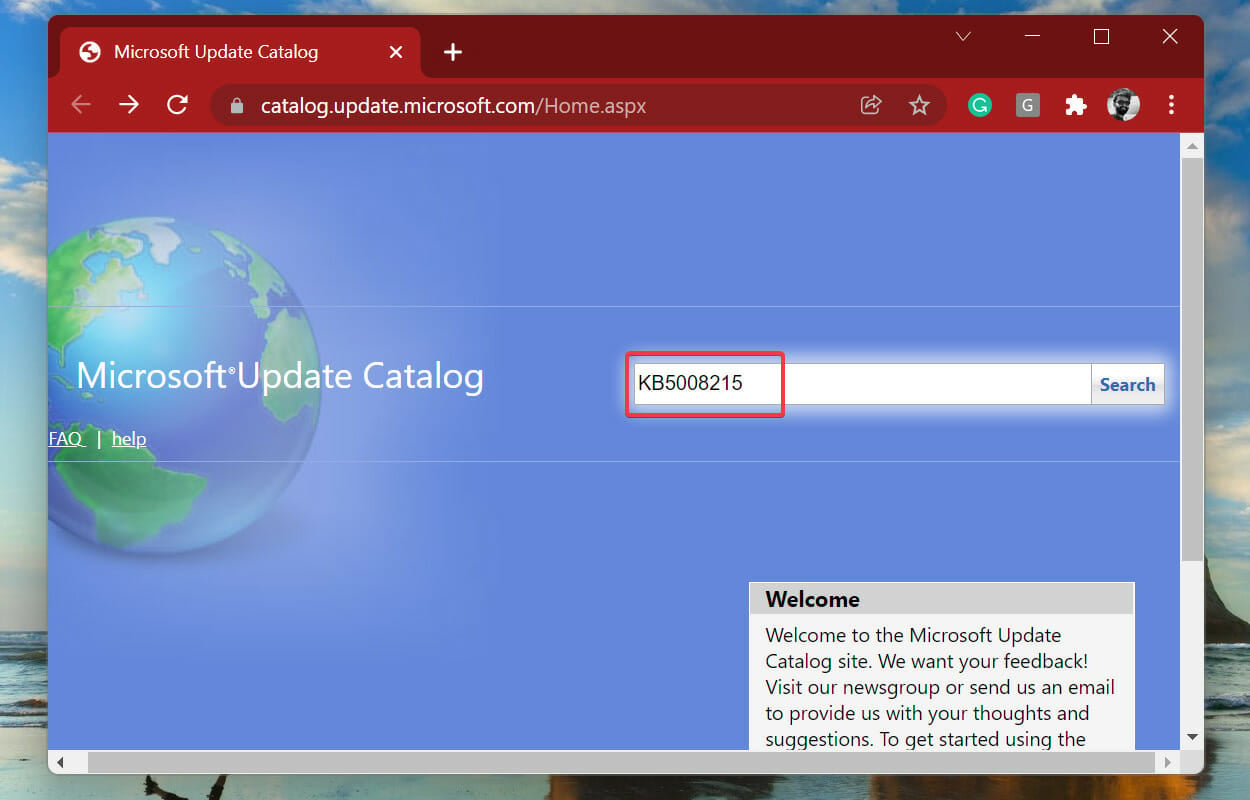
- Now, go to the official Microsoft Update Catalog, paste the KB number in the search box, and then hit Enter.
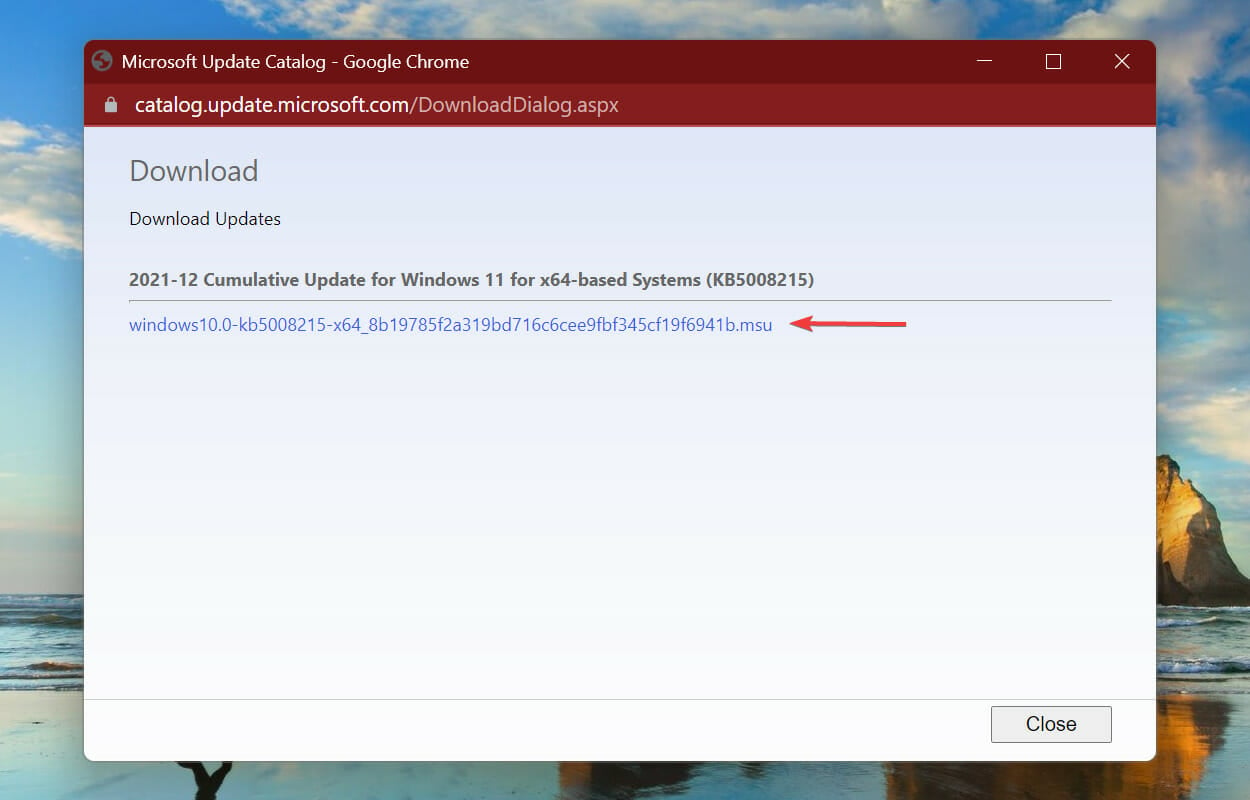
- Click on the Download button next to the update that matches your system.
- Next, click on the link to download the file.
- Double-click on the downloaded file to launch the installer setup, and follow the on-screen instructions to complete the process.

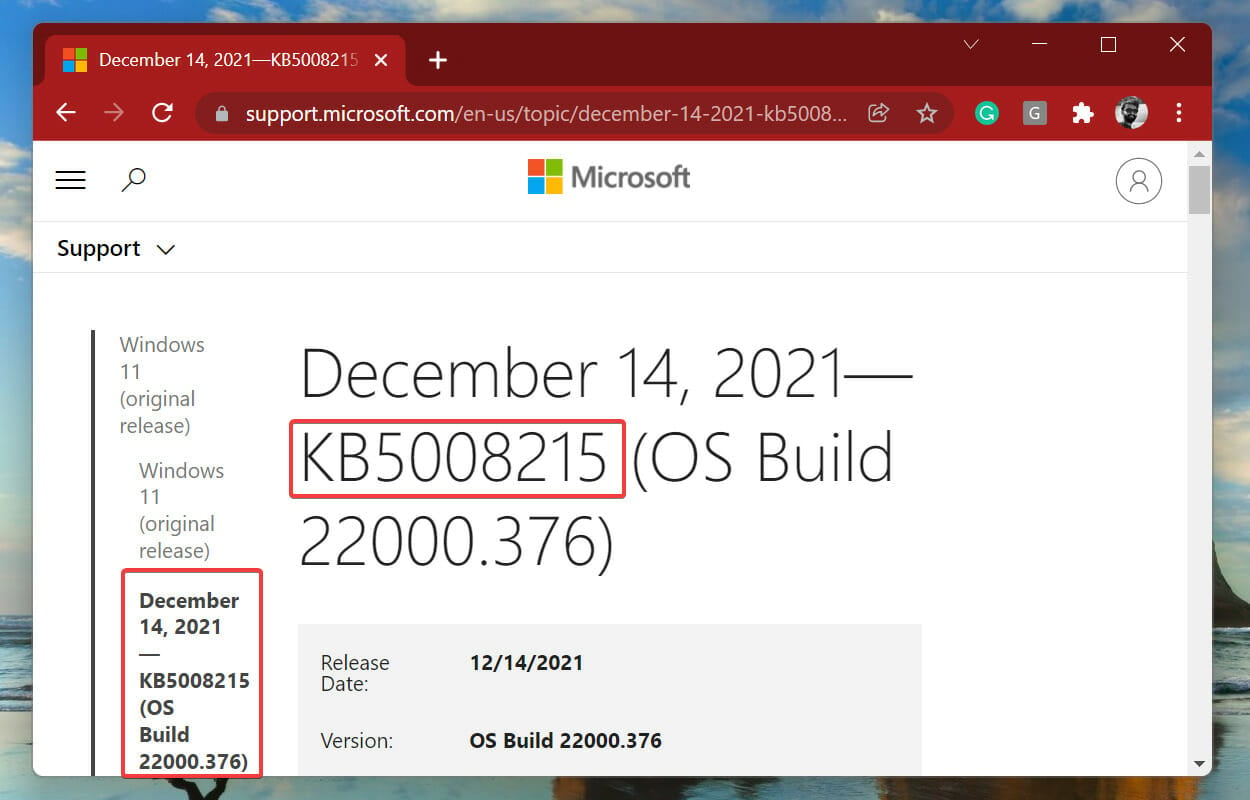

After manually downloading and installing the Windows update, the 0x800f0905 error encountered by the installer should be eliminated.
6. Perform an in-place upgrade
- Go to Microsoft’s official website, scroll to the Download Windows 11 Disk Image (ISO) section, select Windows 11 (multi-edition ISO) from the dropdown menu, and click Download.

- Choose a language, preferably English (United States), and then click Confirm.
- Now, click on the 64-bit Download button.
- After it’s downloaded, double-click on the file.

- Click Open in the confirmation prompt.

- Now, run the setup.exe file.
- Click Yes in the UAC prompt.
- Now, click Next.

- Click Accept in the Applicable notices and license terms window.
- Finally, verify that it lists Keep personal files and apps, then click on Install.
- Now, wait for the installation to complete. It may take some time and should let the process run uninterrupted.


That’s it! If none of the previous methods worked, performing an in-place upgrade should most certainly get things up and running when receiving the Installer encountered an error 0x800f0905 message.
If it still doesn’t work, you can factory reset Windows 11 or even roll back to Windows 10.
Tell us which fix worked or whether you had to reset Windows 11 in the comments section below.
Read our disclosure page to find out how can you help Windows Report sustain the editorial team. Read more
Improve this guide


User forum
0 messages