How to Use the Keyboard Troubleshooter in Windows
If your keyboard isn’t responding properly or some keys have stopped working, you can use the keyboard troubleshooter built into Windows 11 and 10 to detect and fix common problems automatically. This guide explains how to run it and what to do if it doesn’t solve your issue.
Table of contents
How to Run the Keyboard Troubleshooter on Windows 11?
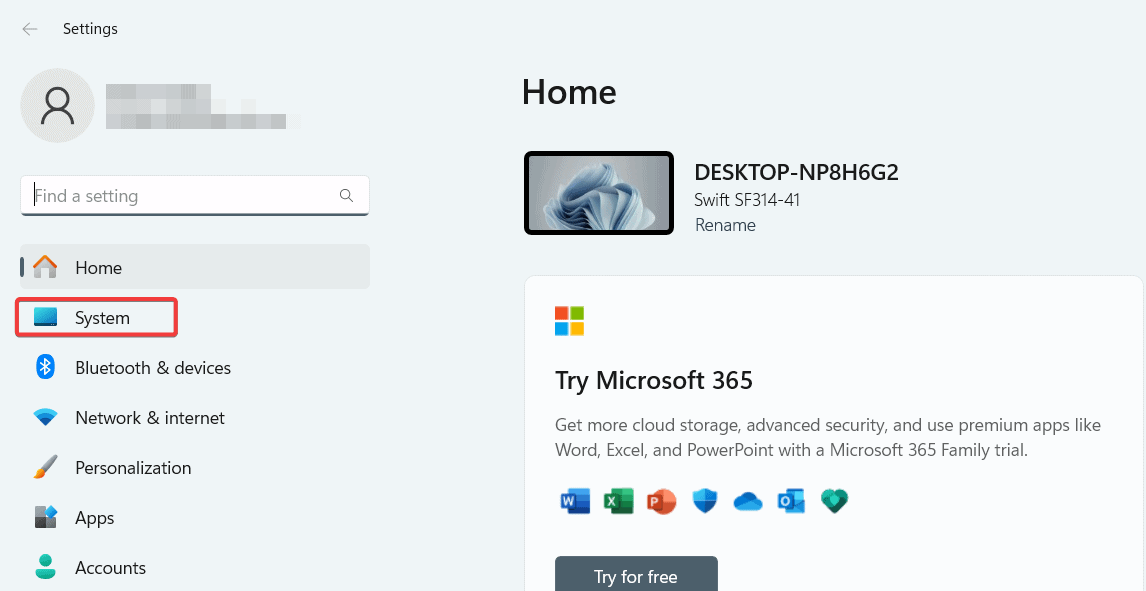
1. Open the Settings App
Start by launching the Settings menu to access system troubleshooting options.
- Press Windows + I on your keyboard.
- Select System from the left sidebar.
- Scroll down and click Troubleshoot.

2. Launch Additional Troubleshooters
Next, open the list of troubleshooters available in Windows 11.
- Click Other troubleshooter.

- Locate the Keyboard section.
- Click Run next to it.
3. Follow On Screen Instructions
Let Windows automatically scan and fix any detected problems.
- Wait while Windows scans your device for problems.
- Apply any recommended fixes automatically.
- Restart your computer if prompted.
If your keyboard types unexpected characters after running the tool, you may need to adjust your layout. See why your keyboard types wrong letters.
How to Run the Keyboard Troubleshooter on Windows 10
Running the troubleshooter is just as simple in Windows 10. Here is how to do it.
1. Open the Troubleshoot Menu
Begin by accessing the Troubleshoot section from Settings.
- Press Windows + I to open Settings.
- Select Update & Security.
- Click Troubleshoot in the sidebar.
2. Access Additional Troubleshooters
Now locate the keyboard troubleshooter among the available tools.
- Click Additional troubleshooter.

- Find and select Keyboard.
- Click Run the troubleshooter.

3. Complete the Repair
Finish by applying suggested fixes and restarting your computer.
- Let Windows detect configuration or driver issues.
- Follow on screen prompts to apply fixes.
- Reboot your PC once the process finishes.
If your keyboard still double types or repeats letters after troubleshooting, read this fix for Windows 11 keyboard double typing issues.
What Is the Keyboard Troubleshooter
The keyboard troubleshooter is a built in Windows diagnostic tool designed to scan for input related issues. It checks system configurations, registry values, and driver integrity, then applies automatic fixes or suggests next steps.
For accessibility related adjustments, review how to configure Ease of Access keyboard settings. You can also run the System Maintenance Troubleshooter to check for wider performance and stability problems across Windows.
You can also run troubleshooters using command line tools for faster access by following this guide on how to run Windows troubleshooters from Command Prompt, which gives you a direct way to launch diagnostic utilities when settings do not open properly.
FAQs
It can happen due to outdated drivers, system updates, or third party software conflicts. Running the troubleshooter is the quickest way to identify the cause.
Yes, but make sure the Bluetooth adapter and keyboard are both connected and paired before starting the tool.
It can fix basic driver and layout issues, but specialized gaming features might still need software updates from the manufacturer.
Visit the official website of your keyboard or laptop manufacturer, go to the Support or Drivers section, and download the latest compatible driver for your model.
Conclusion
The keyboard troubleshooter is one of the easiest ways to fix input problems in Windows 11 or 10. If it does not resolve your issue, you can check your input layout or accessibility preferences for possible conflicts. For more detailed fixes, explore solutions like correcting wrong key mapping or stopping key repetition to make sure your keyboard works smoothly every time.
Read our disclosure page to find out how can you help Windows Report sustain the editorial team. Read more


Improve this guide


User forum
0 messages