Windows Live Mail is not deleting messages? Follow these steps
3 min. read
Updated on
Read our disclosure page to find out how can you help Windows Report sustain the editorial team. Read more

We understand that sometimes you are encountering issues with Windows Live Mail. That’s a pretty neat email client, but it is not without its faults – one of them is precisely the fact that messages are prone to stay longer than you’d want them to.
Long story short, you can’t delete messages from Deleted, Sent, Junk or any other folder. You can’t delete a single email message, nor a group of highlighted messages. You simply can’t delete anything.
Here are a few easy steps that you can perform to fix this glitch.
What can I do if Windows Live Mail is not deleting messages?
1. Confirm and delete superfluous folders
In case of having more than one email account in Windows Live Mail, first, sign in to each account. Then, expand all your folders in the folder pane.
In case of also seeing superfluous folders called Sent items, Junk email or Deleted items in addition to the regular ones called Sent, Junk and Deleted, things are about to get a lot easier for you.
Remember that you need to be signed on to Windows Live Mail with IMAP and simply delete those extra files. Everything should start working normally again.
2. Repair all Windows Essential programs
- Open the Start menu.
- Click Control Panel. You’ll find this option on the right side of the Start window.
- From the Category view, select the Uninstall a program option.
- Locate the Windows Live Essentials program. It is normally placed in the list of programs, in the middle of this window.
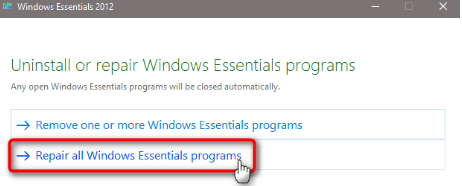
- The Uninstall or repair Windows Essentials programs pop-up will give you two choices. Select Repair all Windows essentials programs this time.
- Wait for the procedure to end, then restart your computer for the changes to take place.
If you are still getting this error, then don’t hesitate to use the Repair utility for Windows Live Mail. Follow the instructions above to the letter if using a Windows 10 PC.
You can’t open Control Panel? Take a look at this step-by-step guide to find a solution.
3. Remove and install Windows Live Mail back
- In the Windows Search bar, type Control and open Control Panel.
- Click Uninstall a program found below the Programs icon.
- Up next, locate Windows Essentials.
- Click Windows Live Essentials. Doing so will select it.
- Click Uninstall/Change.
- This will invoke a pop-up window.
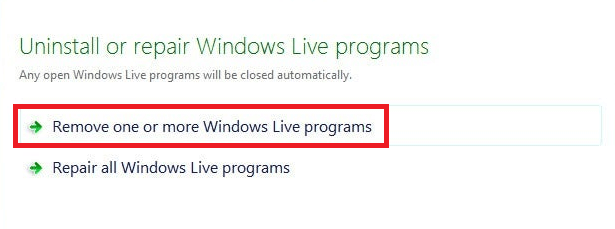
- Click Remove one or more Windows Live programs.
- Then, click the Mail checkbox.
- Click Uninstall and it will begin removing the Windows Live Mail program from your computer.
- Don’t forget the important part of reinstalling it.
If you need additional info on how to uninstall programs and apps in Windows 10, take a look at this detailed guide.
The messages error you are dealing with can also be fixed by completely uninstalling Windows Live Mail, then installing it back.
Some users have reported success by also removing and then reinstalling all their email accounts one by one. What about you? Share your experience with tackling this issue in the comments section below.
READ NEXT:


User forum
0 messages