How to download WebEx for Microsoft Outlook
3 min. read
Updated on
Read our disclosure page to find out how can you help Windows Report sustain the editorial team Read more

Cisco WebEx, is a company that provides on-demand collaboration, online meeting, web conferencing and videoconferencing applications.
In other words, Webex is an ideal tool to add to the corporate environment for boosting overall productivity.
More so, WebEx can also be integrated in other useful company tools, such as Microsoft Outlook.
While Microsoft Outlook may not be as popular as other email clients when it comes to personal use, WebEx isn’t designed for that either, making it the ideal candidate for integration.
However, adding Webex to Outlook is a bit more tricky than it sounds, as it goes far beyond simply installing an Add-in.
As such, this article we compiled was made to show you how you can add WebEx to your Microsoft Outlook client ina step-by-step manner.
How can I download Webex to Outlook?
1. Make sure WebEx Productivity Tools are installed
- Go to your company’s WebEx website
- Your administrator should know the URL
- Go to the Meeting Center tab
- Select Support
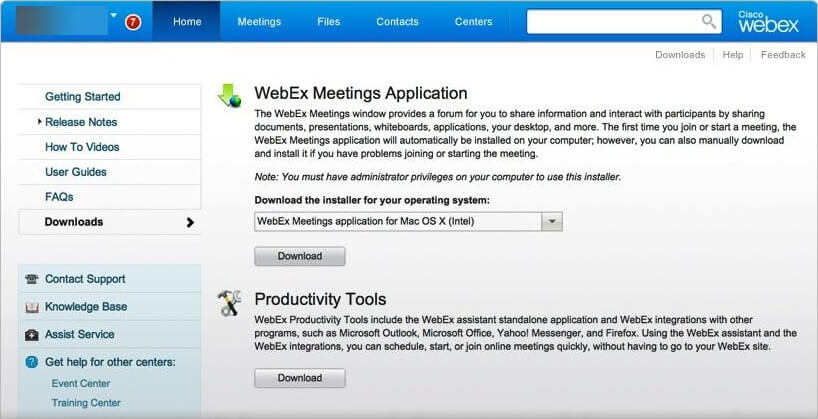
- Choose Downloads
- Choose the Productivity Tools
- Go to the My WebEx tab
- Click on Productivity Tools Setup
- Select On your Desktop
- Click on Install Productivity Tools
2. Check if Outlook Integration is granted to WebEx
- Open the WebEx Settings dialog
- If WebEx is not yet running:
- Press Start
- Go to All Programs
- Select WebEx
- Go to Productivity Tools
- Go to WebEx Settings
- If WebEx is already running:
- Click on the Edit WebEx Settings link at the bottom or press F11
- If WebEx is not yet running:
- Click on the Tools tab
- See that Microsoft Outlook is available for Email and Scheduling
- Press OK
- Restart Outlook and verify that WebEx features appear both in the Toolbar or in the Ribbon
3. Enable the WebEx Productivity Tools Add-in
You only need to follow these steps if the WebEx features still don’t appear in the Toolbar or in the Ribbon after following the steps mentioned above.
- Open Outlook
- Go to the File tab
- Click Options
- Click Add-Ins
- Go to the Manage field
- Type in COM Add-ins
- Select the WebEx Productivity Tools
- Click Go
- Restart Outl0ok
By following the steps listed above, you should now be able to fully integrate all of the features of the WebEx Productivity Tools within your Microsoft Outlook client.
Please remember that you also need to have the WebEx Productivity Tools for PC installed.
More so, keep in mind that you need to keep them installed in order for the Outlook Add-ins to continue functioning.
RELATED ARTICLES YOU SHOULD CHECK OUT:

