How to Get Rid of Outlook Subject Prefix "FW" And "RE"
Create a VBA script to automatically edit the Subject field
5 min. read
Updated on
Read our disclosure page to find out how can you help Windows Report sustain the editorial team Read more
Key notes
- If you want to remove FW and RE in Subject field, you can create a VBA script to do that.
- There are many free add-ins available that can achieve the same results, so be sure to try them.

If you ever sent an email you may have noticed certain prefixes in the subject box. This is why many are wondering how to get rid of Outlook subject prefix FW and RE.
While these prefixes don’t affect users negatively in any way, some might find them distracting, therefore, in today’s guide, we’re going to show you the best way to get rid of them.
What is “RE” and “FW” in Outlook?
These are email subject abbreviations, and they are used to distinguish new email messages from the ones that you’ve replied to or forwarded.
- RE – Stands for a reply and it appears on all new emails that you’ve previously responded to.
- FW – Stands for a forwarded message, and it means that this message was written for someone else originally, but it was forwarded to you.
While these are useful, some may find them distracting. In some cases, you might even get multiple abbreviations in a subject field thus making the subject of the message less visible.
This is the reason why they want to remove them so badly, and if you’re one of those users, keep on reading.
Why do “FW” and “RE” prefixes appear in Outlook?
This is the default behavior not just in Outlook but in every email client and service. These abbreviations are used to help you distinguish quickly between forwarded emails and the ones that you’ve already replied to.
Since these are added to the subject field, you can see this distinguish these messages at a glance, without having to open them.
These are added automatically to all email messages as soon as you reply or forward them, and that’s a common practice that all email services use.
How to manually get rid of “FW” and “RE” prefixes?
Manually edit the subject line before replying
- Click the reply option in the email message that you want to respond to.
- Look for the Subject field and remove FW or RE from it.
- Write your reply and once you’re done, click Send.
Few of reported that they can’t complete these steps because Outlook view is not showing subject, but we showed you a way to fix that in a different guide.
While this method is simple, it’s not the most convenient since you have to do this for every single email that you’re replying to.
It can get tedious, and sometimes you might even forget to remove it thus causing your email subjects to look inconsistent.
To learn more about Outlook, we have a great guide that shows you how to mark all emails as read, so don’t miss it.
How to get rid of the “FW” and “RE” prefixes automatically in Outlook?
1. Use the VBA script
- In Outlook, navigate to the Developer bar. Next, click on Visual Basic. Alternatively, you can use Alt + F11 shortcut.
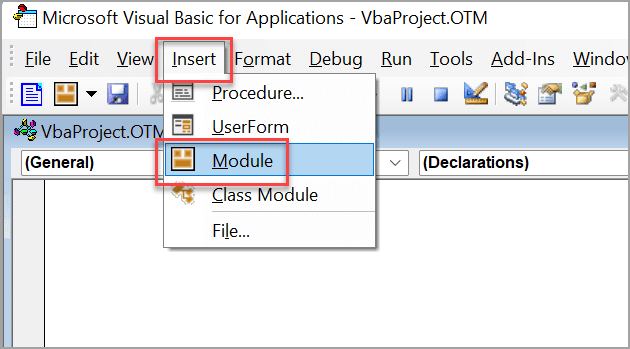
- Go to Insert and select Module.
- Now paste the following code and save it:
Sub Application_ItemSend(ByVal Item As Object, Cancel As Boolean)
   Dim strSubject As String
   If InStr(Item.Subject, "RE") > 0 Then
      'If you don't want the prompt,
      'You can remove the MsgBox line and its correspoding "Else … End If" lines.
      If MsgBox("Do you want to remove the prefix 'RE'?", vbYesNo) = vbYes Then
         strSubject = Replace(Item.Subject, "RE:", "", vbTextCompare)
      Else
         strSubject = Item.Subject
      End If
   End If

   If InStr(Item.Subject, "FW") > 0 Then
      If MsgBox("Do you want to remove the prefix 'FW'?", vbYesNo) = vbYes Then
         strSubject = Replace(Item.Subject, "FW:", "", vbTextCompare)
      Else
         strSubject = Item.Subject
      End If
   End If

   Item.Subject = Trim(strSubject)
   Item.Save
End Sub
The code is pretty simple and it checks if FW or RE appears in the Subject field. If it does, users will be asked if they want to remove it.
If they want, the Subject field will be automatically updated.
2. Use Kutools
- Download Kutools for Outlook and install it.
- In Outlook, select the emails whose prefix you want to remove.
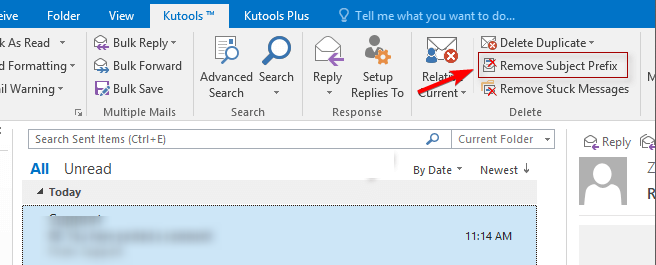
- Click the Kutools tab and choose Remove subject prefix.
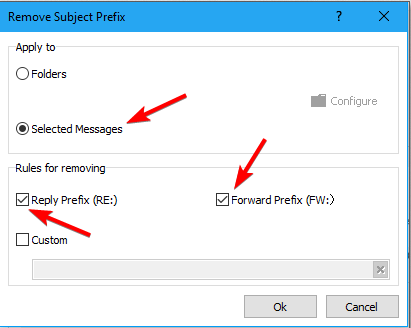
- Next, choose Selected messages and check which prefixes you want to remove.
- Lastly, click OK.
You can also remove prefixes from entire folders as well. To do that, repeat the same steps, but in step 4 select Folders and then choose the desired folder.
3. Use OutlookFreeware utilities
- Download Remove Subject Prefixes Utility.
- Once it’s downloaded, install it.
- In Outlook, click on OutlookFreeware tab and select Remove Subject Prefixes.
- Click on Configure and select the desired Outlook folder.
- Lastly, click on Run.
As you can see, removing Outlook prefixes is simpler than you thought. However, doing so manually can be tedious and ineffective.
To help you with that, we have a great guide on how to search for keywords in Outlook, so be sure to check it out.
Therefore, we recommend using a VBA script or one of many available Outlook add-ins to automate the process.
In case you’re having issues with any of these add-ins, we have a guide on how to fix This add-in could not be started error, so be sure to check it out.
What method do you use to remove RE and FW from the Subject field in Outlook? Let us know in the comments below.


