Monitor Changes BRightness On Its Own: How to Fix
You should disable the Adaptive brightness settings right away
Key notes
- The monitor's brightness can be a problem while working if it keeps changing.
- Several users have reported that they are facing the screen's brightness issue with their system.
- Updating the graphics driver and disabling the adaptive brightness feature can be helpful in resolving this problem.

If your Windows 10 brightness slider isn’t working, it’s likely due to outdated display drivers or incorrect power settings.
In this guide, we’ll show you how to fix these common causes and restore your brightness controls quickly.
How do I stop my monitor from auto-adjusting brightness?
Before applying any advanced steps:
- You can try connecting your monitor to another Windows system to see if it works. If the monitor shows the same problem after connecting to another device, this means the monitor is damaged. You may have to repair it or replace it with the new one.
1. Change brightness settings
- Press the Windows and I keys together to open the Settings app.
- Ensure you are on the System page by clicking the option on the left menu.
- Select the Display option on the System page.

- Click the Brightness option under the Brightness & color section at the top of the Display page.

- Now uncheck the Help improve battery by optimizing the content shown and the brightness checkbox.

- Once done, close the Display page after changing the settings.
2. Disable the Adaptive brightness settings from Control Panel
- Press the Windows key and type the control panel.
- Select the Control Panel app from the search results by clicking on it.

- Click Category from the View by option.
- After selecting it, click Hardware and Sound.

- Click Power Options to view all the power plans.

- Select Change plan settings by clicking on it.

- Now click Change advanced power settings.

- Once the Power Options window opens, double-click on the Display option to expand it.
- Also, expand the Enable adaptive brightness option by double-clicking on it.
- Change the Settings option to Off from its dropdown.

- Once done, click OK.
3. Update the graphics driver
- Open the Run command box by pressing the Windows and R keys together.
- Type devmgmt. msc in the textbox of the Run box and press the Enter key.
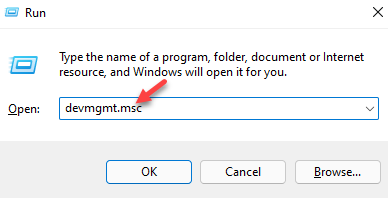
- Once the Device Manager window opens, double-click on the Display adapters option to expand it.
- Right-click on the graphics card and click Update driver from the context menu.

- The update driver window gets popped up on the system.
- Select the Search automatically for drivers option by clicking on it.

- This starts updating the graphics driver on the system.
- Once it is done, you can close the device manager window.
If manual updates didn’t work, you could use a specialized tool to scan, find and update outdated drivers automatically, safely, and fast. Our top choice for this is PC Helpsoft Driver Updater because it offers a user-friendly interface, reliable driver detection, and ensures you get the latest official updates without risking compatibility issues.
4. Turn off the auto-dimming feature while in battery saver mode
- Right-click the Start button on the taskbar and select Settings from the context menu.

- This opens the Settings app window on the system.
- Click System on the left panel.
- Select the Power & battery option on the System page on the right side of the Settings app.

- Select the Battery saver option by clicking on it once, which is located at the bottom of the Power & battery page.

- This expands the section, and you need to uncheck the Lower screen brightness when using the battery saver checkbox.

- When you are done, close the Settings app window.
5. Run the Power Troubleshooter
- Type control.exe /name Microsoft.Troubleshooting in the Run box and then press the Enter key.

- Click the Other troubleshooters option.

- Scroll down the page and click the Power option’s Run button.

- This starts the troubleshooting by detecting the issues associated with the power and trying to fix them.
- Follow any onscreen instructions and complete the troubleshooting process.
6. Change the screen resolution settings
- Press the Windows key and type settings.
- Click the Settings app from the results.

- In the Settings app page, click System on the left menu and click Display on the right side of the page.
- Under the Scale & layout section, select the 1920 x 1080 (Recommended) option from the dropdown list of the Display resolution.
- Also, ensure the Scale option is set as 125%, which Windows recommends.

- When done, you can close the Settings page.
Why does my screen brightness keep changing in Windows 11?
Many users are facing this constant problem with the brightness of their screens. They say the screen’s brightness keeps changing even after upgrading their system to Windows 11, the latest possible version. The potential causes for this issue on any Windows system are listed below:
- Outdated graphics driver – The graphics card is primarily responsible for how you see things on the screen. The better the graphics card specifications, the better will be the appearance. So if the graphics driver is not updated, it might cause such problems.
- Adaptive brightness enabled – There is a feature called Adaptive brightness in the Windows system, which lets the screen brightness change according to the surrounding lights.
- Auto-dimming feature – When the system is in battery saver mode, it changes the brightness to dull to save power consumption if this feature is enabled.
- Screen resolution – If the screen resolution is not set to the recommended value, it might create issues like those discussed in this article above.
- Damaged screen – This type of issue happens when the screen or monitor gets damaged internally or externally.
Why does my LCD screen become dim or sometimes flicker or brighten intermittently?
If the screen’s brightness changes randomly, it could be due to variations in the amount of light around the device. The sensors in the display adjust the brightness according to these changes. In case the display brightens intermittently, the sensors are likely broken.
For regular flickering in the monitor, it’s usually faulty connections, corrupt or outdated drivers, or a broken display to blame.
Other similar issues include your monitor brightness adjusting on its own because of adaptive settings, and brightness control buttons failing due to hardware or driver problems. Check out our guides on how to stop automatic brightness changes and fix non-working brightness buttons for solutions.
How can I calibrate my monitor in Windows 11?
Users can calibrate the monitor in Windows 11 by launching the Settings app page. Then navigate to the Display page and select the HDR option.
Next, you need to turn on the HDR video streaming option by enabling its toggle button. Next, under the Display calibration for HDR video, click Calibrate for previewing and adjusting HDR video on the monitor.
I hope you found this article to be informative! Please leave us comments below for any queries.
Read our disclosure page to find out how can you help Windows Report sustain the editorial team. Read more


Improve this guide


User forum
0 messages