Quick Guide to Printing a Test Page on Windows 11

Printing a test page in Windows helps you verify if your printer is working correctly and aligned properly. Whether you are troubleshooting print issues or setting up a new printer, this quick guide shows you the simplest ways to print a test page on Windows 11.
Table of contents
How to Print a Test Page in Windows 11?
1. Using Windows Settings
This is the easiest and most common way to print a test page in Windows 11.
- Press Windows + I to open the Settings app.
- Go to Bluetooth & devices on the left sidebar.

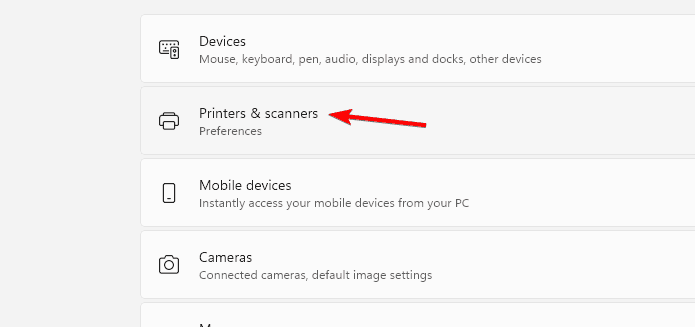
- Click Printers & scanners.
- Select your connected printer from the list.
- Scroll down and choose Printer properties.
- Under the General tab, click Print Test Page.

- Wait a few seconds for the printer to process and print the page.
If your printer is not showing up, follow this guide on Devices and Printers settings in Windows 11 to fix it.
2. Using Control Panel
If you prefer the traditional Control Panel interface, follow these steps.
- Press Windows + R to open the Run dialog box.
- Type control printers and press Enter.
- Right click your printer and choose Printer properties.
- Under the General tab, select Print Test Page.

- Confirm if the page prints correctly.
3. Printing a Test Page from the Printer Itself
You can also print a test page directly from your printer without using your PC.
- Press the Menu or Setup button on your printer.
- Navigate to Maintenance, Tools, or Reports.
- Choose Print Test Page or Printer Report.
- Press OK or Start to begin printing.
If you still face print errors or blank pages, read this troubleshooting guide for Windows printing problems.
What Is a Printer Test Page?
A printer test page is a diagnostic print that helps identify issues like misaligned text, color streaks, or communication errors between your PC and printer. It is also a quick way to confirm that the printer driver is installed properly.
For more help fixing print color issues, check out this detailed guide on printers printing colors wrong.
Why Printing a Test Page Helps
Printing a test page offers quick feedback on your printer status.
- Detects clogged ink nozzles or toner issues.
- Confirms proper driver installation.
- Verifies connectivity between your PC and printer.
- Tests color accuracy and alignment.
You should also check your printer ink levels to rule out low ink as a cause of poor test page results. After confirming your printer quality, you can print a contact sheet of photos in Windows 11 to organize and preview multiple images on one page. It is a useful next step to ensure your printer produces consistent colors and sharp results.
FAQs
Open your printer dedicated software, go to the maintenance section, and select the option to print a test page.
Ensure your printer is powered on, check the connection cable or Wi Fi status, and reinstall the printer driver if needed.
No, printers require at least a minimal ink level to complete the test page, even in grayscale mode.
Not significantly. Test pages use a small amount of ink and help identify issues early, which can save more ink in the long run.
Conclusion
Printing a test page in Windows 11 is a simple but important way to confirm your printer performance. You can do it through Settings, Control Panel, or directly from the printer menu, and the linked guides help you fix device settings, color issues, and common printing errors when problems appear.
You can also verify your recent print activity, and the guide on how to check print history in Windows 11 helps you confirm that your system records each job correctly.
Read our disclosure page to find out how can you help Windows Report sustain the editorial team. Read more


Improve this guide


User forum
0 messages