How to fix screen flickering after upgrading to Windows 10 April Update
Major system updates aren’t built in a day but we can confirm that they tend to go south fast. The Windows 10 April Update has a lot of improvements going for it, but, seemingly, there’s a LOT of critical issues, as well. One of the issues which are hard to cope with is constant screen flickering and stutters after the system update.
The first thing you can do is wait it out for some time. It tends to stabilize over some period of time and there are some hotfix updates on the way. On the other hand, if you’re through with waiting, check the steps we provided below.
Screen flickers after Windows 10 April Update? Here’s how to fix it
- Reinstall GPU drivers
- Remove third-party antivirus
- Update BIOS
- Reset PC to factory settings or roll back to the previous iteration
- Clean reinstall Windows 10
1: Reinstall GPU drivers
When something goes awry with the display, the first point of interest should be on display drivers. Frequent changes Windows Update makes to drivers, in addition to the Legacy support compatibility, and we’re looking at a major issue. And this is something all of us experienced at least once on Windows 10.
In this scenario, chances are that you had a fully functioning driver on the previous iteration of Windows 10. However, Windows 10 April Update updated the driver on its own and the flickering started. In order to address this, we suggest navigating to the OEM’s site and downloading the official driver for the Display adapter.
Follow these steps to reinstall proper GPU drivers on Windows 10 April Update:
- Log off.
- Press and hold Shift and click Restart.
- Click Troubleshoot > Advanced options > Startup Settings > Restart.
- Select Safe mode.
- Right-click Start and open Device manager.
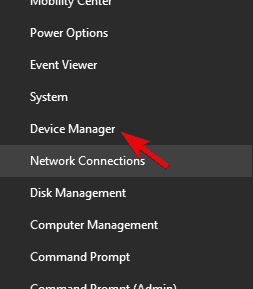
- Under Display adapter, uninstall the GPU device.
- Restart your PC.
- Navigate to OEM’s site and download the latest Windows 10 drivers. You can install Windows 8 and Windows 7 drivers in the compatibility mode, too.
- Restart your PC.
2: Remove third-party antivirus
The love-hate relationship between Windows 10 and certain third-party drivers is there from the start. Even though their respective developers worked out the compatibility issues, there is some still antimalware software with issues. For the sake of troubleshooting this, we recommend removing your antimalware temporarily.
Later on, you can always install the antivirus again, if the problem persists. This means that the third-party antimalware is indeed not to be blamed for the screen flickering. Just navigate to Control Panel and uninstall the application. If there are some supporting programs, make sure to ditch those, too.
3: Update BIOS
The BIOS/UEFI version which got the job done for the Creators Update should work for the April Update, as well. On the other hand, you can never be sure enough. Updating BIOS/UEFI to its latest version isn’s something users do often. Updates are not administered automatically and you’ll need to either access BIOS/UEFI settings or use a third-party program to update your BIOS.
Updating (flashing) BIOS can be a severe procedure for an inexperienced user, but it’s actually rather simple. Check on this article to find out how to do it on Windows 10 PC.
4: Reset PC to factory settings or roll back to the previous iteration
This is where the recovery options in Windows 10 come into play. If the problem is persistent and you’re unable to address it, resetting your system to factory settings or rolling back to Creators Update are next steps. Both options will keep your data and applications, so you can choose what you prefer on your own.
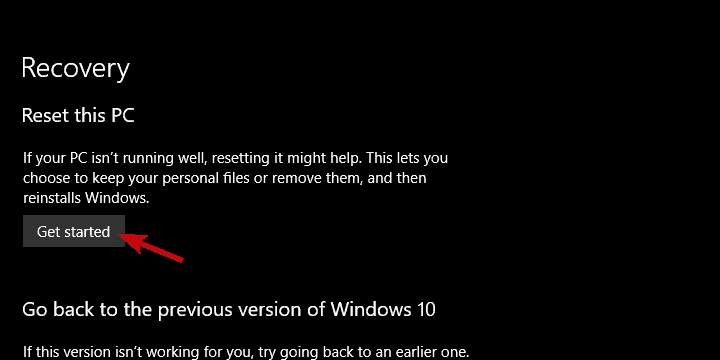
Follow these steps to “Reset this PC” in Windows 10:
- Press Windows key + I to open the Settings app.
- Choose Update & Security section.
- Select the Recovery from the left pane.
- Under the “Reset this PC” option, click Get started.
- Keep your files and start the resetting procedure.
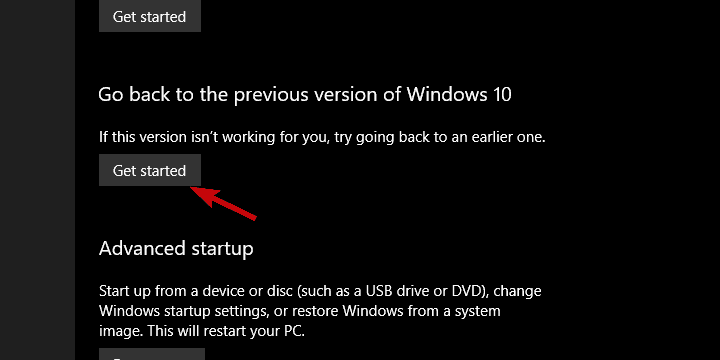
And this is how to roll back to the previous Windows 10 version:
- Navigate to Settings > Update & Security, again,
- Select the Recovery from the left pane.
- Under the “Get back to the previous version of Windows 10” option, click Get started.
- Follow the instructions until the procedure ends.
5: Clean reinstall Windows 10
Finally, if the issue is persistent even after you’ve taken the aforementioned steps, the clean reinstallation is the only solution that comes to mind. Clean reinstallation is the last resort and we recommend it only when you’ve depleted all alternatives. However, taking into consideration this is fast and simple with Media Creation tool, it shouldn’t take too much time.
You can find the in-depth explanation of the clean reinstallation for Windows 10, here. Just don’t forget to backup your data from the system partition.
That’s a wrap. Make sure to share your alternative solutions or questions in the comments section below.
RELATED STORIES YOU SHOULD CHECK OUT:
Read our disclosure page to find out how can you help Windows Report sustain the editorial team. Read more


Improve this guide


User forum
0 messages