Fix: Server Did Not Register With DCOM Within Required Timeout
Explore expert-confirmed methods to resolve this issue
4 min. read
Updated on
Read our disclosure page to find out how can you help Windows Report sustain the editorial team. Read more
Key notes
- DCOM enables software components to communicate with each other across different computers on LAN, WAN, or the Internet.
- The error may occur due to missing credentials, firewalls, and conflicting DCOM settings.
- This guide will discuss all the methods available to resolve the issue.

The server did not register with DCOM within the required timeout error occurs when DCOM software cannot register itself in a certain period.
This guide will discuss all solutions to help you fix the issue right after we discuss how the problem occurs in the first place.
What causes The server did not register with DCOM within the required timeout error?
Spotting the exact error that caused the issue could be challenging. However, there could be a few reasons behind the error:
- Faulty certificate: If Microsoft Store Apps has a faulty certificate, it could cause the issue. To resolve that, you can run Windows Troubleshooter.
- Firewall Settings: The external firewall could be why DCOM cannot connect, causing the issue; try disabling the firewall.
- Administrator account: The admin account can also cause the issue so disabling the admin account might help.
- Antivirus blocking the program: There is a possibility that your third-party antivirus is not allowing the app to access the DCOM server.
How do I fix the server did not register with DCOM within the required timeout?
Before diving into the in-depth solutions for this issue, try disabling the third-party firewall temporarily. And, if it seems to be the issue, use Windows Firewall instead to avoid the error.
1. Use Services
- Press Windows + R to get the Run window.
- Type services.msc and press Enter.
- Go to Function Discovery Resource Publication and right-click on it to select Properties.
- On the Properties tab, go to General, then Startup type.
- Choose Automatic (Delayed Start).
- Click Apply and OK.
- Restart your computer.
2. Use Windows Update
- Press Windows + I to get Settings.
- Go to Windows Update, then Advanced Options.
- Click Delivery Optimization.
- Toggle off the switch beside Allow downloads from other PCs.
3. Use Windows Troubleshooter: fix faulty certificate of Windows Store Apps
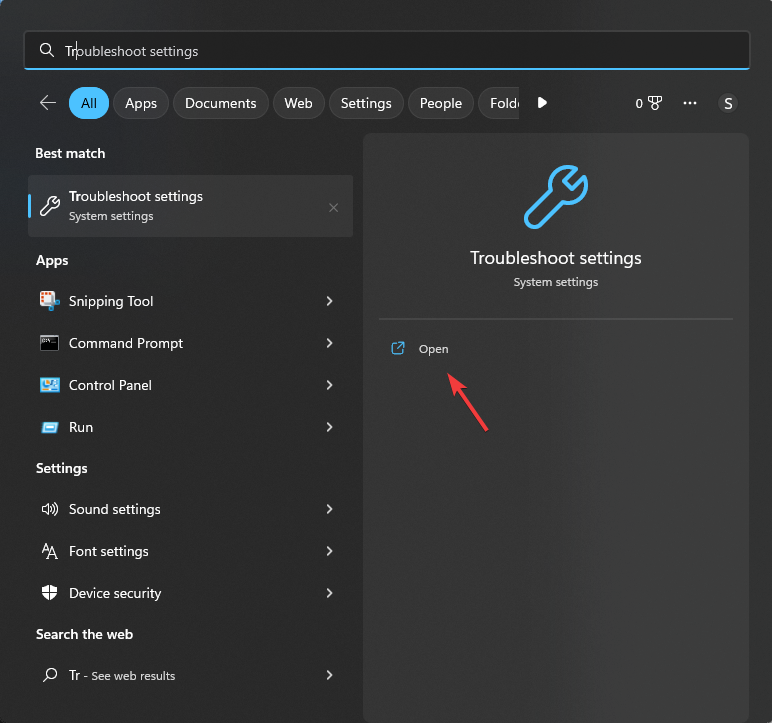
- Press the Windows key and type Troubleshoot. Click on Troubleshoot settings.
- Click on Other troubleshooters.
- Go to Windows Store Apps, and click Run.
- Follow the on-screen instructions to fix it.
4. Modify Access Permissions
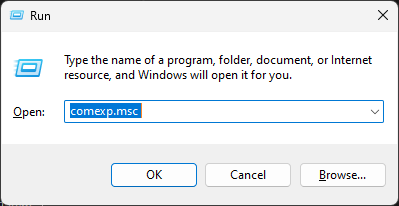
- Press Windows + R to get the Run console.
- Type comexp.msc and press Enter.
- Follow this path:
Component services\Computers
- On the right pane, right-click on My computer and select Properties.
- Go to COM Security, and click Edit Default.
- Click Apply, then OK.
5. Reset DCOM from Component Services
- Press Windows + R to get the Run console.
- Type comexp.msc and press Enter.
- Follow this path:
Component services\Computers
- On the right pane, right-click on My computer and select Properties.
- Go to the Default Properties tab, and uncheck Enable Distributed COM on this computer.
- Click Apply, then OK.
Note: Ensure Windows Impersonation Level is set to Identify and Default Authentication Level is set to Connect.
6. Check Environment Variables in System Properties
- Press Windows + R to get the Run window.
- Type sysdm.cpl and hit Enter.
- Go to the Advanced tab, and click Environmental Variables.
- Locate Path under the System variables and double-click on it.
- On the next window, select %SystemRoot%\System32\Wbem and click OK.
- Restart your PC.
7. Use Registry Editor
- Press Windows + R to get the Run console.
- Type Regedit and hit Enter.
- Noting that the GUID is the string that appears in the error, follow the path:
HKEY_CLASSES_ROOT\CLSID\GUID - On the right pane, double-click AppID.
- Copy the Value data and close the window.
- Copy and paste the following address in the address bar:
HKEY_CLASSES_ROOT\AppID\ - Press Ctrl + F and paste the Value data you copied in step 5 to locate the AppID.
- Right-click on AppID and click Permissions.
- On the next window, click Add.
- On Select Users or Groups window, click Advanced.
- Now click Find Now.
- Select LOCAL SERVICE and press OK.
- Press OK on Select Users or Groups window.
- On the Permissions window, select LOCAL SERVICE, and click Allow for Full Control.
- Click Apply, then OK.
- Restart your PC.
So, these are troubleshooting methods to fix the server did not register with DCOM within the required timeout error. Feel free to let us know which method worked for you in the comments section below.


User forum
0 messages