Surface Pro 3 Can't Connect to This Network [Fix]
Check the power settings to fix network issues
5 min. read
Updated on
Read our disclosure page to find out how can you help Windows Report sustain the editorial team. Read more
Key notes
- If your Surface won't connect to WiFi, check your network settings and make sure everything is in order.
- Check the router settings and make sure that other devices can connect to the network.

Many reported that Surface Pro 3 can’t connect to this network and this can be an issue since you won’t be able to access Internet at all.
This can occur if Microsoft Surface network adapter not working, but there’s a way to fix this issue, and in today’s guide we’re going to show you the best ways to do it.
So without further ado, let’s get started, shall we?
Why does it keep saying can’t connect to this network?
- Issues with your network connection or router can cause this issue to appear.
- Temporary glitches with your Surface or router can cause issues such as this.
- Incorrect date and time can sometimes lead to this and many other problems.
- Power saving features on your Wi-Fi adapter can prevent network from working.
What can I do if Surface Pro 3 can’t connect to this network?
1. Preliminary checks
Check the WiFi settings:
- Click Start and select Settings
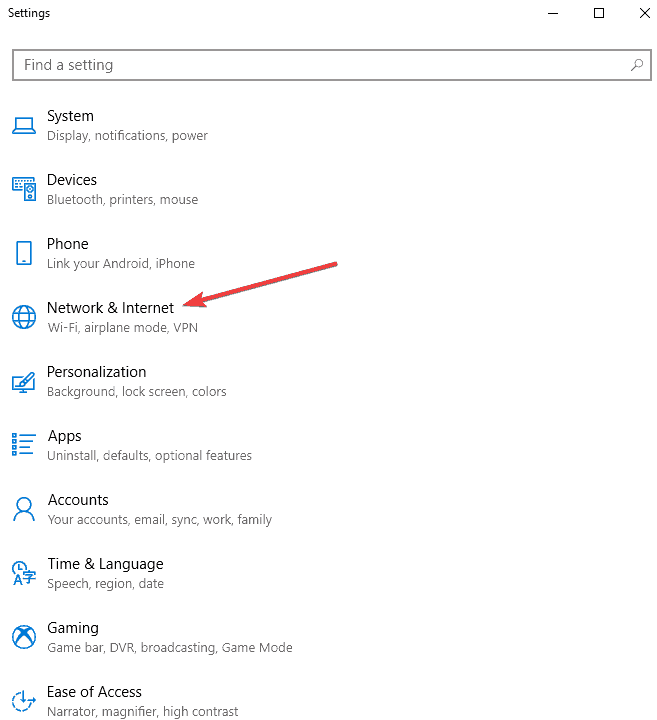
- Select Network & Internet.
- Select WiFi.
- Make sure WiFi is On and that Airplane mode is Off.
Check the password for your router
- Click Start button and select Settings
- Select Network & Internet
- Select Status
- Select Network and Sharing Center.
- In Network and Sharing Center, next to Connections, select your Wi-Fi network name.
- In Wi-Fi Status, select Wireless Properties.
- In Wireless Network Properties, select the Security tab
- Select the Show characters check box. Your Wi-Fi network password is displayed in the Network security key box
These are just a couple of simple checks to perform if Surface Pro 3 can’t connect to this network.
2. Check your network on a different device
- Use your phone or any other Wi-Fi device.
- Try connecting to the network on that device.
- If you can’t connect on other devices, the issue may be with the network or your hardware.
3. Restart your network hardware and reconnect
- Remove the power cord from your router or modem.
- After all lights are out, wait thirty seconds and plug back the modem again.
- Wait for the modem to boot.
- Restart your Surface and try to connect again.
4. Restart your Surface Pro and reconnect
- Restart (don’t shut down) your Surface Pro.
- Select Start
- Select Power
- Select Restart to restart your Surface and re-connect to Wi-Fi.
Sometimes a quick restart is all you need if Surface Pro 3 can’t connect to this network.
5. Check Date and Time settings
- Go to Start, and select Settings and choose Time & language.
- Make sure the info is correct or make changes as necessary.
- Try to connect to your Wi-Fi network
6. Forget the old network
- Swipe from the right to display Charms menu
- Select Settings
- Select the Wireless network list
- Right click or press and hold the network you want to forget
- Select Forget this network
- Restart the Surface Pro device
In case Surface Pro 3 can’t connect to this network, try removing all the networks and check if that solves your problems.
7. Check if MAC address filtering is enabled
- Log in to your router.
- Turn off MAC filtering temporarily to see if it is causing the Surface Pro not to connect.
- Add the MAC address of your Surface to your router’s authorized list.
If you want to find the MAC address, do the following:
- Select the search box in the taskbar, enter cmd, and in the search results select Command Prompt.
- Run the following command:
ipconfig /all - Find the Physical Address. This is the MAC address for your Surface.
Now make sure to add your device’s MAC address to the list of allowed addresses and that should help with Surface Pro 3 can’t connect to this network error.
8. Run Windows network troubleshooter
- Right click Start
- Select Control Panel
- Select Network and Internet
- Select Network and Sharing
- Go to the search box and type Identify and repair network problems
- Select Identify and repair network problems to run it following the instructions carefully
9. Install updates
- Install updates by either using a wired connection, using another connection.
- Install the missing updates on your devices.
- After installing updates, restart your surface and reconnect to Wi-Fi to see if it helps.
10. Reconfigure Wi-Fi adapter
- Right click Start and select Device Manager
- Right click your Wireless adapter and select Properties
- Click Power Management tab
- Uncheck Allow the computer to turn off this device to save power
- Click OK
- Change the default power plan and switch from high energy savings to low
11. Check TCP/IP settings
- In the search box, type CMD
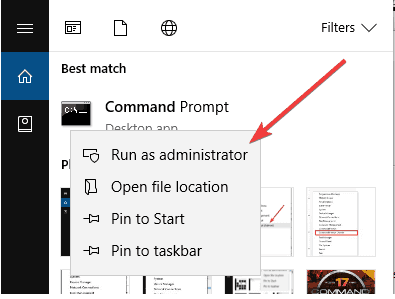
- From the search results, right click Command Prompt and tap Run as administrator.
- Type the following command and press Enter after each command.
netsh int tcp set heuristics disabled
netsh int tcp set global autotuninglevel=disabled
netsh int tcp set global rss=enabled
netsh int tcp show global - Type Exit and press Enter.
We hope that these steps helped you fix Surface Pro 3 can’t connect to this network error message.
This isn’t the only issue, and many reported that Surface Pro won’t connect to iPhone’s hotspot, so you might want to check that guide for more solutions.
Did any of these solutions help? Let us know in the comments section below.


User forum
2 messages