System Cooling Policy on Windows 11: How to Set or Change
You can set up either a Passive or Active cooling policy
Many users have been asking to know how to fix overheating issues in Windows 11 since it does not have the built-in tools for monitoring the CPU fan speed.
Regardless, this article will teach you how to set a system cooling policy in Windows 11 as a more accessible alternative to fixing overheating.
How do I set the best system cooling policy to optimize PC performance?
Users should ensure they perform the following preparatory checks before engaging in any troubleshooting tweaks.
- Eliminate some of the multiple high-end applications running simultaneously that may overwork the CPU.
- Ensure that your computer is properly ventilated.
- Ensure that your Windows is updated. If Windows update fails to work, take a look at this guide for solutions.
- You can further research some of the required settings to control your computer fan speed for Windows 11.
If nothing changes after these checks, proceed to making the tweaks below.
1. Adjust Active/Passive cooling policy settings
- Press Windows + S to launch the Search menu, type Control Panel in the text field and select Open.
- Click on System and Security from the options that appear.

- Click on Power Options.

- Select Change plan settings next to the current power plan.

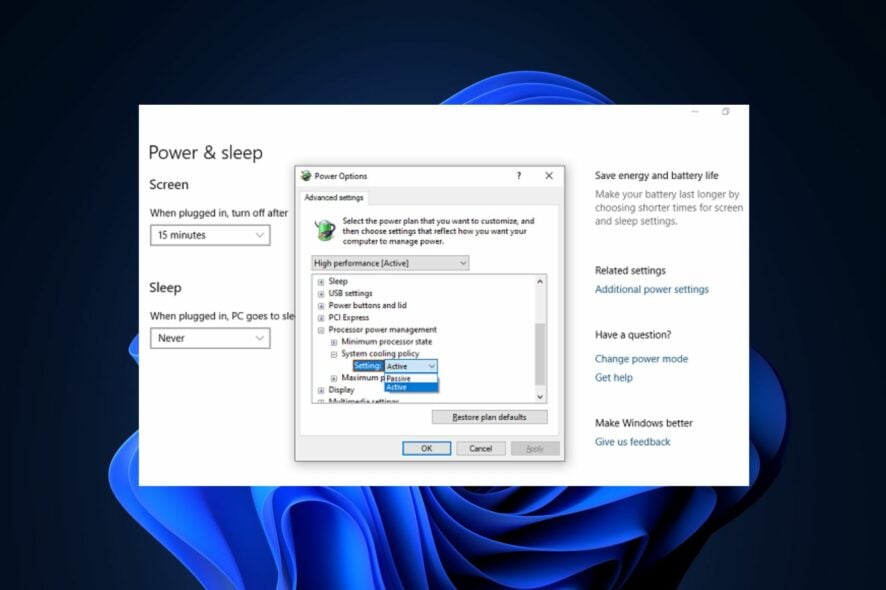
- Next, click on Change advanced power settings.

- Expand System Cooling Policy under Processor power management.
- Change the settings as follows: Plugged in as Active and On battery as Passive.

Since Windows 11 system cooling policy is missing, another effective way to fix your system’s overheating issue is by modifying the power plan settings.
2. Use the SpeedFan software to control your fan
- Press Windows + S to launch the Search menu, type System Information, and launch the app.
- Look for the System Manufacturer and System Model in the System Summary tab.

- Go to the SpeedFan’s official page and download the program.
- Once the download is complete, go to the folder where the downloaded file is stored and double-click on it to begin the installation.
- Follow the on-screen instructions to complete the installation process.
You can, right away (after installation), begin to control your computer fan speed with the SpeedFan software.
What do I do if the System Cooling policy is missing?
- Click the Start button, search cmd, and Run as administrator.

- Input the following command and press Enter:
REG ADD HKLM\SYSTEM\CurrentControlSet\Control\Power\PowerSettings\54533251-82be-4824-96c1-47b60b740d00\94D3A615-A899-4AC5-AE2B-E4D8F634367F /v Attributes /t REG_DWORD /d 2 /f
- Wait till you receive The operation completed successfully, and check Power Options on Control panel.

The System cooling policy will be accessible in the Power Options section in Control Panel.
However, should you ever have a reason to remove the System cooling policy, although it is not advisable, follow these steps:
- Click the Start button, search cmd, and Run as administrator.
- Input the following command and press Enter:
powercfg -attributes SUB_PROCESSOR 94D3A615-A899-4AC5-AE2B-E4D8F634367F +ATTRIB_HIDE
- Then check the Power Options to see if system cooling policy has been removed.

Should you encounter an issue with missing power plans on your Windows, check this guide to fix it.
What does the system cooling policy do?
The system cooling policy allows you to specify the cooling policy you wish to use for your Windows computer, for which there are two options: Active and Passive.
- Active cooling policy: The active cooling policy turns on and speeds up the system fan to reduce high system temperature without affecting the system’s performance. This then brings about an increase in the system’s power consumption.
- Passive cooling policy: The passive cooling mode reduces the power consumption of the system components, hence reducing the overall system performance. This reduces system performance but saves power consumption.
Both options above offer an excellent way to set your system cooling policy, depending on your preference.
These are the best ways to achieve the best system cooling policy in Windows 11. Ensure to follow the steps strictly for optimal results.
Meanwhile, some users also complain about Windows 11 overheating shutdown; you can explore the troubleshooting tweaks provided in this article.
If you have further queries or questions, kindly leave them in the comments section. Also, if you have a suggestion on a solution that has worked for you, apart from the ones provided, you can also drop them.
Read our disclosure page to find out how can you help Windows Report sustain the editorial team. Read more


Improve this guide


User forum
0 messages