Full Fix: System Restore error 0x80070091 on Windows 10, 7
8 min. read
Updated on
Read our disclosure page to find out how can you help Windows Report sustain the editorial team. Read more
Key notes
- The System Restore error 0x80070091 may occur on your Windows 10 PC and prevent you to perform the task.
- In order to fix the issue, you can try to rename the WindowsApp folder in your system.
- You can as well check your antivirus and see if interferes with other processes.
- If any of these didn't work out, you can dive deep into the solutions presented below.
Windows 10 is a reliable OS, but this doesn’t mean that it’s never affected by any issues. Sometimes, due to severe issues, users are left with no option but to perform a system restore. In this manner, the PC is taken back to an earlier point in time, called a system restore point when the OS worked perfectly fine.
Many Windows 10 users have recently reported that the system restore process fails to complete. More specifically, the process launches, but then suddenly freezes and an error message appears on the screen.
Many first thought that this error was caused by the latest Patch Tuesday updates, but this is not the case. The first wave of reports arrived in February.
System Restore error 0x80070091
Here’s how one user describes the issue:
I tried SysRes from two points, both with same failure.
System Restore did not complete successfully. Your computer’s system files and
settings were not changed.Details:
System Restore failed while restoring the directory from the restore point.
Source: AppxStaging
Destination: %ProgramFiles%WindowsApps
An unspecified error occurred during System Restore. (0x80070091)
The two attempts were from: choose a different restore point>show more restore points type Backup. I really need this function to work. Any solutions out there?
The good news is that Microsoft has recently acknowledged this issue. The company promised it would roll out a hotfix as soon as possible.
At the same time, it has also offered a temporary workaround that advanced users can use to fix error 0x80070091.
System Restore Error 0x80070091 can prevent you from fixing certain issues on your PC. Speaking of this error, here are some similar issues that users reported:
- Windows 10 System Restore did not complete successfully – This message usually appears if there’s an issue with System Restore. However, you should be able to fix this problem with one of our solutions.
- 0x80070091 Windows 7 – This error can appear on older versions of Windows as well. Even if you don’t use Windows 10, you should know that almost all of our solutions can be applied to Windows 7 and 8 alike.
- System Restore encountered error, unexpected error, unknown error – Sometimes you might encounter certain errors while trying to perform System Restore. In most cases these issues are caused by corrupted system files, so be sure to check for file corruption.
- System Restore failed due to antivirus – In some cases, this issue can appear due to your antivirus. Antivirus can interfere with your operating system and cause this issue to appear, so be sure to disable it and check if that solves the problem.
1. Rename the WindowsApp folder from Safe Mode
- Boot into Safe Mode.
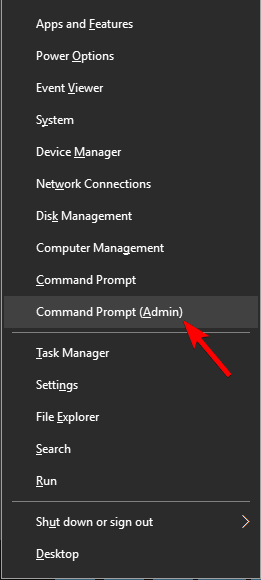
- Right click on Start and click on Command Prompt (Admin).
- Type these commands below one by one:
- cd C:Program Files
- takeown /f WindowsApps /r /d Y
- icacls WindowsApps /grant “%USERDOMAIN%%USERNAME%”:(F) /t
- attrib WindowsApps -h
- rename WindowsApps WindowsApps.old
- Reboot back into Windows.
- Run System Restore.
2. Check your antivirus
Using an antivirus is rather important if you want to protect your PC from online threats, however, sometimes your antivirus can interfere with your system and cause this error to occur.
If you’re having error 0x80070091 on your PC, you might want to try disabling certain antivirus features. Sometimes your antivirus can block other applications from accessing certain directories, and that can lead to this issue.
If the problem is still present, you might have to completely disable your antivirus. In the worst-case scenario, you might even have to uninstall your antivirus. Once your antivirus is removed, check if the problem is resolved.
If your antivirus was the issue, it might be a good time to consider switching to different antivirus software. There are many great antivirus tools on the market, but the best is Bitdefender, so feel free to try it.
You can as well choose from a multitude of compatible antivirus programs that will not interfere with other services and cause System Restore errors.
3. Remove problematic applications
Sometimes this problem can occur due to certain applications. If you installed any new applications recently, it might be a good idea to remove them and check if that solves the problem.
There are many ways to uninstall an application, but the best way is to use uninstaller software. These applications are specially designed to remove all files and registry entries associated with the application you want to remove, so be sure to try them out.
Hence, in order to entirely delete problematic software or junk files, you can perform the task using a famous cleanup software like CCleaner.
4. Use Linux Live CD
If you’re having problems with System Restore and error 0x80070091, you might be able to fix the problem using Linux Live CD. To do that, simply download any version of Linux and create bootable media.
Once you boot from the bootable media, choose the option to Try Linux without installing. Now go to C:Program Files and rename WindowsApps directory to WindowsApps.old.
After doing that, restart your PC and boot to Windows. Take ownership of WindowsApps.old directory and try to perform System Restore again.
5. Run chkdsk scan
According to users, sometimes file corruption can cause error 0x80070091 to appear while performing System Restore. To fix the problem, you need to perform chkdsk scan. This is rather simple and you can do it by following these steps:
- Open Command Prompt as administrator.
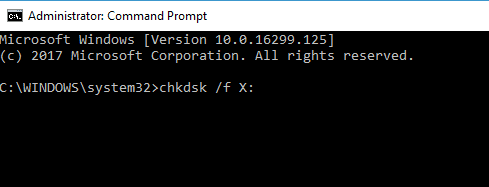
- Now enter chkdsk /f X: command. Be sure to replace X with your system drive. In most cases that would be C. Now press Enter to run the command.
- You’ll be asked to schedule a disk scan at the next reboot. Enter Y and press Enter to confirm.
- Restart your PC.
Chkdsk scan will now start. The scan can take about 15 minutes or more depending on the size of your system drive. Once the scan is finished, check if the problem still appears.
6. Keep your system up to date
According to users, this issue can appear if your system is out of date. However, you can easily solve this issue by updating your operating system. In most cases, Windows automatically installs the missing updates, but sometimes you might miss an update or two due to certain issues.
However, you can always check for missing updates manually. To do that, just follow these steps:
- Press Windows Key + I to open the Settings app.
- Now go to Update & Security section.
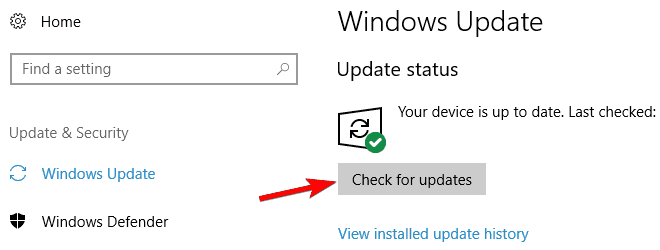
- Click Check for updates button.
Windows will now check for available updates. If any updates are available, they will be downloaded in the background. Once the updates are downloaded, you just need to restart your PC to install them. After updating your PC to the latest version, check if the issue is resolved.
7. Use third-party tools
According to users, a 0x80070091 error can appear due to problems with your WindowsApps folder. However, you might be able to solve the issue by using a third-party tool such as Unlocker. To fix the issue, you need to do the following:
- Download and install Unlocker.
- Now navigate to C:Program Files. Right-click WindowsApps folder and choose Unlocker from the menu.
- Select Rename from the dropdown menu and change the name of the directory to WindowsApps.old. Click OK to save changes.
- If you get a message asking you to rename the object at boot, choose Yes.
After doing that, you should be able to perform System Restore without any problems. As you can see, this solution is rather simple, and if you’re not too fond of the command line, you might want to try this solution out.
8. Remove problematic updates
If this issue started appearing recently, it’s rather likely that an update caused it. Windows 10 installs updates automatically, and sometimes certain updates can lead to issues such as this one. If you suspect that an update caused this issue, we recommend removing problematic updates.
Removing installed updates is rather simple, and you can do it by following these steps:
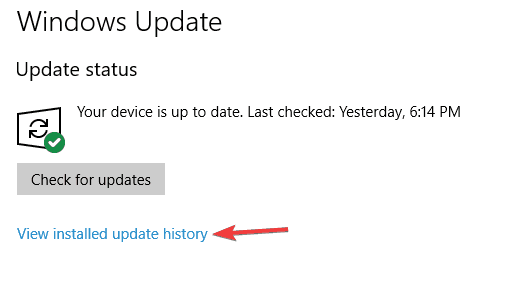
- Open the Settings app and navigate to Update & Security section.
- Now select View installed update history.
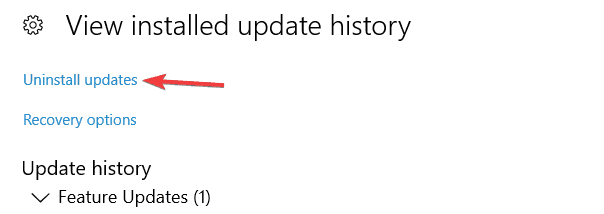
- Now you should see the names of recent updates. Memorize their names or write them down. Select Uninstall updates.
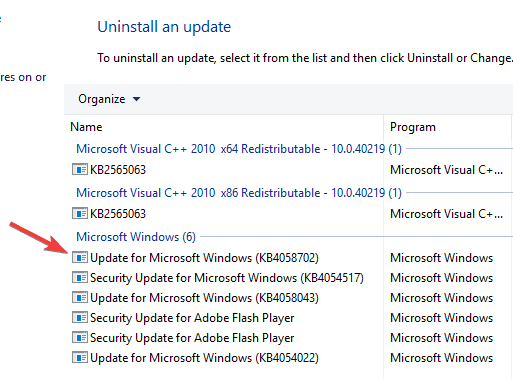
- A list of updates will now appear. Double-click the update you want to remove and follow the instructions on the screen.
Once you remove the update, the problem should be resolved. Keep in mind that Windows 10 automatically installs the missing updates, so the update will be installed again and cause the issue to reappear.
To prevent that from happening, we advise you to block automatic Windows updates. By doing that, you’ll stop this update from installing and the issue won’t appear anymore.
And this should help you to get rid of the error 0x80070091.





User forum
2 messages