Here's how to fix error 0x800070002c-0x3000d on Windows PCs
5 solutions to fix error 0x800070002c-0x3000d
- Uninstall antivirus and defragment your hard drive
- Disable USB devices
- Clean boot your PC
- Run the Update troubleshooter
- Disable your antivirus/firewall
Sometimes upgrading to Windows 10 isn’t as smooth as you might think and errors can occur. One of these errors is error 0x800070002c-0x3000d which happens when you try to upgrade from Windows 7 to Windows 10.
Error 0x800070002c-0x3000d can prevent you completely from upgrading to Windows 10, but it seems that there are few solutions available that you can try.
Steps to fix error 0x800070002c-0x3000d
Solution 1 – Uninstall antivirus and defragment your hard drive
If you’re upgrading from Windows 7 or Windows 8, you might want to try uninstalling your current antivirus software before upgrading to Windows 10.
After you’ve uninstalled your antivirus, try to upgrade to Windows 10 again. If the problem persists, you might have to use a defragmentation tool in Windows and defragment your hard drive.
Solution 2 – Disable USB devices and unplug all USB peripherals
Before we start, make sure that you have removed all installed antivirus software.
First, we’ll need to disable USB devices that you don’t use.
- Go to Device Manager and locate Universal Bus Controllers
- Expand it, and disable USB devices that you’re not using such as your card reader, by right clicking it and choosing Disable.

Now unplug any USB peripherals that you don’t need. This includes external hard drives, printers, game controllers, etc.
Solution 3 – Clean boot your PC
Next, you need to enable Clean Boot:
- Press Windows Key + R and type msconfig and press Enter to run it.
- Make sure that you select to disable all startup applications.
- Next go to Services and select hide all Microsoft services.
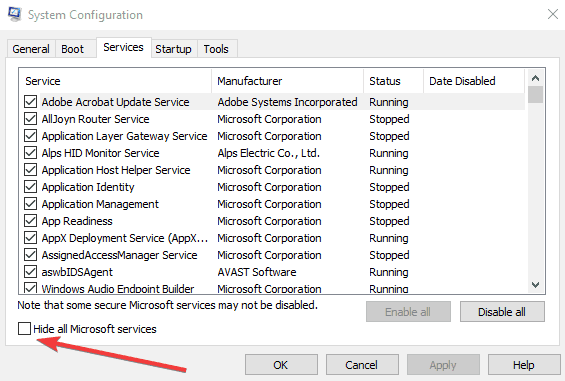
- After all Microsoft services have been hidden select Disable All.
- Click Apply then OK.
- Restart your computer.
Also remember to turn off your internet connection after all the necessary files have been downloaded. You can do that simply by unplugging your Ethernet cable or by unplugging WiFi dongle or simply by pressing the WiFi switch on your router.
Solution 4 – Run the Update troubleshooter
If the problem persists, you can also run the update troubleshooter. This is a built-in tool that automatically scans your system update files and fixes all the detected issues.
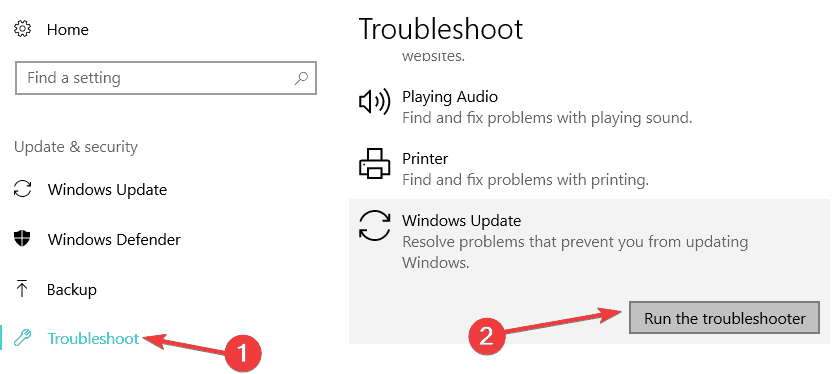
Go to Settings > Update & Security > Troubleshooter > run the Update troubleshooter.
Solution 5 – Disable your antivirus/firewall
Some users also confirmed that disabling their security tools helped them install the latest Windows 10 version. This means turning off your antivirus, firewall, malware and other security tools that you installed on your device.
Read our disclosure page to find out how can you help Windows Report sustain the editorial team. Read more


Improve this guide


User forum
0 messages