Uplay Not Compatible with Operating System Error on PC
3 min. read
Updated on
Read our disclosure page to find out how can you help Windows Report sustain the editorial team Read more

A lot of Windows 10 gamers use Ubisoft‘s Uplay desktop client for their gaming sessions. Despite not being as big as other digital distribution services like Steam, Uplay is especially useful if you like playing Ubisoft‘s games. But sometimes, the client doesn’t work as intended on Windows 10 PCs.
Lots of gamers have problems starting the client and bump in to This program is not compatible with your current operating system error message when trying to open it.
This is a pretty annoying problem and is usually encountered after a client update. If you’ve experienced it as well, you’ll be happy to know that there are some solutions to fix it.
What can I do if Uplay is not compatible with my operating system?
1. Run Uplay in compatibility mode
- Go to Uplay’s installation folder (usually C:\Program Files (x86)\Ubisoft\Ubisoft Game Launcher).
- Locate Uplay.exe and right-click it.
- Click on Proprieties.
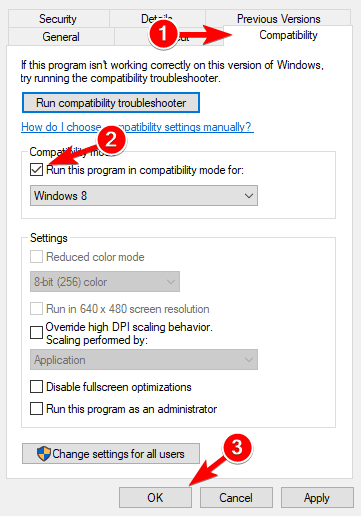
- Click on the Compatibility tab.
- Under Compatibility mode, check Run this program in compatibility mode for:.
- Now, choose one of the older versions of Windows. You can try several to see which works for you.
- Click Apply and OK.
2. Run Uplay as an Administrator
- Go to Uplay’s installation folder (usually C:\Program Files (x86)\Ubisoft\Ubisoft Game Launcher).
- Locate Uplay.exe and right-click it.
- Click on Proprieties.
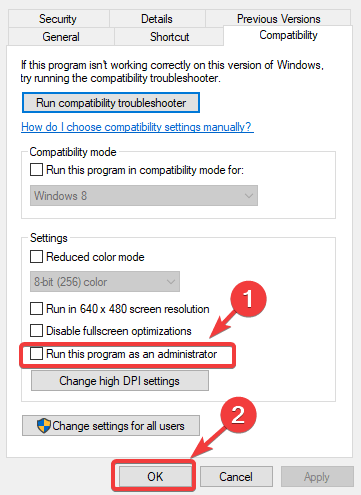
- Click on the Compatibility tab.
- Under Settings, check Run this program as an administrator.
- Click Apply and the OK.
If you want to set program permissions only temporary, right-click on the Uplay shortcut and select Run as administrator from the app‘s context menu.
Alternatively, if you want to change permissions for multiple users, after step 4, click on Change settings for all users and then follow the next steps.
3. Clean install Uplay
- Completely close Uplay. If needed, go to Task Manager and end any related Uplay process.
- Optionally, before uninstalling the client you can backup your save files.
- Uninstall the current Uplay client from your Windows 10 PC. Usually, you can find the uninstaller in C:\Program Files (x86)\Ubisoft\Ubisoft Game Launcher. Also remember to delete the cache folder from the same location after the process is completed.
- When you uninstall Uplay, you’ll have the option to uninstall your games as well. Check the box to uninstall them or leave it unchecked if you want to keep your games.
- Download the latest version of Uplay from Ubisoft’s official site.
- After you download the installer, run it with Administrator rights.
- Follow the on-screen steps to finish the process.
To make sure that you completely uninstall the old version of Uplay from your PC, you can use an uninstaller tool. Find the best ones available right now in this useful guide.
After following the solutions presented above, you shouldn’t get the This program is not compatible with your current operating system error anymore.
For those facing Uplay compatibility problems, our article provides solutions for ‘Uplay_r164.dll Not Found or Untrusted System File’ errors.
If you have any other suggestions or questions, please leave them in the comments section below.

