How to Fix USB-C to HDMI Not Working Windows 11
Get your USB-C to HDMI adapter working in no time

In this guide, we’ll show you how to fix the USB-C to HDMI when it’s not working on Windows 11.
As you probably expect, there are several possible causes for this issue, the most common of which include an outdated or missing driver, a faulty cable or adapter, display settings interfering, or graphics card compatibility.
Here’s how you’ll address them and troubleshoot the USB-C to HDMI not connecting.
How do I fix my USB-C to HDMI adapter if it’s not working?
First, try switching ports, checking the cable for damage, or testing the adapter on another computer; if the issue persists, follow the more advanced steps below.
1. Update the USB C to HDMI driver
1. Press the Windows+ R to open Run.
2. Type devmgmt.msc, and then click OK.

3. Double-click on Other devices to expand and view the ones under it.

4. Now, right-click on the USB device and select Update driver.

5. Select Search automatically for drivers.

The USB-C to HDMI driver in Windows 10 can often be why it is not working. So make sure to install the latest version of it.
You can manually install the latest driver using the built-in tool called Device Manager. However, remember that the manual method is not always practical and might not work for all cases.
Update drivers automatically
You can download the latest driver for your USB to HDMI driver from the company’s website. With a bit of research, you should find the correct driver.
However, the best way to update your drivers is by using a specialized third-party tool that automatically scans your hardware for the latest available version and downloads it.
⇒ Get PC HelpSoft Driver Updater
2. Scan for hardware changes
- Press Windows + X to open the Power User menu, and select Device Manager.

- Now, click on the Action menu, and select Scan for hardware changes.
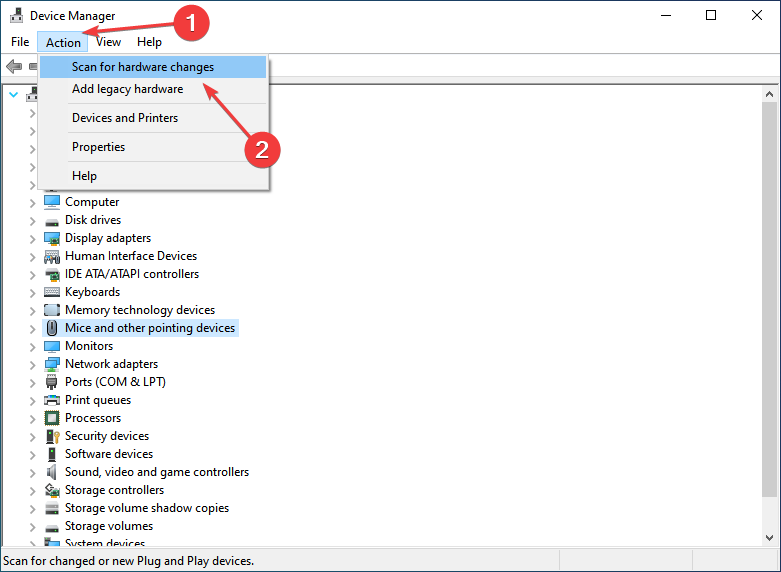
- Then try utilizing the USB to HDMI adapter after scanning.
If USB-C to HDMI is not working on the laptop, scan for hardware changes, and it should get the functionality up and running again.
3. Rollback to the previous Windows build
- Press Windows + I to open Settings and click on Update & Security.

- Now, select Recovery from the navigation pane, and click on the Get started button under Go back to the previous version of Windows 10. Remember, you can only do this within ten days of installing an update.
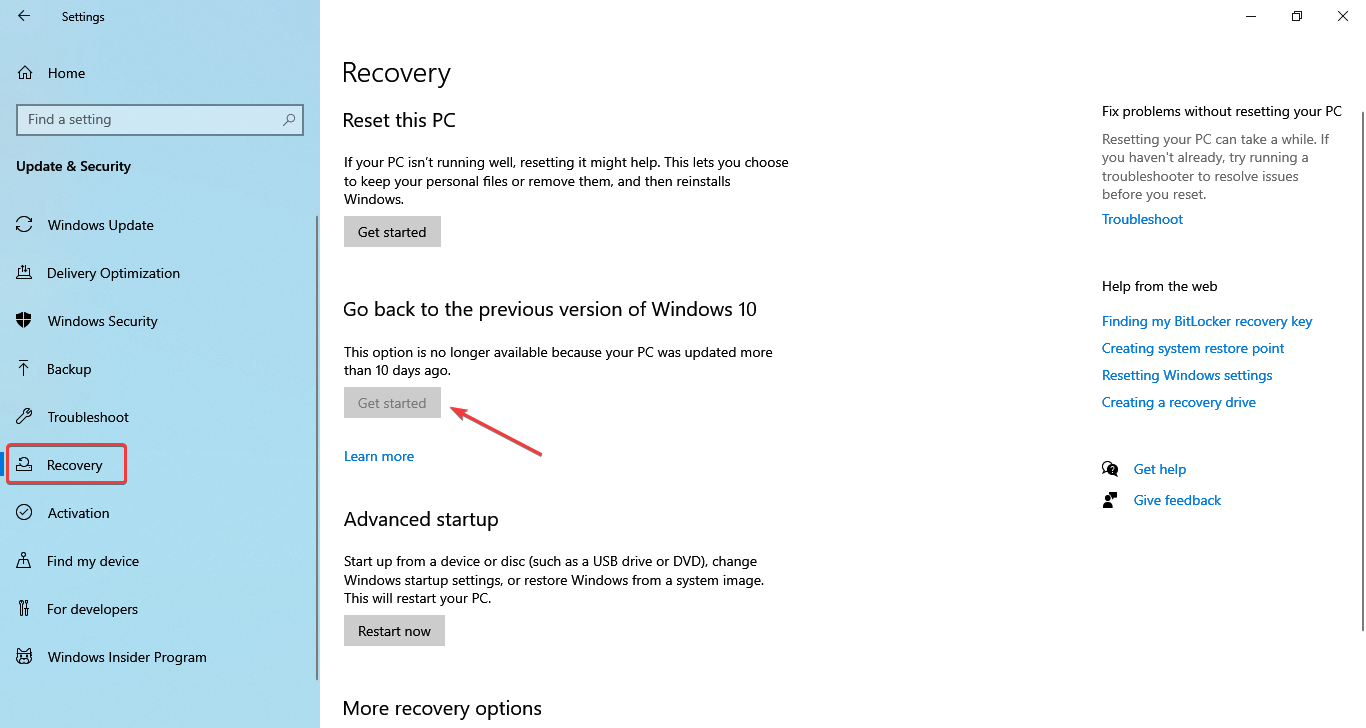
- Follow the on-screen instructions to complete the process.
Some users have found that their USB-C to HDMI adapters stopped working after a Windows update. If that happens, try reverting to the previous version or perform a System Restore if the option is available.
Does USB-C to HDMI always work?
Generally, yes, but issues with the driver or connection can occur. Most of these are fixable with the solutions we’ve provided.
How do I know if my USB-C supports video?
Look for a Lightning symbol or D (DisplayPort) logo next to the USB-C port, indicating support for video output.
If these steps don’t work, your adapter may need replacing. For other USB-related issues, check out our guides on fixing USB-C problems, USB ports not working, or USB devices not working with TVs.
If your adapter is under warranty, consider returning it for repair. Let us know in the comments if you found another solution!
Read our disclosure page to find out how can you help Windows Report sustain the editorial team. Read more


Improve this guide

User forum
0 messages