Fix: Video Memory Management Internal Error in Windows 10
Surefire fixes to get rid of this dreaded Blue Screen of Death issue
5 min. read
Updated on
Read our disclosure page to find out how can you help Windows Report sustain the editorial team. Read more
Key notes
- A critical memory management issue can be caused by faulty drivers or outdated OS.
- You can fix this BSOD error by updating your display drivers manually or automatically.
- Another solution is to run the problematic applications in compatibility mode.

The video memory management internal error is one of the Blue Screen of Death issues on Windows 10. Users report facing this error when trying to run their favorite games.
Also, this issue can make your PC restart and lead to other problems. In this guide, we have curated the surefire fixes to fix the video memory management internal error effortlessly.
What causes video memory management internal?
While there are various errors that can lead to the video memory management internal issue, below are some of the common ones:
- Faulty display driver: If you are getting the video memory management internal error when shutting down or running a game, it might be because of your display driver. To solve this, you need to roll back or update your driver.
- Outdated PC: Some users have reported this problem on Windows 10 builds. Updating your PC to the latest version should help restore normal service here.
- Corrupt system files: Another cause of this BSoD error is corrupt or broken system files. Repairing and restoring these files should solve this problem easily.
How can I fix the video memory management internal error?
Before delving into the fixes in this guide, below are some basic troubleshooting steps that can save you stress:
- Update your BIOS from the manufacturer’s website.
- Disable any feature you have overclocked.
- Run your games in Windows Mode.
If the above preliminary checks do not solve the issue, you can explore the fixes below.
1. Rollback display driver
- Press the Windows key + X and select Device Manager.
- Click the arrow next to the Display adapters and double-click the driver there.
- Select the Driver tab at the top and click the Roll Back Driver button.
- If the button is not clickable, click the Update Driver button.
- From here, select the Search automatically for drivers option and install any available updates.
If you are getting the video memory management internal error when streaming on sites like Netflix, or while playing games, it might be due to problems with your drivers. Users with NVIDIA drivers report facing this issue.
Alternatively, you can download and install the drivers from the manufacturer’s website. This has proved effective for some users.
To make things easier, we recommend using a dedicated tool in PC HelpSoft Driver Updater. This software automatically scans and fixes outdated and broken drivers. This ensures you never face any driver-related issues on your PC.
⇒ Get PC HelpSoft Driver Updater
2. Update your PC
- Press the Windows key + I and select Update & Security.
- Click the Check for updates button.
- Now, download and install any available update.
The video memory management internal error can also be caused by an outdated OS. Users have reported that installing the Windows 10 Technical Preview build 10049 solved the problem. If you can’t find this build, you can just update your PC to the latest version.
One frequent update installation error is showing the message: We couldn’t install this update, but you can try again, yet rest assured that you can correct it in no time.
3. Run applications in compatibility mode
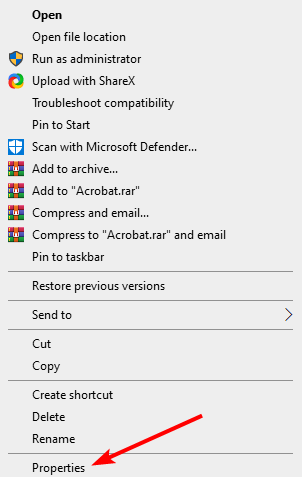
- Right-click the problematic application and choose Properties from the menu.
- Choose the Compatibility tab, check Run this program in compatibility mode for.
- Finally, Select Windows 10 and click Apply, followed by OK to save your settings.
Sometimes, you can encounter the video memory management internal error on Adobe Premier Pro and other apps because you are not running them in compatibility mode. The steps above should help you solve this problem effectively.
4. Repair system files
- Press the Windows key + S, type cmd, and select Run as administrator under Command Prompt.
- Type the command below and press Enter to run it:
sfc/scannow - Wait for the command to complete, type the command below and hit Enter:
DISM /Online /Cleanup-Image /RestoreHealth
System files are important for the smooth running of your PC. If they are corrupt, it can lead to the video memory management internal BSoD error.
Alternatively, you can fix this issue using a specialized system file fixer. This error can also appear in the form of video_memory_management_internal, and to get rid of it for good you can use a repair tool.
5. Reset Windows 10
- Press the Windows key + I and choose the Update & Security option.
- Select Recovery in the left pane and click Get Started under Reset this PC.
- Choose whether to keep or remove your files and click the Next button.
- Now, follow the onscreen instruction to complete the process.
If all the solutions above fail to solve this BSoD issue, you might need to reset your PC to default. Note that You might also need a bootable USB flash drive to complete Windows 10 reset, and you can easily create one by using Media Creation Tool.
The video memory management internal error can be frustrating, as it disrupts your activities. Thankfully, it is an issue that can be solved following the fixes in this guide.
If you have upgraded your PC to the latest OS and still facing the video memory management internal error on Windows 11, check our detailed guide to fix it quickly.
Feel free to let us know the solution that helped fix this issue in the comments below.


User forum
1 messages