Webcam JS Error: Could Not Access Overconstrainederror
HTTPS connection is necessary for Webcam JS
![]() 3 min. read
3 min. read
![]() Updated on
Updated on
Share this article
Improve this guide
Read our disclosure page to find out how can you help Windows Report sustain the editorial team. Read more

Running into a Could not access webcam issue with Webcam.js can be incredibly frustrating, especially when you’re in the middle of an important task. Let’s dive into some practical solutions to get your webcam up and running again.
How can I fix the Webcam JS error?
Before trying anything else, check if the problem appears in other browsers or PCs. Also, check if the webcam is properly connected and that no other applications are using it.
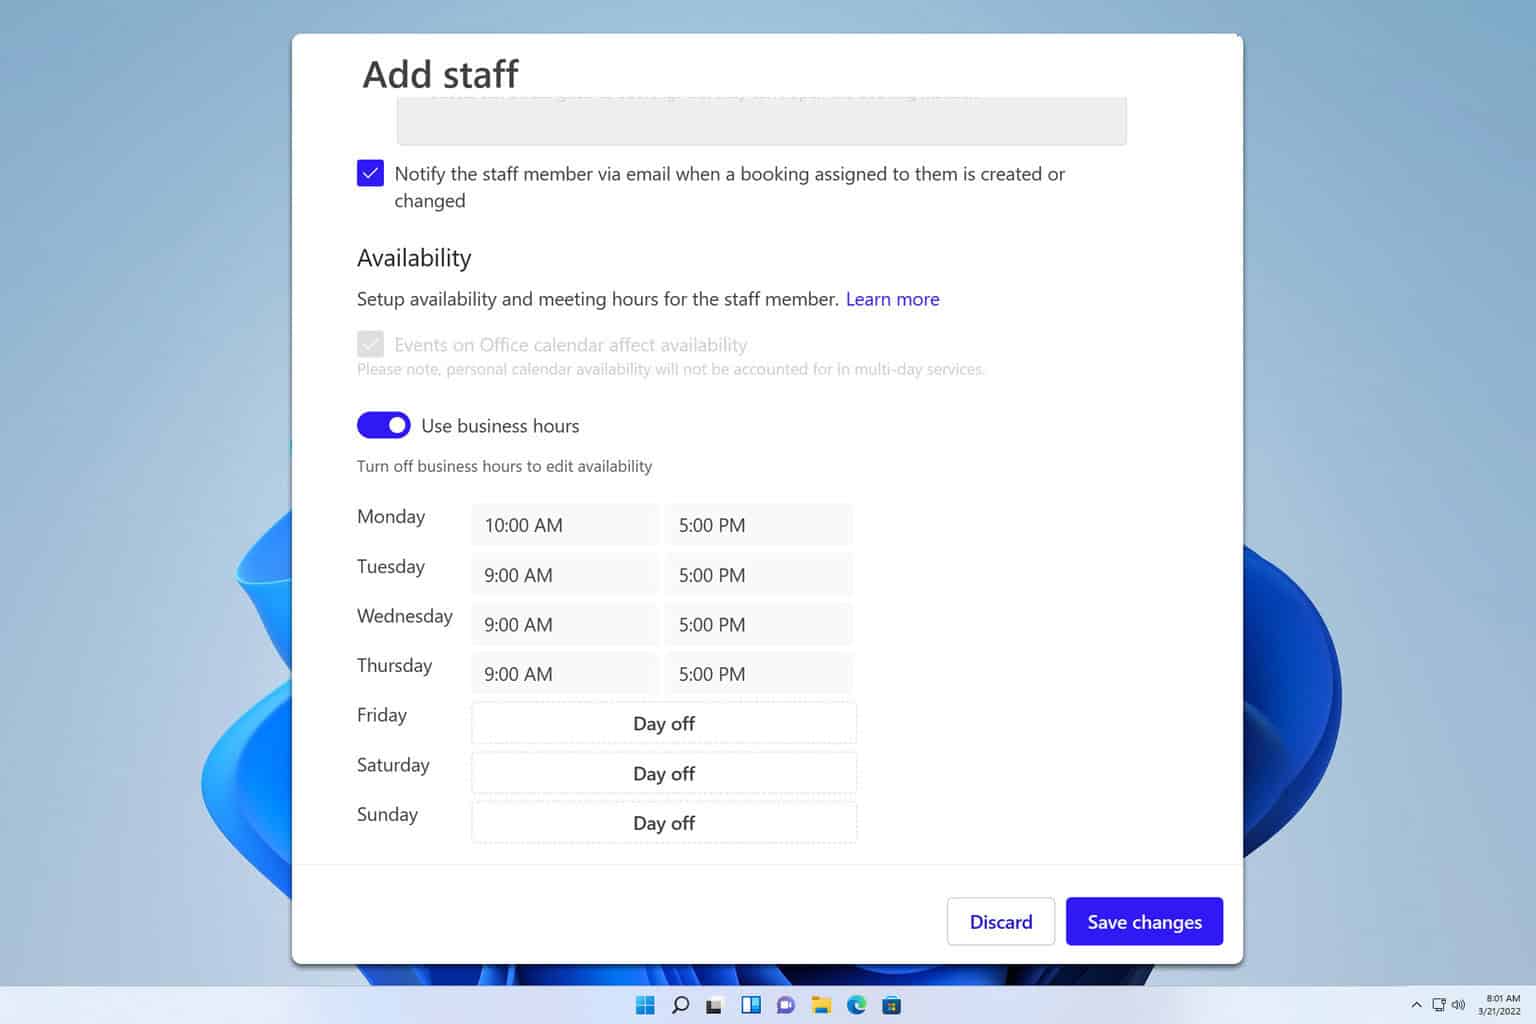
1. Ensure HTTPS connection
- Open Chrome and navigate to the website where you are encountering the webcam.js error.
- Check the URL in the address bar to ensure it begins with https.

- If it starts with HTTP, update your website to use HTTPS. For this, you’ll need to purchase an SSL certificate and install it on the server.

To prevent errors such as this one, all resources need to be loaded using HTTPS.
2. Reset Camera permissions
- Open Chrome and navigate to the website experiencing the webcam.js error.
- Click on the camera icon in the address bar (it may appear as a blocked camera).
- Select Allow to use the camera.

- Refresh the page to apply the new setting.

3. Enable insecure origins treated as secure
- Open Chrome and type
chrome://flags/#unsafely-treat-insecure-origin-as-securein the address bar, then press Enter.

- Find the flag for Insecure origins treated as secure.
- Enable the flag and add the addresses you want to treat as secure, including the port number if required.

- Save and restart Chrome.


This workaround allows you to bypass the secure origin policy temporarily. It can be helpful if you cannot switch to HTTPS immediately but need to test webcam functionality on an insecure site.
4. Revisit webcam.js implementation
- Ensure you are using the latest version of Webcam.js by downloading it from GitHub.
- Check your implementation against the documentation to ensure all settings are correctly configured.
Webcam.set({
   width: 320,
   height: 240,
   image_format: 'jpeg',
   jpeg_quality: 90
});
Webcam.attach('#my_camera'); - Include error handling to manage any issues that arise during initialization.
Webcam.on('error', function(err)
{
   console.log(err);
});
5. Clear the browser cache
- Open Chrome, go to the settings menu and click on Clear browsing data.

- Set the Time range to All time and select data to remove. Click on Clear data.

- Close Chrome completely and restart it.
- Try accessing the webcam again on the site.


By following these solutions, you should be able to resolve the webcam.js could not access overconstrainederror message. If the problem is still there, might want to use other libraries such as JpegCamera or CameraTag.
To learn more about how your webcam works, we have a guide that lets you see what app is using your camera. We also have an article on how to test your webcam, so don’t miss it.
Before you leave, did you know that you can use a webcam without any drivers? That’s right, and we covered this subject in another guide.


User forum
0 messages