Sysprep Error on Windows 10: How to Troubleshoot it
You can fix various sysprep error by running a couple of commands
Key notes
- You can fix sysprep errors simply by disabling services that might be interfering with it.
- In some cases, you can encounter this issue if your system files are corrupted or if the system is out of date.

Sysprep is a System Preparation Tool designed for Windows deployment, but sometimes a Sysprep error on Windows 10 can appear.
If this happens, Sysprep won’t be able to validate installation, or you might get other issues. It’s crucial to fix them, so in today’s guide, we’re going to show you how to do that.
Why is Sysprep failing?
- Certain packages and provisioning can cause issues with sysprep.
- Sometimes certain services can prevent this feature from properly running on your PC.
- In some rare instances, your antivirus might interfere with this feature.
- Outdated Windows installation can encounter glitches with sysprep.
- Corruption of system files will cause this and many other errors on your PC.
What do I do if Sysprep fails?
1. Use PowerShell to remove the package and remove provisioning
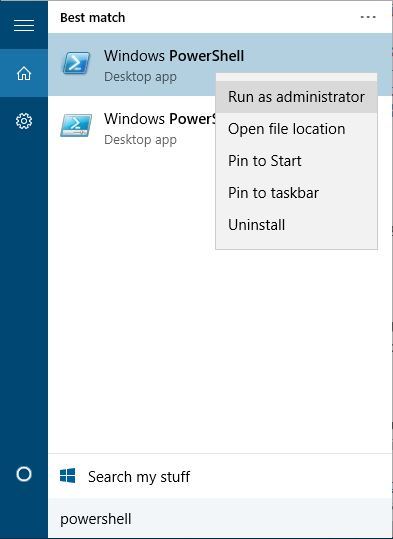
- Start PowerShell as administrator. To do that, press Windows key + S, enter PowerShell, right-click PowerShell from the list of results, and choose Run as administrator.
- Once PowerShell starts, enter the following lines, and after each line press Enter to run it:
Import-Module Appx
Import-Module Dism
Get-AppxPackage -AllUser | Where PublisherId -eq 8wekyb3d8bbwe | Format-List -Property PackageFullName,PackageUserInformation - Check the output of the last command to see for which users the package is showing as installed. Delete those users’ accounts or simply log in to the computer by using those accounts and perform the next step.
- Run the following command but be sure to replace packagefullname with name of the actual package:
Remove-AppxPackage -Package packagefullname
- Now run the
Remove-AppxProvisionedPackage -Online -PackageName packagefullname
After performing these steps, issues with Sysprep should be resolved.
It’s worth mentioning that you might want to disable your Internet connection while performing this step in order to stop Windows Store from updating apps.
2. Stop the tiledatamodelsvc service
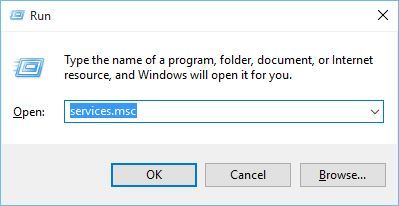
- Press Windows key + R and enter services.msc. Press Enter or click OK to run it.
- Locate the tiledatamodelsvc (Tile Data model server) service, right click it and choose Stop.

Alternatively, you can disable this service by and fix Windows 10 sysprep errors with PowerShell.
- Open PowerShell as administrator.
- Enter Stop-Service tiledatamodelsvc .
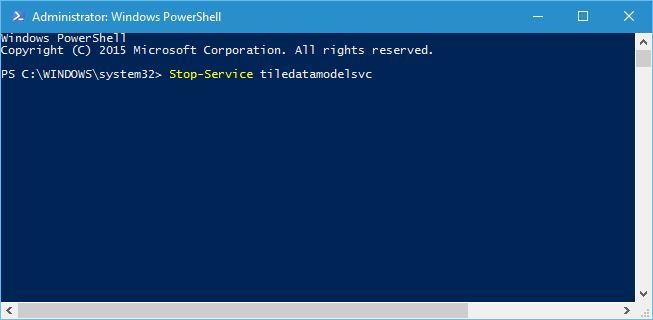
- Press Enter.
If you prefer using Command Prompt, you can use it as well to stop this service by following these steps:
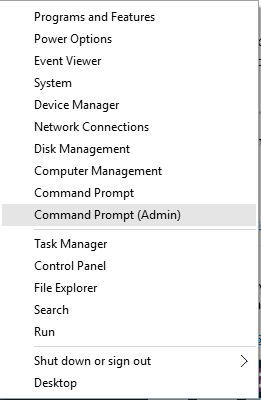
- Press Windows key + X and choose Command Prompt (Admin) from the menu.
- When Command Prompt starts, enter net stop tiledatamodelsvc and press Enter to run it.

Users reported that this service sometimes automatically restarts itself, so you might have to stop it a few times before it’s permanently stopped.
3. Use Registry Editor
- Press Windows key + R and enter regedit. Press Enter or click OK to start Registry Editor.

- Navigate to
HKEY_LOCAL_MACHINE\SYSTEM\Setup - Locate Upgrade key in the right pane and delete it.
- Close Registry Editor and check if the issue is resolved.
If you cannot find the Upgrade key in Registry Editor, skip this solution and try a different one.
4. Run the SFC scan
- Right-click Start and run Command Prompt (Admin).
- In the command line, type (or copy-paste)
sfc/scannow
- Press Enter to start the scanning.
- After the process is finished, you’ll be informed of possible errors.
SFC scan can help with Windows 10 sysprep errors, so be sure to try it. In case the sfc scannow is not working, we have a specialized guide that can help you fix it.
In other cases, you could employ a tailored PC repair solution that will fully scan your Windows and detect corrupted files and issues.
5. Uninstall your antivirus software
- If you’re getting Sysprep error on Windows 10, ensure your antivirus software is disabled.
- Some users even suggest uninstalling your antivirus software completely before trying to run Sysprep.
- To avoid any potential problems with sysprep make sure that you’re running Sysprep as an administrator.
In some rare instances, your antivirus software can cause Windows 10 sysprep errors, but that can be fixed easily.
6. Install the latest updates
- Open the Settings app and go to Update & Security.

- Click on Check for updates.

- Wait for the process to finish.
7. Run DISM
- Open the Command Prompt as shown above.
- Enter the following command and press Enter:
DISM.exe /Online /Cleanup-image /Restorehealth
- Wait for the process to finish.
- Restart your computer.
- In case the DISM can’t obtain files online, try using your installation USB or DVD. Insert media and type the following command:
DISM.exe /Online /Cleanup-Image /RestoreHealth /Source:C:\PathToYourInstallationMedia /LimitAccess - Follow further on-screen instructions.
For more information, we have a great guide on how to use DISM, so be sure to check it out.
Sysprep Windows 10 errors can cause problems for advanced Windows 10 users, but we hope our solutions helped you fix the problem.
Sadly, this isn’t the only issue, and many reported Fatal error occurred while trying to sysprep the machine, but we covered that issue in a separate guide.
What solution did you use to fix this problem? Let us know in the comments below.
Read our disclosure page to find out how can you help Windows Report sustain the editorial team. Read more


Improve this guide


User forum
0 messages